Do you have a question about the Holland 17 Series and is the answer not in the manual?
Failure to follow instructions may lead to component failure, death, or serious injury.
All repair and maintenance should be performed by trained technicians using proper safety procedures.
All maintenance MUST be performed while the tractor is uncoupled from the trailer.
Instructions apply to top plates of FW17/XA-171, FW17/XA-171-A-80, and FW17/XA-171-A-80-L Series.
Improper repair/installation can lead to tractor-trailer separation, death, or serious injury.
Remove bracket pin retention bolts and pins, then lift top plate with a device.
Remove bracket pin retention bolts/nuts and pins, then lift top plate with a device.
Do not remove pocket inserts unless cracked/worn. Do not reuse old parts from rebuild kits.
Steam clean top plate and inspect for cracks and flatness. Replace if elongated holes are found.
Failure to replace cracked or elongated parts can cause separation and serious injury or death.
Rotate front lock insert into detent, secure with keeper and one screw. Torque to 11-13 ft-lbs (15-18 Nm).
Install air cylinder with M10 screws and hardened steel washers. Hand-tighten initially.
Install air cylinder with 1/2"-20 screws and hardened steel washers. Hand-tighten initially.
Torque Gen 2 fasteners to 20-25 ft-lbs (27-34 Nm); Gen 1 to 40-50 ft-lbs (54-68 Nm).
Maneuver cam, lubricate shoulder bolt, place washer/roller, secure bolt into tapped boss. Torque 40-50 ft-lbs.
Maneuver cam, place washer, lubricate bolt, place washer/roller, secure bolt. Torque 40-50 ft-lbs.
Connect cam extension spring to last hole of cam and fifth wheel top plate, hook facing away.
Feed cam extension spring through slot, connect to second cam hole and top plate, hooks facing away.
Hook lock extension spring to lock and fifth wheel top plate, hook facing away.
Pry top plate ear; if more than 1/4" (6.4 mm) movement, remove top plate for inspection.
Improper fifth wheel adjustment can result in loss of vehicle control, death, or serious injury.
Check free play with tester (max 0.080" / 2.03 mm) and adjust as needed.
This document is a rebuild/repair manual for the Holland 17 Series Fifth Wheel, specifically covering the FW17/XA-171 Series and the FW17/XA-171 Air Release Series (80 option). The manual, identified as XL-FW20096RM-en-US Rev C, provides comprehensive instructions for the proper rebuilding and maintenance of these fifth wheel assemblies.
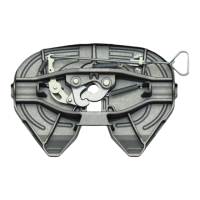
The Holland 17 Series Fifth Wheel is a critical component in tractor-trailer coupling systems, designed to securely connect a semi-trailer to a tractor. Its primary function is to provide a pivot point for the trailer, allowing for articulation during turns and over uneven terrain, while ensuring a robust and safe connection. The manual covers both standard (non-air release) and air release models, indicating a versatility in operation and control mechanisms. The air release option suggests an automated or power-assisted uncoupling process, enhancing operational efficiency and safety.
The manual details various components and their specifications, crucial for proper rebuilding and repair. Key specifications include:
The manual also provides detailed parts lists for different generations and configurations (RK-17-A-L-H, RK-17-A-80-L-H, RK-171-12310, RK-171-12309, RK-10605, RK-06973-1, RK-PKT-2), including part numbers and quantities for components like locks, hooks, release cams, springs, pins, washers, and various fasteners. Service tools such as the Kingpin Gage (TF-0110), Lock Gage (TF-0237), and Kingpin Lock Tester (TF-TLN-5001) are also listed, highlighting the need for specialized equipment for accurate adjustments.
The Holland 17 Series Fifth Wheel is designed for robust and reliable operation in heavy-duty trucking applications. Key usage features, as implied by the manual's content, include:
The manual is primarily a guide for maintenance and repair, emphasizing critical aspects to ensure safety and longevity:
| Brand | Holland |
|---|---|
| Model | 17 Series |
| Category | Automobile Accessories |
| Language | English |