METERING PLATE
STAMP NUMBER
EQUIV. MAIN METERING
JETS LEFT/RIGHT
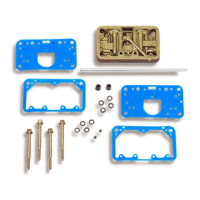
11. Install the secondary metering body gasket. Press gasket firmly on the metering body. Install the fuel bowl gasket on the
face of the metering body. Install the fuel bowl gasket on the face of the metering body.
12. Place the metering block and gasket assembly on the carburetor main body.
13. Carefully slide the secondary fuel bowl on the fuel transfer tube and seat the bowl on the gasket. Install four (4) long bowl
screws and new gaskets supplied in the kit. Torque the screws evenly, in stages, 25 to 30 in./lbs.
14. Reinstall the carburetor on the engine as described in the original carburetor instruction sheet. This is basically the reverse of
the steps outlined in Step #2. Check to make sure that the throttle linkage does not bind or stick.
15. Start the engine and check for leaks. If a leak is found, reassemble the carburetor as previously described exercising care
not to pinch o-rings and to properly install all gaskets.
Holley Technical Support
1801 Russellville Road
Bowling Green, KY 42101
Phone: 1-270-781-9741 or 1-866-464-6553
Fax: 1-270-781-9772
For online help, please refer to the Tech Service section of our website: www.holley.com
© 1989 Holley Performance Products, Inc. All rights reserved.
199R8110
Revision Date: 1-21-14
 Loading...