Do you have a question about the Holman 318HX Series and is the answer not in the manual?
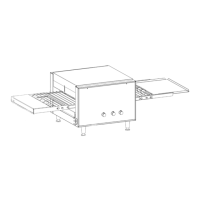
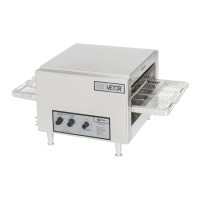
The device is a Holman Proveyor Multi-Purpose Oven, available in 314HX and 318HX series models. It is designed for commercial use in food service locations, intended for personnel trained and experienced in its operation.
The Holman Proveyor Multi-Purpose Oven is a conveyor oven designed for baking various food products. Its primary function is to cook items by combining heat and belt speed, allowing for flexible cooking profiles. The oven features separate controls for top and bottom heat, as well as a variable speed control for the conveyor belt, enabling users to adjust settings to achieve the desired balance of heat and speed for different products.
The oven is equipped with heating elements that provide the necessary heat for cooking. A cooling system, including an air intake fan, is integrated to manage internal temperatures, particularly within the control box, and prevent overheating. The conveyor belt transports food items through the heated chamber, ensuring consistent cooking.
For safety, the oven includes a Hi-Limit Reset button, which is an automatic activated temperature limit switch. This switch interrupts the heater tube connections if the air temperature in the control box exceeds 190°F (88°C), preventing damage from excessive heat. The unit will not reset until the internal temperature has fallen below this threshold.
Before operating the oven, users must ensure that all heating element shipping supports are removed. The unit requires proper assembly, including attaching the four stainless steel legs and leveling the unit. It must be plugged into a standard outlet specified for its voltage and amp draw.
For initial setup, the load, unload, and crumb trays need to be installed as shown in the manual, ensuring at least 6 inches of space from any vertical combustible surfaces for proper ventilation. Adequate space around the oven is crucial for ventilation to prevent overheating and poor baking. The crumb tray must always be properly positioned during operation.
To begin operation, the master on/off switch should be turned to the ON position. Both the top and bottom heat controls (or front heat controls for 3-phase units) should be set to 500°F (260°C), and the conveyor speed control should be set to the fastest setting. An initial warm-up time of 10 to 15 minutes is required before loading any product to ensure the unit reaches its operating temperature for satisfactory cooking. When changing heat or belt speed settings, allow approximately 5 minutes for the oven to stabilize.
The oven is designed for continuous operation but should not be left unattended. It is recommended to disconnect power at the end of each day. To prevent carbonization of food particles and grease, the unit should not be left at high temperatures when not in use or during idle periods, as it only takes a few minutes to regain operating temperature.
For stacking multiple ovens, a stacking spacer with an external air duct is required to prevent overheating of the control box of the top oven. The spacer ensures proper airflow into the top unit's control box.
Regular cleaning and maintenance are essential to keep the Holman Proveyor Oven in top operating condition.
Daily Maintenance:
Weekly Maintenance:
Monthly Maintenance:
Periodic Maintenance:
Troubleshooting and Repair: The manual provides guidance for common issues such as the unit not heating or the conveyor belt not moving. It also includes instructions for replacing heater tubes, fan motors, and belt drive motors. For any problems, users are advised to contact the Star Service Department. Removal and replacement of the power cord and plug will void the warranty.
| Brand | Holman |
|---|---|
| Model | 318HX Series |
| Category | Oven |
| Power Source | Electric |
| Fuel Type | Electric |
| Material | Stainless Steel |
| Oven Type | Conveyor |