Do you have a question about the Holman RSR and is the answer not in the manual?
| Brand | Holman |
|---|---|
| Model | RSR |
| Category | Controller |
| Language | English |
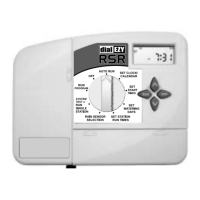
Explains the controller's design with four programs for different garden areas and sequential watering.
Illustrates programming with lawn, vegetables, and flower beds using different watering needs.
Provides tips to avoid programming confusion, like using the watering planner and button functions.
Guides on setting the current hour, minute, and day of the week using specific buttons and dial positions.
Explains setting the year, month, and day for ODD/EVEN day watering options.
Details options for interval, individual day, or ODD/EVEN day selection for watering schedules.
Explains how to set ODD or EVEN day watering based on house numbers or water restrictions.
Defines the duration each station (valve) waters, with a maximum of 12 hours 59 minutes.
Details adjusting run time in minutes or hours and setting stations to 'OFF'.
Guides on using the dual function dial for testing valves and sprinklers sequentially.
Explains how to manually run one station for a set duration, adjusting time using buttons.
Describes manually running a complete program once, noting rain sensor interaction.
Instructions on stopping automatic or manual watering by turning the dial to the Off position.
Explains how the controller handles multiple programs with the same start time by stacking them.
Details the default program that runs when the battery is missing or flat.
Explains connecting and enabling individual stations for rain sensor control (ON/OFF).
Details the delay feature for rain sensor activation, setting it in 24-hour blocks up to 96 hours.
How to stop automatic watering cycles during winter by turning the dial to Off.
Adjusting automatic station run times by percentage to save water and money seasonally.
Guidance on installing the indoor controller near a 240V AC outlet, at eye level.
General warning about electrical work, following codes, and disconnecting power before maintenance.
Steps for preparing wires, stripping insulation, inserting into terminal blocks, and tightening screws.
Illustrates the layout of the terminal block with labels for AC, COM, PUMP, and stations 1-6.
Details connecting the controller to a 240V AC to 24V AC external transformer.
Explains how to connect up to two 24VAC Solenoid Valves to each station output.
Guidance on connecting a pump starter via a relay and linking unused stations to prevent pump damage.
Specifies the unit runs off a 50Hz external transformer with 24VAC @ 1 Amp output.
Mentions the wiring for the 24VAC plug pack model, suitable for indoor use.
Lists input voltage, output current to valves, and master valve/pump start.