This document provides the user manual for an Air Fryer, model INcsb066_UK, with a voltage range of 800-125V70. The appliance is designed for indoor household use only and emphasizes the importance of reading the instructions carefully and retaining them for future reference.
Function Description:
The Hot-air fryer offers an easy and healthy method for preparing various ingredients by utilizing hot rapid air circulation and a top grill. This technology allows for cooking numerous dishes, often without the need for oil, promoting healthier meal preparation.
Important Safeguards:
Users are advised to read all instructions before use. Key safety precautions include:
- Avoiding contact with hot surfaces.
- Not immersing the cord, plugs, or base in water or other liquids to prevent electric shock.
- Being aware that surfaces, including those other than functional surfaces, can reach high temperatures due to the heating function. Users should touch only intended handles and gripping surfaces, and use heat protection like gloves. Sufficient time should be allowed for surfaces to cool down before touching.
- Unplugging the appliance when not in use and before cleaning, allowing it to cool.
- In case of a damaged supply cord, it must be replaced by the manufacturer, its service agent, or similarly qualified persons to avoid hazards.
- Using only accessory attachments recommended by the manufacturer to prevent injuries.
- Not using the appliance outdoors.
- Keeping the cord away from hot surfaces and not letting it hang over the edge of a table or counter.
- Avoiding placement on or near hot gas or electric burners or in a heated oven.
- Exercising extreme caution when moving the appliance with hot oil or liquids.
- Always attaching the plug to the appliance first, then plugging the cord into the wall outlet. To disconnect, turn controls to "off" and then remove the plug.
- Using the appliance only for its intended purpose.
- The appliance can be used by children aged 8 and above, and persons with reduced physical, sensory, or mental capabilities or lack of experience, provided they receive supervision or instruction on safe use and understand the hazards. Children should not play with the appliance, and cleaning/user maintenance should not be performed by children unless they are over 8 and supervised.
- Keeping the appliance and its cord out of reach of children under 8 years.
- The appliance is not designed to be operated by an external timer or separate remote-control system.
- Never immerse the housing (containing electrical components and heating elements) in water or rinse it under the tap.
- Prevent water or other liquids from entering the appliance to avoid electric shock.
- Always place ingredients in the basket to prevent contact with heating elements.
- Do not cover air inlet and outlet openings during operation.
- Do not fill the pot with oil, as this poses a fire hazard.
- Never touch the inside of the appliance while it is operating.
- The temperature of accessible surfaces can be high during operation.
- Verify that the appliance's voltage matches the local mains voltage.
- Do not use if the plug, mains cord, or other parts are damaged.
- Do not allow unauthorized persons to replace or fix a damaged mains cord.
- Do not plug in or operate the control panel with wet hands.
- Maintain at least 10 cm of free space around the back, sides, and above the appliance.
- Do not place anything on top of the appliance.
- Do not leave the appliance unattended.
- Be cautious of hot steam released from air outlet openings during hot air frying, keeping hands and face at a safe distance.
- Immediately unplug the appliance if dark smoke is observed, and wait for smoke emission to stop before removing the pot.
Important Technical Specifications:
- Voltage: 220-240V ~50/60Hz
- Wattage: 1500 W
- Capacity of basket: 4.5 L
- Adjustable temperature: 80℃-200℃
- Timer: 0-60 min
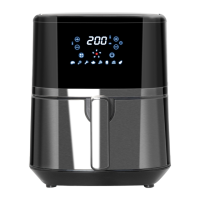
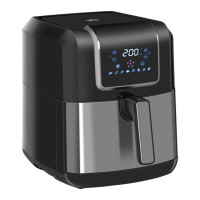
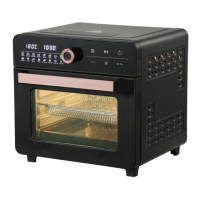
General Description (Fig.1):
- Control panel
- Basket
- Single pot handle
- Basket handle
- Pot
- Main housing
- Air outlet
- Main cord (Electrical cord)
Usage Features:
Before First Use:
- Remove all packaging materials, stickers, and labels.
- Thoroughly clean the basket and pot with hot water, washing-up liquid, and a non-abrasive sponge.
- Wipe the inside and outside of the appliance with a moist cloth.
- Note that this is an oil-free fryer; do not fill the pot with oil or frying fat directly.
Preparing for Use:
- Place the appliance on a stable, horizontal, and even non-heat-resistant surface.
- Place the basket in the pot (Fig.3).
- Do not fill the pot with oil or any other liquid.
- Do not place anything on top of the appliance to avoid disrupting airflow and affecting frying results.
Using the Appliance (Hot Air Frying):
- Connect the mains plug to an earthed wall socket.
- Carefully pull the pot out (Fig.6).
- Place ingredients in the basket (Fig.5).
- Slide the pot back into the fryer (Fig.4), ensuring it aligns with the guides. Never use the pot without the shelf.
- Determine the required preparation time and temperature (refer to 'Settings' section).
- Some ingredients require shaking halfway through cooking. Pull the pot out by the handle, shake, and slide it back in. If the timer is set for half the preparation time, it will buzz, prompting you to shake ingredients and reset the timer for the remaining time.
- When the timer buzzes, the set preparation time has elapsed. Pull the pot out.
- To manually switch off, set the time to 1.
- Check if ingredients are ready. If not, slide the pot back in and set the timer for a few extra minutes.
- To remove ingredients, pull the pot out and place it on a trial framework. Do not turn the pot upside down while still attached, as excess oil may leak onto ingredients.
- The pot and ingredients will be hot; steam may escape.
- Empty the contents into a bowl or onto a plate.
- The fryer is ready for another batch immediately after one is finished.
Control Panel Instructions:
- Power Key (ن): When the basket and pot are correctly placed, the Power light illuminates. Pressing for 3 seconds sets the default temperature to 200℃ and cooking time to 15 minutes. Pressing again starts cooking. Pressing for 3 seconds during cooking turns off the device, stopping the fan and extinguishing all lights. During cooking, this key can also pause and start cooking.
- Preset Key (M): Scrolls through 8 popular food choices, automatically setting predetermined time and temperature.
- Timer/Temperature Control Keys (+/-):
- Timer Control Buttons: Add or decrease cooking time by one minute per press. Holding the button changes time rapidly.
- Temperature Control Buttons: Add or decrease cooking temperature by 5℃ per press. Holding the button changes temperature rapidly. Temperature control range: 80℃-200℃.
- Indicator lights:
- "Fan indicator"
- Center circle: "Heating lamp"
- Around 5 lamp lights: "Motor work"
- "Temperature light"
- "Timer light"
- "Timer indicator"
- "Recipe indicator"
Settings (Table provides basic settings, but these are indications and may vary based on ingredient origin, size, shape, and brand):
- Time: 1-60 min
- Temperature: 80-200℃
- Min-max Amount (g): 100-600g (for various items like Steak, Wings, Shrimp, Fish, Snacks, Fries, Bake, Vegetables).
- Note 1: Add 3 minutes to preparation time when starting with a cold fryer.
- Note 2: Turn or shake once during baking.
Tips:
- Smaller ingredients require shorter preparation times.
- Larger amounts of ingredients require slightly longer preparation times.
- Shaking smaller ingredients halfway optimizes results and prevents uneven frying.
- Adding oil to fresh potatoes can create a crispier result.
- Do not prepare extremely greasy ingredients (e.g., sausages).
- Snacks suitable for an oven can also be prepared in the air fryer.
- Optimal amount for crispy fries is 500 grams.
- Use pre-made dough for quick snacks; it requires less preparation time than homemade dough.
- Use a baking tin or oven dish in the basket for cakes, quiches, or fragile/filled ingredients.
- To reheat ingredients, set the temperature to 150°C for up to 10 minutes.
Maintenance Features:
Cleaning:
- Clean the appliance after every use.
- Do not use metal kitchen utensils or abrasive cleaning materials on the pot and non-stick coating shelf, as this may damage the non-stick coating.
- Remove the mains plug and allow the appliance to cool down. Removing the pot helps it cool faster.
- Wipe the outside with a moist cloth.
- Clean the pot and basket with hot water, some washing-up liquid, and a non-abrasive sponge. Use degreasing liquid for stubborn dirt.
- If dirt is stuck, fill the pot with hot water and washing-up liquid, place the basket in it, and let soak for approximately 10 minutes.
- Clean the inside of the appliance with hot water and a non-abrasive sponge.
- Clean the heating element with a cleaning brush to remove food residues.
Storage:
- Unplug the appliance and let it cool down.
- Ensure all parts are clean and dry before storage.
Troubleshooting:
- Appliance not working: Check if plugged into an earthed wall socket. Ensure the timer key is set for the required preparation time.
- Ingredients not done: Reduce the amount of ingredients in the basket. Set the temperature key to the required setting. Set the timer to the required preparation time.
- Ingredients fried unevenly: Shake certain types of ingredients halfway through the preparation time (e.g., fries).
- Fried snacks not crispy: Use oven snacks or lightly brush with oil. Do not overfill the pot.
- Pan cannot be slid in properly: Ensure the pot is placed correctly and push it in the correct direction.
- White smoke: This can occur when frying greasy ingredients (oil leaks into the pot, heats up, produces white smoke, but does not affect appliance or result). It can also be caused by grease residues from previous use; ensure the pan is cleaned properly after each use.
- Fresh fries fried unevenly: Use the right potato type. Rinse potato sticks properly to remove starch.
- Fresh fries not crispy: Crispiness depends on oil and water content. Dry potato sticks properly before adding oil. Cut potato sticks smaller for crispier results. Add slightly more oil for crispier results.
Correct Disposal of this product:
The product is marked with a crossed-out wheeled bin symbol, indicating it should not be disposed of with other household waste in the EU. To prevent environmental or health harm from uncontrolled waste disposal, recycle it responsibly. Users should utilize return and collection systems or contact the retailer for environmentally safe recycling.