A
WARNING
This item is not a toy and should be used for decoration only. This item contains small parts that can be a
choking hazard. Keep all plastic and wire parts away from children. This product is intended for people
ages 14 and up.
Please read all instructions carefully before assembling. Save this instruction sheet for future reference.
A
B
C
D
E
C
C
D
D
D
E
E
F
F
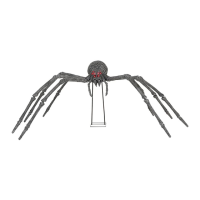
PARTS LIST
A. Base
B. Support Poles x 6
C. Head
D. Upper Legs x 8
E. Middle Legs x 8
F. Lower Legs x 8
G. Right Feeder Leg
H. Left Feeder Leg
I. Upper Abdomen
J. Lower Abdomen
K. Polybag with Small Parts
(Attached to the B. Support poles )
CARE AND STORAGE INSTRUCTIONS
For best performance operate your item indoors or in a sheltered outdoor area. We also recommend that
you bring your item indoors during adverse weather (extreme cold, strong winds and/or rain). When not
in use, store this product in it’s original packing. Keep away from heat and moisture.
EASY ASSEMBLY AND OPERATION INSTRUCTIONS
Gargantuan Spider
Please follow these step by step instructions to properly assemble and display your Gargantuan Spider.
Model#5124419
X 6
X 27 Screws
Small Hex Key
Big Hex Key
x12 Lawn Stakes
X 8
X 8
X 8
C
B
B
B
B
B
B
A
E
F
G
H
I
K
J
BEFORE ASSEMBLING, REMOVE ALL THE ABOVE PARTS FROM BOX. IF ANY PART IS MISSING, DO NOT ATTEMPT TO ASSEMBLE THE PRODUCT AND CONTACT CUSTOMER
SERVICE FROM 8:30AM TO 5:30PM PST AT 1-855-428-3921.
1
2
3
STEP 1
First, To secure the Spider Base into the ground, take the lawn stakes from the (K)
Polybag with Small Parts and push the stake into the ground with one side going
through each corner of the (A) Base as shown. Assemble the (B) Support Poles x6 to
one another to construct 3 sets of 2-pole support sections. Next, attach these 2-pole
support sections into the corresponding support posts located on the (A) Base.
Finally, attach the (C) Head by sliding the support posts exposed at the base down
onto the tops of these 2-pole support sections. NOTE: Secure all support poles and
posts by aligning the quick-connect buttons into the pre-drilled holes as shown.
STEP 2
NOTE: Assemble all 8 legs one at a time and in a clockwise direction
starting at the front right side of the spider as shown in Figure 4.
To assemble Leg #1, First take one of the (D) Upper Legs and slide the open
end into the pipe connected to a joint located on the front right side of the
(C) Head and then set a screw from the (K) Polybag with Small Parts into the
corresponding hole and tighten as shown in Figure 1. NOTE: DO NOT
overtighten the screw. Next, take one of the (E) Middle Legs and assemble
to the attached (D) Upper Leg and secure using the same method, and as
shown in Figure 2. Finally, take one of the (F) Lower Legs and assemble to
the attached (E) Middle Leg and secure using the same method, and as
shown in Figure 3. Repeat this process to complete the assembly for all 7 of
the remaining legs.
STEP 3
Insert the (G) Right Feeder Leg & (H) Left Feeder Leg into the holes located
at the front of the (C) Head and twist clockwise as shown.
2
1
3
1
2
3
4
C
G H
G H
&
1/2