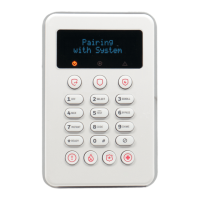
ENROLL THE KEYPAD
The keypad must be enrolled in the control panel before it can be used. Registration and Programming is
conducted through AlarmNet 360. On a laptop, PC or Smart Device, go to www.alarmnet360.com or use
the AN360 App. After accessing the customer account, perform the following steps.
1. Select “KEYPADS”.
2. Select “ADD KEYPAD”.
3. Select “Learn” and wait for the Control Panel to be in learn mode.
4. Plug the keypad’s power supply into a 24hr, non-switchable 110VAC, 60Hz outlet.
• The keypad automatically attempts to pair with the Control Panel.
• If enrollment is not successful, press any of the keys on the keypad to restart the pairing process or
disconnect and reconnect power.
5. After successful pairing, keypad displays “Paired with System”, then “Waiting for Status Update” until
exit of program mode. The system then displays system status.
6. After enrollment, program and save the keypad’s zone options (zone descriptor, etc.)
NOTE: Make sure to assign a descriptor to the keypad for easy identification when keypad events occur.
ENRÔLER LE CLAVIER
Le clavier doit être enregistré au panneau de commande avant de pouvoir être utilisé.
L’enregistrement et la programmation se font par le biais d’AlarmNet 360. À partir d’un ordinateur
portable, PC ou un appareil intelligent, allez à www.alarmnet360.com ou utiliser l’application AN360.
Après avoir accédé à votre compte client, suivez les étapes suivantes.
1. Sélectionnez « CLAVIERS ».
2. Sélectionnez « AJOUTER CLAVIER ».
3. Sélectionnez « Apprendre » et attendez que le panneau de contrôle passe en mode Apprentissage.
4. Branchez l’alimentation électrique du clavier dans une prise de courant non commutable de 24
heures, 110 V CA, 60 Hz.
• Le clavier tente automatiquement de se jumeler au panneau de contrôle.
• Si l’enregistrement échoue, appuyez sur n’importe quelle touche du clavier pour relancer le
processus d’appariement ou débranchez puis rebranchez l’alimentation.
5. Une fois le jumelage réussi, le clavier affiche « Apparié au système », puis « En attente d’une mise
à jour d’état » jusqu’à la sortie du mode Programme. Le système affiche ensuite l’état du système.
6. Après l’enregistrement, programmez et sauvegardez les options de zone du clavier (descripteur
de zone, etc.).
NOTE : assurez-vous d’attribuer un descripteur au keypad pour faciliter l’identification lorsque des
IMPORTANT: Once enrolled, the keypad cannot be used with another Control Panel until it is
un-enrolled (deleted) from the current Control Panel. Refer to Keypad Menu Mode for details on removing
IMPORTANT : une fois enregistré, le keypad ne peut pas être utilisé avec un autre panneau de
commande tant qu’il n’est pas désinscrit (supprimé) du contrôleur actuel. Reportez-vous au mode
pad pour plus de détails sur la suppression de périphériques.
PANIC KEYS
This keypad also features panic keys. These keys may be programmed for Fire, Police and Medical
alarms. Panic activation requires a 2-button sequence. After the first button in the sequence is pressed,
can cancel the panic by pressing any key other than one of the panic keys.
Panic
There are 3 ways to generate an alarm:
1. Press Panic and within 10 seconds press the desired panic key (Fire, Police, Medical)
2. Press desired panic key and within 10 seconds press the Panic
button
3. Press desired panic key and within 10 seconds press the same key.
Fire
Police
Medical
TOUCHES D’URGENCE
Ce clavier comporte également des touches d'urgence. Ces touches peuvent être programmées
pour les alarmes d’incendie, de police et médicale. L’activation de l'urgence requiert l’utilisation d’une
séquence à 2 boutons. Après avoir appuyé sur le premier bouton de la séquence, appuyez sur une
touche autre que l’une des touches d'urgence pour annuler la function.
Panique
Il y a 3 manières d’enclencher une alarme :
1. Appuyez sur « Panic » (Panique), puis en moins de 10 secondes, appuyez sur la
touche de panique appropriée (incendie, police, urgence médicale)
2. Appuyez sur la touche de panique appropriée, puis en moins de 10 secondes, appuyez
sur le bouton « Panic »
3. Appuyez sur la touche de panique appropriée, puis en moins de 10 secondes, appuyez
sur la même touche.
Incendie
Police
Médical /
Personnel
Keypad Menu Mode
This mode displays keypad programmed information and provides access to Default, Reset, LCD
Brightness and Backlight options. Press and hold the 3 key for 2 seconds to enter Menu Mode. The
system will exit Menu Mode after 1 minute of inactivity. Press 3 key to scroll or * key to exit.
Display
Meaning/Option
App:
Boot:
Displays the keypad’s current App and Boot versions
RF6: Displays the keypad’s SiX software version and the keypad MAC ID
Default Keypad Prompts to Default Keypad. 2 = CONFIRM to remove keypad from control panel.
Note: If the keypad is repowered within 24 hours, it will re-pair with the control panel.
After 24 hours, it will need to be re-enrolled.
Partition=
Keypad ID=
Displays Partition assignment and Keypad ID programmed in the control
panel
Reset Keypad Prompts to Reset Keypad. 2=CONFIRM (restart)
LCD Brightness Prompts to change LCD brightness. 2 will toggle from Low, Medium and High
LCD Backlight Press 2 to cycle through options for: Always Off / ON, After 1, 5, or 15 minutes.
A: None
B: None
(Future Use)
(Future Use)
SPECIFICATIONS:
Physical: ...................................................... 4.17” W x 6.36” H x 1.16” D / (106.02mm x 161.52mm x 29.5mm)
Frequency of Operation: ............................................................................................................. 2405-2475MHz
Battery Pack: ....................................................................................... P/N 300-06868:7.2V, 6 x 600mAh, NiMH
Power Supply: ...................................................................................................... P/N 300-07332US – 9VDC-1A
Input Voltage: .................................................................................................................................. 102-132 VAC
Input Current: ........................................................................................................................................ 0.5A MAX
Input Frequency: .................................................................................................................................. 57 - 63 HZ
Output Minimum Voltage: ................................................................................................................ 9 VDC/ VCC
Output Current: ......................................................................................... 1.0 A MIN, no minimum load required
Sounder: ............................................................................................................................................ Piezoelectric
Mode Menu Keypad
Ce mode affiche les informations programmées sur le pavé tactile et permet d'accéder aux options Par
défaut, Réinitialiser, Luminosité LCD et Rétro-éclairage. Pour accéder au mode Menu, maintenez la
touche 3 enfoncée pendant 2 secondes Le système quitte le mode Menu après 1 minute d’inactivité.
Appuyez sur la touche 3 pour faire défiler ou sur la touche * pour quitter.
Afficher
Signification/Option
App:
Démarrage:
Affiche les versions actuelles de l'application et du démarrage du pavé tactile
RF6: Affiche la version du logiciel SiX du keypad et l’ID MAC du keypad.
Clavier par
défaut
Invite pour retour au clavier par défaut. 2 = CONFIRMER pour retirer le clavier du
panneau de commande.
Remarque: si le pavé tactile est alimenté de nouveau dans les 24 heures, il se
reconnectera avec le contrôle. Après 24 heures, il devra être ré-inscrit.
Partition=
ID du clavier =
Affiche l’attribution de partition et l’identifiant du pavé tactile programmés dans
la fenêtre de contrôle.
Réinitialiser le
clavier
Invite pour réinitialiser le clavier. 2=CONFIRMER (redémarrage)
Luminosité de
l'écran LCD
Invite pour modifier la luminosité de l’écran ACL. 2 alterne entre Faible, Moyenne et
Haute intensité
LCD retro-
éclairage
Appuyez sur 2 pour faire défiler les options pour: Toujours éteint / allumé, après 1, 5
ou 15 minutes
A: None
B: None
(Usage futur)
(Usage futur)
SPÉCIFICATIONS:
Caractéristiques physiques: ................................................................ 95,25mm l x 142,87mm H x 25,4mm P
Fréquence de fonctionnement: ................................................................................................. 2405-2475MHz
Bloc-batterie: ....................................................................................... P/N 300-06868:7.2V, 6 x 600mAh, NiMH
Source de courant: .............................................................................................. P/N 300-07332US – 9VCC-1A
Tension d'entrée: ............................................................................................................................ 102-132 VAC
Courant d'entrée: .................................................................................................................................. 0.5A MAX
Fréquence d'entrée: ............................................................................................................................ 57 - 63 HZ
Tension minimale de sortie: ........................................................................................................... 9 VDC/ VCC
Courant de sortie: ........................................................................... 1.0 A MIN, pas de charge minimale requise
Avertisseur sonore: ............................................................................................................................ Mini klaxon
FEDERAL COMMUNICATIONS COMMISSION & ISED STATEMENTS
The user shall not make any changes or modifications to the equipment unless authorized by the Installation Instructions or User's Manual. Unauthorized changes or modifications could void the user's authority to operate the equipment.
CLASS B DIGITAL DEVICE STATEMENT
This equipment has been tested to FCC requirements and has been found acceptable for use. The FCC requires the following statement for your information.
This equipment generates and uses radio frequency energy and if not installed and used properly, that is, in strict accordance with the manufacturer's instructions, may cause interference to radio and television reception. It has been type tested and found to
comply with the limits for a Class B computing device in accordance with the specifications in Part 15 of FCC Rules, which are designed to provide reasonable protection against such interference in a residential installation. However, there is no guarantee that
interference will not occur in a particular installation. If this equipment does cause interference to radio or television reception, which can be determined by turning the equipment off and on, the user is encouraged to try to correct the interference by one or more
of the following measures:
• If using an indoor antenna, replace it with a quality outdoor antenna.
• Reorient the receiving antenna until interference is reduced or eliminated.
• Move the radio or television receiver away from the receiver/control panel.
• Move the antenna leads away from any wire runs to the receiver/control panel.
• Plug the receiver/control panel into a different outlet so that it and the radio or television receiver are on different branch circuits.
• Consult the dealer or an experienced radio/TV technician for help.
ISED CLASS B STATEMENT
This Class B digital apparatus complies with Canadian ICES-003.
Cet appareil numérique de la classe B est conforme à la norme NMB-003 du Canada.
FCC / ISED STATEMENT
This device complies with Part 15 of the FCC Rules, and ISED’s license-exempt RSSs. Operation is subject to the following two conditions: (1) This device may not cause harmful interference (2) This device must accept any interference received, including
interference that may cause undesired operation.
Cet appareil est conforme à la partie 15 des règles de la FCC et exempt de licence RSS d’ISED. Son fonctionnement est soumis aux conditions suivantes: (1) Cet appareil ne doit pas causer d’interférences nuisibles. (2) Cet appareil doit accepter toute interférence
reçue y compris les interférences causant une réception indésirable.
Responsible Party / Issuer of Supplier’s Declaration of Conformity: Ademco Inc., a subsidiary of Resideo Technologies, Inc., 2 Corporate Center Drive., Melville, NY 11747, Ph: 516-577-2000
Partie responsable / Émetteur de la déclaration de conformité du fournisseur : Ademco Inc., une filiale de Resideo Technologies, Inc., 2 Corporate Center Drive., Melville, NY 11747, Tél. 516 577-2000..
RF EXPOSURE
Warning – The antenna(s) used for this device must be installed to provide a separation distance of at least 7.8 inches (20 cm) from all persons
and must not be co-located or operating in conjunction with any other antenna or transmitter except in accordance with FCC and ISED multi-
transmitter.
Mise en Garde
Exposition aux Fréquences Radio : La/les antenne(s) utilisée(s) pour cet émetteur doit/doivent être installée(s) à une distance de
séparation d'au moins 20 cm (7,8 pouces) de toute personne et ne pas être située(s) ni fonctionner parallèlement à tout autre
antenne, excepté en conformité avec les procédures de produit multi transmetteur FCC et ISED.
REFER TO THE INSTALLATION INSTRUCTIONS FOR THE CONTROL PANEL WITH WHICH THIS DEVICE IS USED, FOR
DETAILS ON LIMITATIONS OF THE ENTIRE ALARM SYSTEM.
For the latest warranty information, please go to:
https://www.security.honeywellhome.com/hsc/resources/wa/index.html
For technical support, call 1-800-645-7492, M-F 8:30am to 5pm EST.
For documentation, go to: www.resideo.com
POUR LES LIMITES DU SYSTÈME D'ALARME EN ENTIER, CONSULTEZ LE GUIDE D’INSTALLATION DU PANNEAU DE
COMMANDE AVEC LEQUEL CE DISPOSITIF EST UTILISÉ.
Pour voir les toutes dernières informations relatives à la garantie, veuillez consulter:
https://www.security.honeywellhome.com/hsc/resources/wa/index.html
Assistance technique en français, 1-877-667-8324 (8 h 30 à 17 h 30, heure de l’Est).
Pour voir des documents consulter: www.resideo.com
This equipment should be installed in accordance with National Electrical Code, NFPA 70, Standard for the Installation of
Residential Fire Warning Systems, CAN/ULC-S540 and Chapter 2 of the National Fire Alarm Code, ANSI/NFPA 72 (National Fire
Protection Association, Batterymarch Park, Quincy, MA 02269). Printed information describing proper installation, operation, testing,
maintenance, evacuation planning, and repair service is to be provided with this equipment.
Warning: Owner’s instruction notice: ’Not to be removed by anyone except occupant’ / Avertissement: Avis du propriétaire: «Ne
doit être retiré par personne, saut l’occupant»
This system must be checked by a qualified technician at least once every three (3) years.
Any attempt to reverse-engineer this device by decoding proprietary protocols, de-compiling firmware, or any similar
actions is strictly prohibited.
Note: The product should not be disposed of with other household waste. Check for the nearest authorized collection centers or
authorized recyclers. The correct disposal of end-of-life equipment will help prevent potential negative consequences for the
environment and human health.
This equipment should be installed in accordance with National Electrical Code, NFPA 70, Standard for the Installation of
Residential Fire Warning Systems, CAN/ULC-S540 and Chapter 2 of the National Fire Alarm Code, ANSI/NFPA 72 (National
Fire Protection Association, Batterymarch Park, Quincy, MA 02269). Printed information describing proper installation, operation,
testing, maintenance, evacuation planning, and repair service is to be provided with this equipment.
Warning: Owner’s instruction notice: ’Not to be removed by anyone except occupant’ / Avertissement: Avis du propriétaire:
«Ne doit être retiré par personne, saut l’occupant»
This system must be checked by a qualified technician at least once every three (3) years.
Toute tentative d’ingénierie inverse de cet appareil,en décodant les protocoles propriétaires, en décompilant le logiciel
microprogramme ou en effectuant toute mesure similaire est strictement interdite.
Note: The product should not be disposed of with other household waste. Check for the nearest authorized collection centers or
authorized recyclers. The correct disposal of end-of-life equipment will help prevent potential negative consequences for the
environment and human health.
Any attempt to reverse-engineer this device by decoding proprietary protocols, de-compiling firmware, or any
similar actions is strictly prohibited.
Toute tentative d’ingénierie inverse de cet appareil,en décodant les protocoles propriétaires, en décompilant le
logiciel microprogramme ou en effectuant toute mesure similaire est strictement interdite.
 Loading...