This document provides installation instructions for a Hooke Road Roof Rack, model BXG.5004. The roof rack is designed to be installed on a vehicle to provide additional cargo carrying capacity.
Function Description
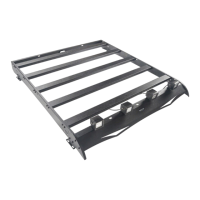
The Hooke Road Roof Rack BXG.5004 serves as an external cargo carrying system for vehicles. It allows users to transport items that may not fit inside the vehicle's cabin or trunk, such as luggage, camping gear, sports equipment, or other bulky items. The rack is designed to be securely mounted on the vehicle's roof, providing a stable platform for various loads. The installation process involves assembling multiple components, including cross bars and side rails, and then securely attaching the entire structure to the vehicle's roof using specialized tools and hardware.
Important Technical Specifications
The manual outlines the components included and the tools required for installation, which can be considered indirect technical specifications related to the product's design and assembly.
Included Components (Parts List):
The roof rack assembly consists of various parts identified by letters and numbers:
- Structural Components: D, E, F, G, H, A, I, B2 (likely referring to cross bars and side rails or similar structural elements).
- Fasteners/Hardware: J, M, O, L (bolts, nuts, washers, or other connecting pieces).
- Mounting Hardware: K, P, N (specific parts for attaching the rack to the vehicle's roof).
- Quantity Indicators: C1, C2, C3, C4 (likely indicating quantities or specific locations for certain parts). The visual representation shows multiple instances of parts like D, E, F, G, H, A, I, B2, suggesting a modular design with several cross bars.
Tools Required for Installation:
The installation process requires specific tools, indicating the type of fasteners and assembly methods used:
- Wrenches:
- 13mm & 12mm Wrench (for tightening bolts of specific sizes).
- 4mm & 5mm Socket Wrench (for tightening smaller bolts or nuts).
- 4mm Ratchet Allen Key Wrench (for Allen head screws, providing leverage and speed).
- Specialized Tool:
- Pneumatic Riveting Nut Gun with 6mm Nut Chuck (essential for installing riveting nuts into the vehicle's roof, indicating a secure and permanent mounting method). This tool suggests that the installation involves creating threaded inserts in the vehicle's body for robust attachment.
Installation Time:
- Approximately 2 hours.
- Requires 2-3 people, suggesting the size and weight of the components, and the need for assistance in positioning and securing the rack.
- Installation time may vary based on the installer's mechanical skill level.
Usage Features
The Hooke Road Roof Rack is designed to enhance a vehicle's utility by providing external storage.
- Cargo Capacity: While not explicitly stated in terms of weight, the robust assembly and the use of a pneumatic riveting nut gun for installation imply a strong and secure attachment capable of carrying significant loads.
- Modular Design: The presence of multiple cross bars (D, E, F, G, H, A, I) suggests a modular design that allows for flexible placement of cargo or accessories. The instruction to "Pay attention to the order of the five cross bars" indicates that these bars are not interchangeable and must be installed in a specific sequence for proper fit and function.
- Durability: The use of metal components and secure fastening methods (bolts, riveting nuts) points to a durable product built to withstand various weather conditions and road vibrations.
- Aesthetic Integration: The final installed image shows a sleek, low-profile design that integrates well with the vehicle's aesthetics, providing a factory-like appearance.
Maintenance Features
The manual does not explicitly detail maintenance features, but based on the product type and installation, some general maintenance aspects can be inferred:
- Regular Inspection: It is advisable to regularly inspect all bolts and riveting nuts for tightness, especially after initial installation and periodically thereafter, to ensure the rack remains securely attached to the vehicle.
- Cleaning: The metal construction suggests that the rack can be cleaned with standard automotive cleaning products.
- Corrosion Prevention: Given its external exposure, periodic checks for rust or corrosion on metal parts and fasteners would be beneficial, especially in harsh weather environments.
- Part Replacement: In case of damage, the modular nature of the rack might allow for individual component replacement, although this is not specified.
Installation Process Overview
The installation process is broken down into several steps:
- Step 1: Frame Assembly: Involves installing the main structural components (D, E, F, G, H, A, I, B2) using bolts (J, M, O). Crucially, the order of the five cross bars must be followed.
- Step 2: Side Rail Attachment: Attaching additional structural parts (B2, A, I) to the assembled frame using more fasteners (J, L, M, O). This step likely involves securing the side rails to the cross bars.
- Step 3: Repeat for Other Side: The assembly steps are mirrored for the opposite side of the roof rack, ensuring symmetry and structural integrity.
- Step 4: Initial Placement on Vehicle: The assembled roof rack is placed on the vehicle's roof in its proper position.
- Step 5: Marking and Drilling: The installation brackets' positions are marked on the vehicle's roof. Eight installation holes are drilled according to these marks.
- Step 6: Riveting Nut Installation: A pneumatic riveting nut gun with a 6mm nut chuck is used to install eight riveting nuts into the drilled holes. This creates secure, threaded anchor points in the vehicle's roof.
- Step 7: Final Attachment to Vehicle: The rack is then placed on the car, and secured using parts K, P, and N, which are likely bolts or other fasteners that thread into the newly installed riveting nuts.
- Step 8: Completion: The installation is complete, and the user is encouraged to enjoy their new off-road life with the product.
Important Considerations
- Pre-Installation Check: The manual explicitly states, "(PLEASE VERIFY ALL PARTS ARE PRESENT AND READ INSTRUCTIONS CAREFULLY BEFORE STARTING INSTALLATION!)" This highlights the importance of checking all components against the parts list before beginning assembly.
- Skill Level: The note about installation time varying with mechanical skill level suggests that while the instructions are provided, some mechanical aptitude is expected from the installer.
- Electronic Version: A QR code is provided to access an electronic version of the manual (BXG.5004), offering convenience and potentially more detailed visuals or interactive guidance.
- Product Variations: The "Attention" section notes that product parts in the instruction may differ slightly from actual product contents but generally do not affect installation. This is a common disclaimer for manufactured goods.
- Customer Support: Users are encouraged to contact their distributor for any questions about their purchase, emphasizing customer support availability.
- Community Engagement: The manual includes social media handles (@HookeRoad4x4 on Facebook and TikTok) and a hashtag (#hookeroad) to encourage users to post pictures of their Jeep/Truck with the product for a chance to win discounts, fostering a community around the brand.
In summary, the Hooke Road Roof Rack BXG.5004 is a robust, multi-component cargo solution designed for vehicle roofs, requiring specific tools and a multi-step installation process that emphasizes secure attachment for reliable performance.