EasyManua.ls Logo

Hoover SteamVac deluxe User Manual

Hoover SteamVac deluxe
16 pages
To Next Page IconTo Next Page
Page #1 background imageLoading...
Page #1 background image
HOOVER .
The Easy to
Use Deep
Cleaner
Owner s
Manua
t'°"®
with
attached
tools
Review this manual before oper-
ating deep cleaner,
Record and Retain
This HOOVER deep cleaner is designed for deep cleaning of
carpet, and rugs. It can also be used to clean carpeted stairs
and upholstery.
The model and serial numbers are located on the data label
on the back of the deep cleaner handle.
For your personal records, please enter the COMPLETE
model and serial numbers in the spaces provided and retain
this information.
Your deep cleaner is model
and has serial number
It is suggested that you attach your sales receipt to this
owner's manual. Verification of date of purchase may be
required for warranty service of your Hoover product.
Index
Important safeguards ..................................................... 2
Unpacking deep cleaner ................................................. 2
Assembling deep cleaner ........................................... 3-5
Deep cleaner description ............................................... 5
General operation ........................................................... 6
Filling the clean solution tank ............................ 7-8
Emptying the recovery tank .................................... 8
Agitator speed selector ........................................... 6
Brush indicator ........................................................ 7
How to use
Before you begin ...................................................... 9
After cleaning ........................................................... 9
Cleaning carpet ...................................................... 10
Picking up spills ..................................................... 10
Cleaning bare floors ........................................ 10-11
Using the stair/upholstery nozzle ................... 11-12
Cleaning carpeted stairs ................................ 13
Cleaning upholstery ....................................... 14
If you have a problem ................................................... !5
Lubrication ..................................................................... 14
Service .......................................................................... 15
Storage .......................................................................... 14
This cleaner was inspected and packaged carefully before
being shipped from the factory. If you should happen to rleed
assistance during assembly or operation, call
1-800-944-9200 for an automated referral of authorized
service outlet locations (U.S. only) or
1-330-499-9499 (U.S,) ,_,nd1-800-263-6376 (Canada) to
speak with a Hoover representative.
DO NOT RETURN THIS PRODUCT
TO THE STORE.
Grounding Instructions
This appliance must be grounded. If it should malfunction or
breakdown_ grounding provides a path of least resistance for
electrical current to reduce the risk of electric shock, This
appliance is equipped with a cord having an equipment-
grounding conductor and grounding plug (A), The plug must
be plugged into an appropriate outlet (B) that is properly
installed and grounded in accordance with all local codes and
ordinances,
GROUNDING PIN (B)
DANGER-
Improper connection of the eclmipnlent-grounding condLictor
carl result in the risk of electric shock. Check with a qualified
electrician or service person if you are in doubt as to whether
the outlet is properly grounded. Do not modify the plug
provided with the appliance - if it will not fit the outlet, have a
proper outlet installed by a qualified electrician. This appliance
is for use on a nominal 120 vok circuit and has a grounding
plug that looks like the plug illustrated in sketch (A).
A temporary adapter (C) may be used to connect this plug to a
2-pole receptacle (D) if a properly grounded outlet is not
available, The temporary adapter should be used only LEntil a
properly grounded outlet (B) can be installed by a qualified
electrician, The green colored rigid ear, lug, or the like
extending frorrl the adapter rrlust be connected to a perrrlanent
ground such as a properly grounded outlet box cover. When-
ever the adapter is usedr it must be hekJ in place by a metal
DAPTER
TAB FOR
(C) _ GROUNDING
SCREW
METAL SCREW -
(D)
NOTE: In Canada, the use of a temporary adaptor is not
permitted by the Canadian Electrical Code.
',0 1995, 1996 The Hoover Company
Question and Answer IconNeed help?

Do you have a question about the Hoover SteamVac deluxe and is the answer not in the manual?

Hoover SteamVac deluxe Specifications

General IconGeneral
TypeUpright
Cleaning Path Width12 inches
Water Tank Capacity1 gallon
Heated CleaningYes
Voltage120V
Height44 inches
Power SourceElectric

Summary

Grounding Instructions

DANGER

Safety warning regarding improper electrical connection of the equipment-grounding conductor.

Important Safeguards!

Unpacking

Assembling deep cleaner

Attach upper handle

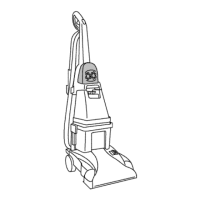
Step-by-step instructions for attaching the upper handle to the deep cleaner unit.

Attach lower hose holder

Instructions for attaching the lower hose holder to the main body of the cleaner.

Storing hose and nozzle on rack

Guidance on how to properly store the hose and nozzle on the cleaner's rack.

Deep cleaner description

Main Components and Controls

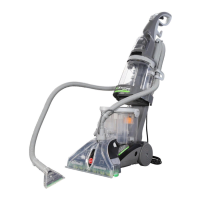
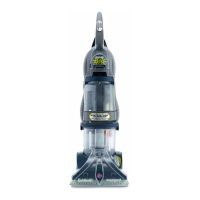
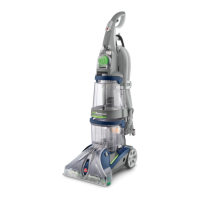
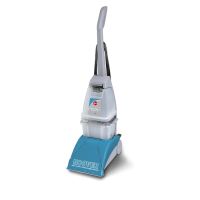
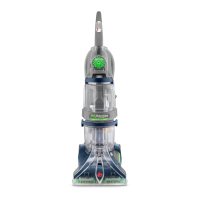
Overview of key parts like hand grip, solution trigger, ON/OFF pedal, and carrying handle.

Tanks and Lids

Description of clean solution tank, recovery tank, and their associated components.

Hose and Attachments

Details on the hose, hose holders, cord hooks, and specialized nozzles.

General operation

ON/OFF pedal

Instructions for turning the deep cleaner on and off using the foot pedal.

Handle release pedal

How to adjust the handle position for operation using the release pedal.

Automatic "shut-off"

Explanation of the mechanism that stops suction when the recovery tank is full.

Agitator speed selector

Guide to selecting brush speed settings (HI, LO, OFF) for different cleaning tasks.

Brush indicator

The tanks

Clean solution tank (upper tank)

Instructions for filling the clean solution tank with detergent and water.

Recovery tank (lower tank)

Procedure for emptying the dirty water from the recovery tank.

How to use

Before you begin cleaning

Essential preparatory steps and checks before starting any cleaning task.

After cleaning

Steps to take after completing a cleaning session, including drying and rinsing.

To clean nozzle

Method for clearing debris or blockages from the cleaning nozzle.

Cleaning carpet

Picking up spills

Instructions for using the cleaner to absorb small liquid spills on various surfaces.

Cleaning bare floors

Procedure for attaching the bare floor attachment and cleaning hard surfaces.

To clean floor

Using the stair/upholstery nozzle

How to attach hose

Steps to connect the hose to the main unit for specialized cleaning.

Connecting the solution tube

Procedure for connecting the solution tube to the cleaner for specific attachments.

Cleaning carpeted stairs

After using stair/upholstery nozzle

Post-use procedures for the stair/upholstery nozzle, including draining and disconnecting.

Cleaning upholstery and automobile interiors

Storage

Lubrication

If you have a problem

Machine won't run

Troubleshooting steps for when the cleaner fails to power on.

Low suction

Diagnosing and fixing issues related to reduced suction power.

Clean solution won't dispense

Steps to resolve problems with the cleaner not dispensing cleaning solution.

Solution tube on stair/upholstery nozzle won't connect

Troubleshooting for issues connecting the solution tube to the specialized nozzle.

Brushes/brush indicator won't rotate during floor cleaning

Resolving problems with the agitator brushes not rotating during operation.

Service

Related product manuals