EasyManua.ls Logo

HornBlasters 127H - User Manual

HornBlasters 127H
14 pages
Print Icon
To Next Page IconTo Next Page
Loading...
CONDUCTOR'S SPECIAL
INSTALLATION MANUAL
127H / 228H
WARNING: To ensure the longevity of your
system, reading and following these instructions
are recommended. Make sure to change filters
and to drain the moisture from your tank on a
regular basis.
BEFORE YOUR PROCEED! THE AIR SOURCE
IN THIS KIT IS NOT MEANT TO BE MOUNTED
OUTSIDE IN THE ELEMENTS! IT IS NOT
WEATHER PROOF AND WILL NOT BE
COVERED UNDER WARRANTY IF MOUNTED
OUTSIDE OR EXPOSED TO THE
ELEMENTS! MUST BE MOUNTED UPRIGHT.
Page 1
Question and Answer IconNeed help?

Do you have a question about the HornBlasters 127H and is the answer not in the manual?

Summary

Conductors Special Installation Manual

Critical System Warning

Important caution about component mounting and environmental exposure.

Kit Contents and Component Identification

Kit Components List

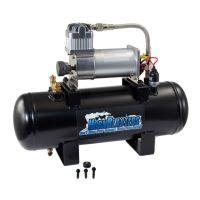
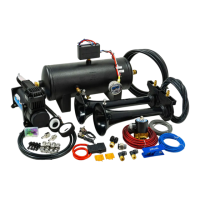
Lists all parts included in the 127H/228H kit.

Fittings Identification Guide

Guide to measure and identify thread sizes of fittings.

Safety Precautions and Guidelines

Electrical Safety

Essential safety measures to prevent electric shock and electrocution.

Injury Prevention

Critical warnings to prevent physical harm during operation.

Preparing For the Install

Recommended Install Locations for Your Car (Compressor)

Best locations for mounting the compressor in cars.

Recommended Install Locations for the Horns

Optimal placement for horns for sound projection in cars.

Recommended Install Locations for Trucks (Compressor)

Best practices for mounting the compressor in truck toolboxes or beds.

Recommended Install Locations (Horns)

Mounting locations for horns in trucks, considering road debris.

Plumbing and Air Line Setup

Plumbing Diagram

Visual guide for connecting air lines and components.

Air Line Connection Technique

Proper method for seating and tightening air lines into fittings.

Compressor Filter Maintenance

Instructions on how to change the compressor's air filter element.

Wiring Diagram

2-Gallon Conductor Special 127 H;228 H Wiring Diagram

Schematic for wiring the compressor, relay, and power source.

Wiring Instructions

Relay Wiring Procedure

Detailed steps for connecting the relay to power and ground.

Key-Power Source Connection

How to find and connect to a switched power source.

Toggle Switch Wiring Alternative

Using a toggle switch for manual compressor control.

Horn Activation Wiring Methods

Steering Wheel Horn Button Wiring

Connecting horns to the vehicle's steering wheel horn button.

Push Button Horn Activation

Wiring horns to a separate push button.

Maintenance and Operational Tips

Scheduled Maintenance

Routine checks for moisture, air lines, and connections.

General Operational Tips

Advice on checking ground connections and hardware security.

Troubleshooting: Compressor

Compressor Not Turning On

Steps to diagnose why the compressor fails to start.

Compressor Not Filling Tank

Diagnosing issues preventing the tank from pressurizing.

Tank Losing Pressure

Methods to find and fix air leaks in the system.

Troubleshooting: Horns

Horns Not Honking

Resolving issues where the horns do not activate.

Horns Sounding Incorrectly

Fixing squeaky or high-pitched horn sounds.

Horns Honking Autonomously

Diagnosing and fixing horns that activate unexpectedly.

Uneven Horn Activation

Addressing horns sounding at different times due to line length.

Overview

This document provides a comprehensive guide for the installation, operation, and maintenance of the HornBlasters Conductor's Special 127H/228H air horn system. Designed to deliver a powerful and attention-grabbing sound, this kit is intended for vehicle enthusiasts who desire a robust air horn setup.

Function Description

The HornBlasters Conductor's Special 127H/228H is a complete air horn system that includes an air source kit (compressor and tank), Shocker XL horns, air lines, an electric solenoid valve, and a universal wiring kit. The system operates by using an air compressor to fill a tank with compressed air, which is then released through the solenoid valve to activate the horns, producing a loud and distinctive sound. The primary function is to provide an enhanced audible warning or signaling capability for a vehicle, far exceeding the volume and presence of standard factory horns. The system is designed for 12-volt DC vehicle electrical systems.

Usage Features

The system offers several features that enhance its usability and performance:

  • Powerful Sound: The Shocker XL horns are engineered to produce a very loud and clear sound, mimicking the sound of a train horn, making them highly effective for signaling and attracting attention.
  • Complete Kit: The Conductor's Special kit includes all necessary components for a full installation, from the air source to the horns and wiring, simplifying the purchasing process.
  • Flexible Activation: The horns can be activated either through a toggle switch or by integrating with the vehicle's existing OEM horn button, offering flexibility in how the user chooses to operate them. The wiring diagram provides clear instructions for both methods.
  • Key-Power Source Integration: The compressor's relay is designed to connect to a key-power source, ensuring that the compressor only runs when the vehicle is on. This prevents accidental battery drain when the vehicle is off. An alternative toggle switch wiring method is also provided for situations where a suitable key-power source is difficult to locate.
  • Optional Add-ons: HornBlasters offers several compatible add-on kits, such as a Tire Inflation Kit for using air tools, an Electric Drain Valve Kit for remote moisture draining, a Digital Air Gauge for monitoring tank pressure, and a Six Horn Upgrade for increased volume. These add-ons allow users to customize and expand the functionality of their system.
  • Mounting Versatility: The manual provides recommendations for mounting both the air source and the horns in various vehicle types, including cars, sedans, SUVs, and trucks. This includes locations like the trunk, engine bay, behind the front bumper, or underneath the bed, allowing users to choose the best fit for their specific vehicle and preferences.
  • Durability Considerations: The manual emphasizes the importance of proper mounting to ensure longevity, particularly for the air source, which is not weather-proof and must be mounted upright and protected from the elements.

Maintenance Features

Regular maintenance is crucial for the longevity and optimal performance of the HornBlasters system. The manual outlines a clear maintenance schedule:

  • Every 2 Weeks:
    • Drain Air Tank Moisture: It is critical to regularly drain moisture from the air tank. Accumulated water can lead to squeaky or non-functional horns and can cause the pressure switch to fail.
  • Every Month:
    • Check Air Filter Element: Inspect the compressor's air filter element for dust or dirt buildup. If signs of buildup are present, the element should be replaced with a new one to ensure clean air intake and prevent premature wear of the compressor.
  • Every 2 Months:
    • Inspect Air Lines: Check air lines for any rubbing or damage that could lead to leaks.
    • Inspect Horns: Examine the horns for any physical damage.
    • Check Wiring for Corrosion: Inspect terminal connectors for corrosion, especially in winter conditions. Corroded connections can lead to intermittent system operation.
  • Every 3 Months:
    • Replace Filter (if not already done): If the air filter element was not replaced monthly, it should be replaced at this interval.
    • Check Tank for Leaks: Due to vehicle vibration, small leaks can develop at fittings or air line connections. The manual recommends using soapy water or Windex® to identify leaks (bubbles will form at the leak point). Leaks can often be resolved by tightening fittings or re-cutting and re-seating air lines.
  • Every Year:
    • Check Ground Connections: Ensure all ground connections for the compressor and solenoid valve are secure and free of corrosion. A wire brush can be used to clean them if needed. Poor ground connections can impair system operation.
    • Inspect Mounting Hardware: Verify that all mounting hardware for the compressor, tank, and horns is secure and tight to prevent components from coming loose due to vibration.

The manual also includes troubleshooting tips for common issues such as the compressor not turning on, the tank not filling, pressure loss, horns not honking, horns sounding incorrect, or horns honking on their own. These tips guide users through diagnostic steps, from checking electrical connections and fuses to inspecting air lines and valve operation, ensuring that users can effectively resolve most problems themselves or know when to contact support.

HornBlasters 127H Specifications

General IconGeneral
TypeTrain Horn
Air SourceCompressed Air
MaterialMetal
InstallationVehicle Specific
Sound OutputLoud
Air Tank Capacity1.5 Gallons

Related product manuals