This document outlines the user manual for the HOUSEFIT SMART 420 MOTORIZED TREADMILL, providing essential information on safety, assembly, operation, and maintenance. It is designed to guide users through setting up and effectively using their new treadmill for home exercise.
Function Description
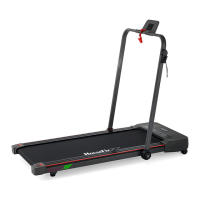
The SMART 420 Motorized Treadmill is a home-use exercise machine designed to facilitate walking, jogging, and running workouts. It features a motorized belt that allows users to control their speed and intensity. The treadmill is equipped with a console that displays key workout metrics such as speed, distance, time, and steps, enabling users to monitor their progress. A wireless remote control is provided for convenient adjustment of speed and starting/stopping the machine during a workout. The treadmill also includes a safety key mechanism, which, when pulled, immediately stops the machine, enhancing user safety. Its design allows for the adjustment of the handlebar height, catering to different user preferences and enabling it to function as a "walking machine." The treadmill is intended to help users stay healthy and fit by providing a controlled environment for cardiovascular exercise.
Usage Features
The treadmill emphasizes user safety and ease of use. Before operation, users are instructed to plug the power cord into a surge protector and a grounded circuit, ensuring electrical safety. Proper placement on a clear, level surface, away from thick carpets and water, is crucial for ventilation and stability. Users should always start the treadmill while standing on the side rails and gradually adjust speed in small increments, holding onto the handrails for balance. Appropriate attire, including running or aerobic shoes with rubber soles, is recommended, while loose clothing, bare feet, stockings, or sandals should be avoided to prevent accidents.
A critical safety feature is the safety key, which must be attached to the user's clothing during operation. This ensures that the treadmill stops immediately if the user falls or moves too far from the console, preventing potential injury from sudden speed increases or electronic failures. When not in use, the safety key should be unplugged and removed.
The console provides real-time feedback on workout parameters: SPEED, DISTANCE, TIME, and STEP count. The speed range varies depending on whether the handrail is folded or standing, offering flexibility for different workout intensities. The remote control simplifies operation, allowing users to start, stop, and adjust speed in 0.1 MPH increments. The "START" button initiates the treadmill at minimum speed, while the "STOP" button brings it to a gradual halt. Speed adjustments are made using the "+" and "-" buttons.
The manual outlines an exercise program, starting with a warm-up stage for 5-10 minutes, followed by stretching exercises. It provides guidance on exercise intensity, suggesting gradual increases in speed and incline. For those new to treadmills or with health concerns, consulting a physician or health professional before starting any exercise program is strongly advised. The document also details specific stretching exercises, including down stretch, hamstring stretch, legs and feet tendon stretch, quadricones stretch, and sartorius muscle stretch, each with recommended durations and repetitions.
The treadmill also features a "SLEEP MODE" that activates after 10 minutes of inactivity, turning off the LED display to conserve energy. Pressing the power button wakes the console back to standby mode. For environments with multiple treadmills, a code matching process is described for the remote control to ensure it operates the correct device.
Maintenance Features
Regular maintenance is crucial for prolonging the life and ensuring the safe operation of the SMART 420 Treadmill. The manual stresses the importance of always unplugging the treadmill before any cleaning or maintenance tasks. General cleaning, such as regular dusting, is recommended to keep the machine clean and prevent debris from interfering with its operation. Users should pay particular attention to cleaning the exposed parts of the deck on either side of the walking belt and the side rails. Keeping running shoes clean is also advised to prevent foreign material from accumulating underneath the walking belt.
For internal maintenance, users are instructed to unplug the treadmill before removing the motor cover. The motor should be cleaned once a year.
A key maintenance aspect is the lubrication of the running belt and deck. The treadmill comes with a pre-lubricated, low-maintenance deck system, but periodic lubrication is still necessary to reduce friction between the belt and deck, which significantly impacts the treadmill's function and lifespan. The manual provides a lubrication timetable based on usage frequency:
- Light user (less than 3 hours/week): Annually
- Medium user (3-5 hours/week): Every six months
- Heavy user (more than 5 hours/week): Every three months
Users are advised to purchase lubrication from the distributor or directly from the manufacturer.
The manual also includes instructions for belt adjustment, which is necessary if the belt becomes too loose (causing slipping) or too tight (affecting motor performance and increasing abrasion). It recommends cutting off power for 10 minutes after 1.5 hours of continuous running to maintain the treadmill. The belt should be lifted approximately 50-75mm from the deck when properly tightened. Detailed steps are provided for centering the running belt if it drifts to the right or left, involving clockwise turns of the adjusting bolts and re-starting the treadmill to check alignment. After a period of use, the belt's tightness can be adjusted by turning both left and right adjusting bolts clockwise.
A troubleshooting guide is included to help users identify and resolve common issues, such as abnormal communication between the lower controller and console (E01), the lower controller not detecting motor voltage (E02), lower control not detecting speed signal (E03), overvoltage protection (E04), overcurrent protection (E05), and low driving power supply voltage (E06). For each problem, potential causes and corrective actions are listed, ranging from checking cable connections to replacing components like the console, lower controller, or motor. The manual explicitly states that any repairs beyond the procedures outlined should only be performed by an authorized service representative or professional technician.