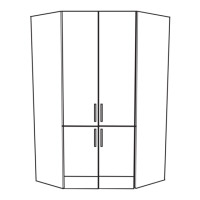
This document provides assembly and installation instructions for a Corner Larder Unit, identified by the sales code suffix ****59F and product code CLARDEROP2 (and TCLARDEROP2 in a variant). It is designed to fit into a kitchen corner, maximizing storage space with a combination of base, larder, and top units, along with specialized components like wine racks and tray units.
Function Description
The Corner Larder Unit serves as a comprehensive storage solution for kitchens, designed to be integrated into a corner space. It combines multiple cabinet types to offer versatile storage options:
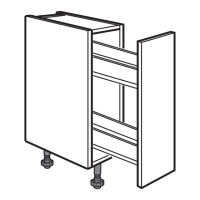
- Base Cabinet: Forms the foundation of the unit, providing lower storage.
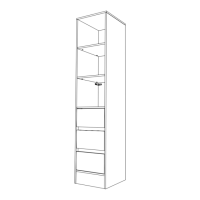
- Larder Unit: A tall cabinet for general pantry storage, often including adjustable shelves.
- Larder Top Unit: Sits atop the larder unit, offering additional storage space.
- Specialized Storage: Integrates dedicated sections for wine racks and a tray unit, enhancing functionality and organization within the kitchen.
- Corner Fillet/Infill Panels: These components are crucial for seamlessly integrating the unit into a corner, filling gaps and providing a finished appearance.
- Decor Ends: Used on exposed sides of the cabinets to provide a cohesive and aesthetically pleasing finish, matching the overall kitchen design.
- Plinth Sections: Form the base trim of the unit, concealing the cabinet legs and providing a neat finish at floor level.
- Cornice: A decorative trim applied to the top of the unit, completing the aesthetic integration with other kitchen cabinets.
The unit is designed for self-assembly, with detailed step-by-step instructions and diagrams to guide the installation process. It aims to provide efficient and organized storage for various kitchen items, from pantry staples to specialized items like wine bottles and baking trays.
Important Technical Specifications
The manual provides specific dimensions and component lists, which are critical for assembly and ensuring proper fit.
Key Components and Dimensions (from Assembly Overview):
- 1000mm Larder Top Unit: x1
- Range Specific Tower Decor End: x2
- Cabinet Corner Fillet: 1926mm x 104mm (Tall Tower Decor End)
- Long Infill: 1942mm x 36mm (Tall Tower Decor End)
- Range Specific 400mm Larder Door: x2
- 1000mm Base Cabinet: x1
- Range Specific 400 FH Door: x2
- Blanking Panels: x2 (RKC0601) – required for assembly, suggesting a 6mm thickness based on step 6 of the instructions.
- Cornice: x1 Length
- Top Panel: x1 (565mm x 565mm) – decor end
- 400 Larder Unit: x1
- Storage Tray Space:
- Side Panel: 502mm x 575mm
- Top/Bottom Panel: 114mm x 490mm
- Back Panel: 114mm x 502mm
- x2 base decor end
- 150mm Wine Rack: x2
- Inner Plinth: x1 Length
- Plinth Sections: x1/2 – Requires 'notching', Length 417mm (Wall Decor end)
Fasteners and Hardware:
- Screws: Various types are implied for securing components (e.g., "screws provided," "screws from the inside").
- KD Blocks: x5 (for corner fillet/infill, Fig. C), x5 (for blanking panel, Fig. C). These are used for securing panels.
- Hinges:
- 170° hinges (Fig. E) – x2 for the doors.
- Hinge plates (Fig. D) – x5/10, for attaching hinges to cabinet sides.
- Joining Plates: Used for securing the top triangular section (step 12).
- Metal Plates: Used to join top and bottom door sections (step 15).
Specific Dimensions for Assembly:
- Corner Fillet/Infill (Fig. C):
- Width: 104mm
- Depth: 37.5mm
- Screws: 30mm x6
- Tray Space Box (Fig. B):
- Plinth Notching (Fig. C):
- Back notch: 55mm
- Side notch: 32mm
- Plinth height: 210mm (for wall decor end sections)
- Planning Considerations (Fig. A):
- Overall width: 1161mm
- Depth: 565mm
- Corner section depth: 1000mm
- Side section width: 161mm
- Height of larder unit section: 186mm (above base)
- Total height (excluding cornice/plinth): 1161mm (from base to top of larder top box)
The document emphasizes checking panel sizes before cutting, indicating that some components may require custom trimming to fit.
Usage Features
The Corner Larder Unit is designed for practical use in a kitchen environment, offering several features that enhance its utility:
- Optimized Corner Storage: The primary feature is its ability to utilize often-underused corner spaces effectively, providing substantial storage capacity.
- Multi-functional Storage: Includes dedicated sections for wine bottles (wine racks) and baking trays (tray unit), alongside general shelving for pantry items, making it versatile for various kitchen storage needs.
- Adjustable Shelving (Implied): While not explicitly stated for all shelves, larder units typically feature adjustable shelving, allowing users to customize the internal layout to accommodate items of different heights.
- Integrated Aesthetics: The use of decor ends, plinths, and cornices ensures that the unit integrates seamlessly with other kitchen cabinetry, providing a built-in and finished look.
- Easy Access: The design with two larder doors and two FH doors (full height) suggests wide access to the stored contents. The 170° hinges (Fig. E) are a key feature, allowing doors to open very wide, providing excellent access to the interior of the corner unit, which can often be difficult to reach.
- Customizable Plinth: The plinth section can be "stepped back" from the door to align with adjoining units, offering flexibility in installation and aesthetic alignment.
- Digital Manual Access: A QR code is provided for easy access to a digital copy of the kitchen installation manual, offering convenience for users who prefer digital resources or need to quickly reference instructions on a smart device.
Maintenance Features
While the manual primarily focuses on assembly, some aspects touch upon maintenance or considerations that contribute to the longevity and proper functioning of the unit:
- Durable Construction (Implied): The use of various panels, screws, and KD blocks suggests a robust construction designed to withstand daily kitchen use.
- Adjustable Hinges: Step 15 explicitly mentions fitting and adjusting the doors (see kitchen installation manual), which is a crucial maintenance feature. Properly adjusted hinges ensure doors close correctly, prevent sagging, and extend the lifespan of both the doors and the cabinet.
- Secure Installation: The emphasis on securing the unit to the wall (step 10) and using wall brackets (step 1) ensures stability, preventing tipping and potential damage, thereby contributing to its long-term integrity.
- Environmentally Friendly Disposal: The "Important Notes" section advises ensuring packaging is disposed of in a safe environmentally friendly way, promoting responsible waste management.
- Reference to Kitchen Installation Manual: The document frequently refers to the main kitchen installation manual for details on cabinet installation, hinge and door fitting/adjustment, and general information. This indicates that the unit is part of a larger kitchen system, and adherence to the broader manual's guidelines is essential for proper maintenance and longevity.
- Scribing Panels: Step 11 mentions scribing panels to the wall as required. This customization ensures a tight fit against uneven walls, preventing gaps where dust or debris could accumulate, thus simplifying cleaning and maintaining a neat appearance.
- Checking Panel Sizes: The note "Ensure panel sizes are checked before cutting" (near wine rack diagram) is a preventative measure. Correctly sized and cut panels ensure a proper fit, reducing stress on joints and components, which contributes to the unit's structural integrity and reduces the need for future repairs.