90°
20x
EN
FR
IT
ES
PT
RU
DE
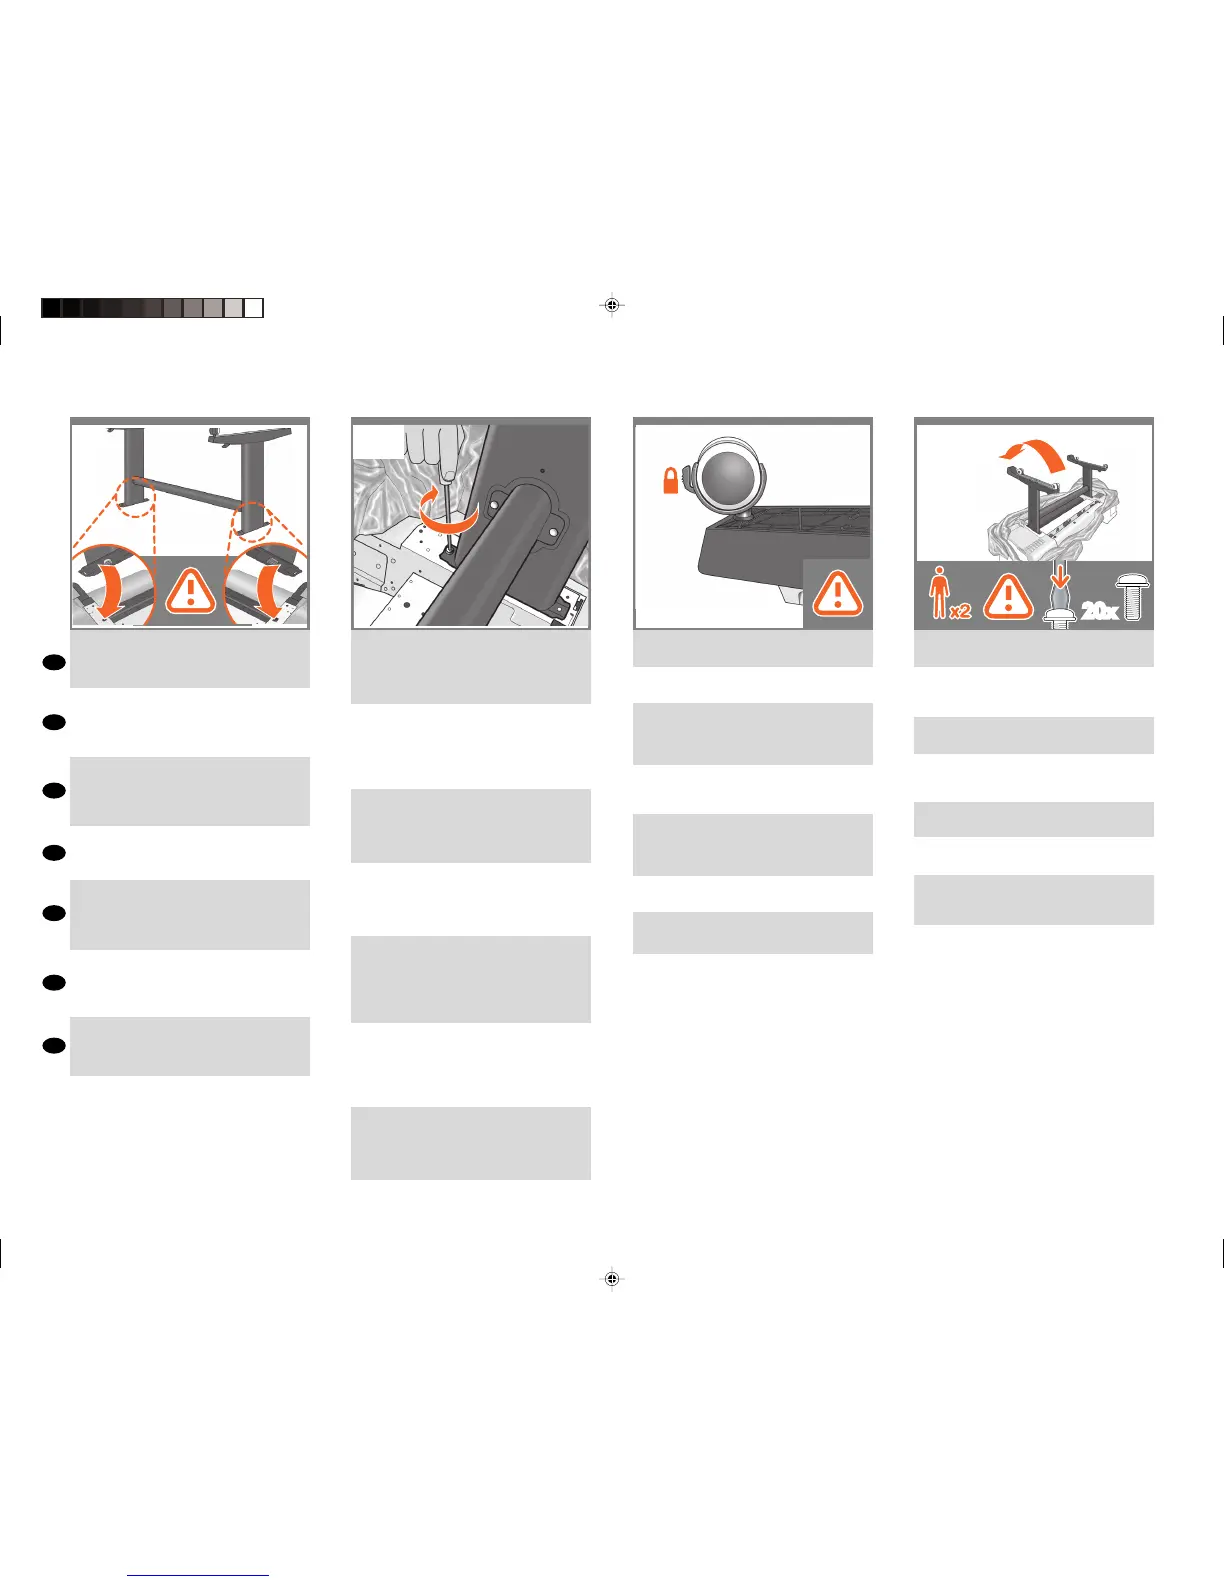
Place the stand on the product slowly and carefully,
so that the colored buttons on the legs t into the
corresponding holes in the product. Notice that the
product body is upside down.
Placez doucement et avec précaution le support sur
le produit, en faisant en sorte que les boutons de
couleur des montants correspondent aux trous dans le
produit. Vous remarquerez que la partie principale du
produit est à l’envers.
Setzen Sie den Standfuß langsam und vorsichtig
so auf den Produkt, dass die farbigen Zapfen
genau in die entsprechenden Aussparungen
am Produkt greifen. Beachten Sie, dass die Basisein-
heit des Produkts verkehrt herum liegt.
Collocare il piedistallo sul prodotto lentamente e
con cautela, in modo che i bottoni colorati dei piedi
vengano inseriti correttamente nei fori del prodotto
corrispondenti. Il corpo del prodotto è capovolto.
Coloque el soporte en el producto lentamente y con
cuidado de tal forma que los botones de colores de
la patas encajen en los correspondientes oricios
de el producto. Observe que el cuerpo del producto se
encuentra boca abajo.
Coloque o suporte no produto lenta e cuidadosamente
para que os botões coloridos se encaixem nos orifícios
correspondentes do produto
Observe que o corpo do produto está de cabeça
para baixo.
Поставьте основание на принтер так, чтобы цветные
выступы стоек вошли в соответствующие отверстия
принтера. Обратите внимание, что корпус
принтера лежит вверх дном.
When the legs are correctly located on the product,
attach them to the product using two screws for
each leg. Check that you have used a total of twenty
screws, and that all have been tightened. You should
have two screws left over, which are spare.
Lorsque les montants sont correctement positionnés sur
le produit, xez-les à le produit en utilisant deux
vis pour chaque montant. Vériez que vous avez
utilisé les vingt vis et qu’elles sont toutes correctement
vissées. Il devrait vous rester les deux vis de
remplacement.
Wenn die Beine richtig auf den Produkt aufgesetzt
sind, befestigen Sie sie mit jeweils zwei Schrauben.
Vergewissern Sie sich, dass Sie 20 Schrauben ange-
bracht und alle fest angezogen haben. Die beiden
Reserveschrauben sollten übrig sein.
Quando i piedi sono posizionati correttamente sul
prodotto, ssarli utilizzando due viti per ogni piede.
Vericare di aver utilizzato un totale di venti viti e che
tutte siano ben strette. Dovrebbero rimanere due viti
inutilizzate di ricambio.
Cuando las patas estén situadas correctamente en
el producto, fíjelas a ella utilizando dos tornillos
para cada pata. Compruebe que ha utilizado un
total de veinte tornillos y que todos ellos han sido
apretados. Deberían quedar dos tornillos, que son los
de repuesto.
Quando as pernas estiverem localizadas
corretamente no produto, xe-as usando dois
parafusos para cada perna. Verique se foram
usados vinte parafusos no total e se todos foram
apertados. Devem sobrar dois parafusos, que são
de reserva.
Правильно расположив стойки на корпусе
принтера, прикрепите каждую стойку к корпусу
двумя винтами. Убедитесь, что всего использовано
двадцать винтов и каждый из них плотно затянут.
Должно остаться два запасных винта.
Check that the wheels on the stand are locked.
At this point you will have two spare screws.
Vériez que les roulettes du support sont verrouillées.
À cette étape, vous disposez de deux vis de réserve.
Vergewissern Sie sich, dass die Rollen des Standfußes
blockiert sind.
An dieser Stelle verfügen Sie über zwei Er-
satzschrauben.
Vericare che le ruote del piedistallo siano bloccate.
A questo punto saranno disponibili due viti di
ricambio.
Compruebe que las ruedas del soporte estén blo-
queadas.
En este momento dispondrá de dos tornillos de
repuesto.
Verique se as rodas do suporte estão travadas.
Então, você terá dois parafusos de reposição.
Убедитесь, что колесики основания застопорены.
На этот момент у вас будет два свободных винта
Rotate the product 90 degrees. IMPORTANT:make
sure that the roll feeds are facing downwards.
Faites pivoter le produit à 90 degrés. IMPORTANT :
vériez que les supports d’impression se trouvent face
vers le bas.
Drehen Sie das Gerät um 90 °. WICHTIG: Die Rol-
lenfüße müssen nach unten zeigen.
Ruotare il prodotto di 90 gradi.
IMPORTANTE:accertarsi che gli alimentatori a rotolo
siano rivolti verso il basso.
Gire el producto 90 grados. IMPORTANTE: asegúrese
de que los alimentadores del rollo miren hacia abajo.
Gire o produto 90°. IMPORTANTE: Verique se todas
as alimentações do rolo estão voltadas para baixo.
Поверните продукт на 90 градусов. ВАЖНО:
убедитесь, что бумага расположена лицевой
стороной вниз.
23 25 2624
Hewlett-Packard Company - Learning Products - Barcelona

 Loading...