Do you have a question about the Hunter Hardwick 50593 and is the answer not in the manual?
Important safety instructions to read and keep for reference during installation and use.
Ensure adequate clearance from blades to walls and floor.
Verify the outlet box is secured to the building structure for fan support.
Assess ceiling slope for appropriate mounting methods and accessories.
Use a standard downrod for flat ceilings; a shorter one for low profile.
Requires a longer downrod and potentially an Angled Mounting Kit for slopes > 34°.
Instructions on determining the need for an angled mounting kit using a guide.
Use provided machine screws and washers for existing outlet boxes.
Use wood screws and washers for securing to support structures.
Remove pre-installed setscrew to allow downrod insertion.
Pass wires through downrod; hand-tighten downrod and trim wires.
Tighten the setscrew firmly with pliers to prevent fan fall.
Slide the canopy over the downrod and wires, aligning it for installation.
Place the downrod ball into the slot in the ceiling bracket.
Connect ceiling wires to fan wires based on switch configuration.
Connect ceiling wires to fan wires for independent fan and light control.
Connect all grounding wires (green, green/yellow, or bare copper) securely.
Partially install two light kit screws into the motor housing.
Align keyhole slots with screws, wrap, and install third screw.
Connect single-pin connectors, white wires, and blue/black wires.
Install and tighten the three switch housing screws.
Install included bulbs into sockets; replace with same wattage if needed.
Install two AAA batteries into the remote transmitter.
Toggle dimming mode by long-pressing 'Fan Speed Up' and 'Fan Speed Down'.
Mount cradle using adhesive strip by pressing firmly for 30 seconds.
Mount cradle using screws, drilling pilot holes and using anchors if needed.
Check power switch, circuit breaker, wiring connections, and blade freedom.
Ensure proper blade installation, hanger ball seating, and use balancing kit.
Verify correct blade installation and check for cracked blades.
Address erratic remote behavior, limited range, pairing, and multiple remote interference.
Contact Hunter with proof of purchase; do not ship parts to Hunter.
Covers motor (limited lifetime), other parts (one-year), and LED kits (three-year).
Excludes labor, bulbs, normal wear, damage from misuse, improper installation, or acts of God.
Explains how state laws provide specific legal rights regarding warranty coverage.
Follow numbered steps to remove the standard downrod and reassemble with a new one.
Crucial safety advice for tightening setscrews to prevent fan fall.
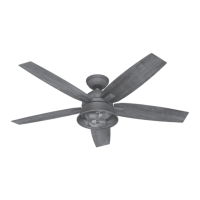
| Fan Type | Ceiling Fan |
|---|---|
| Model Number | 50593 |
| Brand | Hunter |
| Blade Span | 52 inches |
| Number of Blades | 5 |
| Motor Type | WhisperWind |
| Light Kit Included | Yes |
| Number of Speeds | 3 |
| Reversible Motor | Yes |
| Energy Star Certified | No |