5
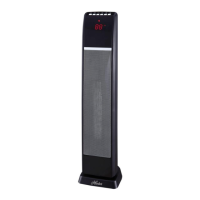
PARTS OF THE HEATER
Parts of the Heater
1.
2. LED Display
3. Safety Grille
4. Base
5. Remote Control
6. Power Light
Control Panel
Symbols
OPERATING INSTRUCTIONS
1. Place the heater on a firm, level surface, after assembling per
this manual. Plastic or rubber tabs, like the feet on this unit, may
stick to furniture surfaces and/or hardwood floors. The unit may
leave a residue that could darken, stain or leave permanent
blemishes on the finish of certain furniture surfaces, including
wood surfaces, and/or hardwood floors.
2. Plug the cord set into a 120 volt AC outlet. Be sure that the
plug fits tightly into outlet. When plugs fit loosely into
receptacles, they may slip partially or completely out of the
receptacle with only the slight movement of the attached cord.
Receptacles in this condition may overheat and pose a serious
fire hazard; if covered by a curtain or drape, the fire hazard is
even greater.
3. When the heater is initially plugged in, there will be a "beep"
and the Power Light will come on indicating that there is power
to the unit. The Power Light will remain lit until the heater is
unplugged from the electrical outlet. (Figure 2)
4. Turn the heater ON by pressing the Power Button .
5. Press the and buttons at the same time for two
seconds to change the display to show the temperature reading
in Celsius. Press the same two buttons together again to change
the display back to show the temperature reading in Fahrenheit.
6. Upon turning the heater on, the unit will be in HIGH heat.
7. Press the button to switch over LOW or HIGH heat.
(Figure 2)
Power Button
H/L Heat Button
Oscillation Button
High Temperature Setting Button
Low Temperature Setting Button
Timer Button
Figure 2
Operation
(Figure 1)
81603-01 R20140228
Figure 1
5
2
3
1
4
6