Do you have a question about the Hunter Hydrawise WIFI-EXT-KIT and is the answer not in the manual?
Explains the purpose of the Wi-Fi extension kit, its applications, and cable specifications.
Open the front panel to access the antenna compartment for installation.
Locate and remove three Phillips screws from the left side of the panel's back.
Unthread the current antenna and thread on the extension cable, attaching the new antenna.
Route the antenna cable through the bottom facepack channel, re-installing the cover.
Route the cable through 3/4" conduit using standard fittings to the desired location.
Route cable and antenna through a 3/4" threaded adapter with the male end facing up.
Insert antenna into the holder tube, sliding to adjust length, and fit cable through slot.
Drop the antenna holder into the conduit fitting, resting its rim on the fitting's top.
Add a threaded cap or glue cap to prevent water entry and complete the installation.
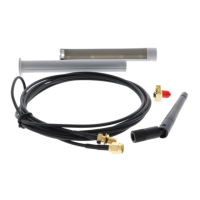
The Hunter Hydrawise HCC Wi-Fi Antenna Extension Kit is designed to enhance the Wi-Fi signal reception for the Hunter Hydrawise HCC controller, particularly in environments where the controller's built-in antenna might struggle to maintain a strong connection with the router. This kit is not a signal booster but rather a solution to reposition the antenna closer to the router, thereby improving signal visibility and reliability. It is particularly useful in situations where the controller is located behind obstructions, around corners, or at a distance that degrades the Wi-Fi signal. By extending the antenna's reach, the kit helps to mitigate signal loss caused by physical barriers or distance, ensuring a more stable and consistent connection for the smart irrigation system.
The kit includes two distinct cables to provide flexibility in installation. A thicker cable offers a 9-foot extension, while a thinner cable provides a 3.5-foot extension. This allows users to choose the appropriate length based on their specific installation needs and the proximity of the router. It is crucial to note that only one cable extension should be used at a time, as combining both cables will result in signal loss, counteracting the kit's intended purpose. The cables are designed for installation within a 3/4-inch conduit, which helps protect them from environmental elements and provides a neat, professional installation. The kit also comes with the necessary mounting hardware to facilitate a secure and proper setup.
Installation of the Wi-Fi Antenna Extension Kit involves several steps, starting with accessing the antenna compartment of the HCC controller. The process begins by opening the front panel of the controller. Once the front panel is open, the user needs to remove three Phillips screws located on the left-hand side of the back of the panel. This step allows access to the existing antenna. The next step involves unthreading the existing antenna from its connection point. The extension cable is then threaded onto this connection point until it is hand-tightened, ensuring a secure electrical connection. The included antenna, which is designed to work with the extension cable, is then attached to the other end of the extension cable. This setup effectively relocates the antenna's receiving point away from the controller itself.
After connecting the extension cable and antenna, the cable needs to be routed through the controller's housing. The manual specifies routing the antenna cable through the channel at the bottom of the facepack. It is important to re-install the plastic cover over the compartment once the cable is routed to protect the internal components. A key recommendation during this stage is to avoid drilling into the cabinet. Instead, users should only utilize existing conduit knockouts for routing the cable, preserving the integrity and weather resistance of the controller's enclosure. This ensures that the controller remains protected from the elements and that its warranty is not voided by unauthorized modifications.
The next phase of installation involves routing the antenna cable from the enclosure through a 3/4-inch (20 mm) plastic electrical conduit. Standard fittings should be used to position the antenna where required, ensuring that the total length of the cable does not exceed the supplied length. This conduit provides protection for the cable and allows for a clean and organized installation, especially in outdoor environments where the cable might be exposed to weather or physical damage. The manual then details how to route the cable and antenna through a standard 3/4-inch (20 mm) threaded adapter, with the male threaded end pointing upwards. This adapter serves as the base for the antenna holder.
The antenna holder itself is designed for easy assembly and adjustment. The antenna is inserted into the open side of the lower tube of the holder, with the cable fitted through a designated slot. The length of the holder can be adjusted by sliding the upper body into the lower body, allowing the user to customize the antenna's height and position for optimal signal reception. Once the antenna holder is assembled and adjusted, it is dropped into the threaded conduit fitting. The rim of the antenna holder is designed to rest on top of the fitting, securing it in place.
The final step in the installation process involves protecting the connection from environmental ingress. A threaded cap is recommended, or a glue cap can be used, to prevent water entry into the conduit fitting. This is a critical step, especially for outdoor installations, as it protects the electrical connections from moisture, which can lead to corrosion and signal degradation. By ensuring a watertight seal, the longevity and reliability of the Wi-Fi extension kit are significantly enhanced. This completes the installation, allowing the controller to utilize the extended antenna for improved Wi-Fi connectivity.
In terms of usage features, the primary benefit of this kit is enhanced Wi-Fi signal visibility. By allowing the antenna to be positioned closer to the router, the kit helps overcome common obstacles like walls, large appliances, or other structures that can attenuate Wi-Fi signals. This results in a more stable connection, which is crucial for the reliable operation of a smart irrigation system that relies on consistent communication for scheduling and remote control. The flexibility offered by the two cable lengths (9 feet and 3.5 feet) allows for tailored installations, whether the router is just a short distance away or requires a more significant extension. The design for conduit installation ensures that the cables are protected, making the solution robust for both indoor and outdoor environments. The adjustable antenna holder further contributes to optimizing signal reception by allowing precise positioning of the antenna.
Maintenance features for the Wi-Fi Antenna Extension Kit are minimal, primarily focusing on proper installation to ensure long-term reliability. The use of conduit for cable protection is a key maintenance-preventive measure, shielding the cables from physical damage, UV exposure, and moisture. The recommendation to use a threaded or glue cap to prevent water entry is also a critical maintenance aspect, as it prevents corrosion of the electrical connections. Once installed correctly, the kit is designed to be largely maintenance-free. Regular checks for physical damage to the conduit or antenna, especially in harsh outdoor environments, might be beneficial, but generally, the robust design aims for a set-it-and-forget-it approach. The kit's components are built to withstand typical outdoor conditions when properly installed, ensuring consistent performance without the need for frequent intervention. Should any issues arise, troubleshooting would typically involve checking the physical connections and ensuring the antenna is positioned optimally, as well as verifying the router's signal strength. The emphasis on using only one extension cable at a time is also a maintenance guideline to prevent signal degradation.
| Connector Type | RP-SMA |
|---|---|
| Wireless Standard | 802.11 b/g/n |
| Frequency | 2.4 GHz |
| Compatibility | Hydrawise controllers |
| Cable Length | 3 m (10 ft) |
| Function | Extends Wi-Fi range |