This document outlines the use and care of a 52-inch, 15-drawer tool chest and cabinet set, designed to provide organized storage for tools and equipment. The set is intended for use in various settings, from personal workshops to professional environments, offering robust construction and practical features for tool management.
Function Description
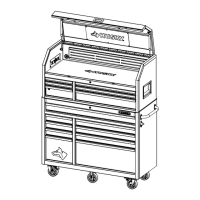
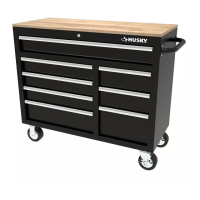
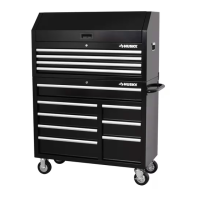
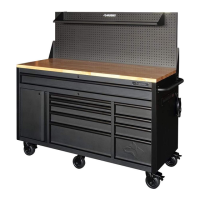
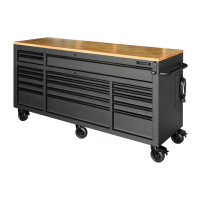
The Husky 52-inch, 15-drawer tool chest and cabinet set serves as a comprehensive storage solution for tools and other items. It comprises a top chest and a bottom cabinet, each equipped with multiple drawers of varying sizes to accommodate different types of tools. The chest provides additional storage on top, often with a hinged lid for quick access to frequently used items. The cabinet, being the base unit, typically features larger drawers and is equipped with casters for mobility. The primary function of this set is to organize, protect, and secure tools, making them easily accessible while preventing loss or damage. The drawers are designed with smooth-gliding slides for easy opening and closing, even when loaded. The entire unit can be locked, ensuring the security of its contents. An integrated power strip or charging station is often included, allowing for convenient charging of cordless power tools and other electronic devices directly within the unit.
Usage Features
The tool chest and cabinet set offers several features that enhance its usability and convenience:
- Drawer Management: The drawers are designed for smooth operation. To remove a drawer, fully extend the empty drawer, then push up one release lever while pulling down on the other release lever. This action releases the drawer from its slides, allowing for complete removal. When re-inserting a drawer, extend the drawer slides, align the brackets on each side of the drawer with the slots in the slides, and carefully push the drawer in until it is properly seated. Once inserted, fully close the drawer to set the slides in their proper positions. This mechanism ensures that drawers can be easily removed for cleaning or reorganization and securely re-inserted.
- Locking Mechanism: The chest features a locking mechanism to secure all drawers simultaneously. To unlock the chest, simply turn the key. Lifting the cover typically unlocks the drawers, providing access to the contents. When locking the chest/cabinet, it is crucial to ensure all drawers are completely closed for the lock bars to engage properly and secure the unit.
- Mobility: The cabinet is equipped with casters for easy movement. There are two types of casters: fixed casters and swivel casters. The swivel casters are typically attached to the same side as the handle and the opposite side, allowing for directional control. The fixed casters are usually attached to the center of the cabinet, providing stability. When moving the unit, it is essential to engage the brakes on the casters once the unit is in its desired location to prevent accidental rolling. Before moving the product, ensure all drawers are locked to prevent them from opening and potentially causing instability or tipping.
- Handle and Bottle Opener Attachment: The cabinet handle is designed for easy attachment. Position the handle over the pre-drilled holes on the cabinet and secure it with the provided bolts, tightening them with the supplied wrench or a 10mm wrench/socket. The holes in the cabinet are tapped, so no nuts are required. Similarly, a bottle opener can be attached to the cabinet by positioning it over the designated holes and securing it with screws, tightened with a screwdriver.
- Rubber Grommet for Cord Management: The top till of the chest includes a rubber grommet for cord management. When passing cords into the box, always feed them from the rear. Once the head of the cord is in place, pull it back slightly (2-3 inches) to ensure the weather-resistant "starbursts" of the grommet face toward the outside of the box. This prevents moisture ingress and protects the electrical connections. It is important never to push the cord from inside the box, as this could expose mating plug points to the environment, increasing the risk of electrical hazards. Always follow all electrical safety precautions when using the grommet for cord management.
- Electrical Safety: The unit may include power supply cords for integrated charging features. It is critical to follow all electrical safety guidelines. Do not plug cords into outlets with wet hands. Avoid using the tool chest near water sources like bathtubs, showers, or swimming pools. Ensure that chest/cabinet plugs match the outlet and never modify the plug in any way. Do not use adapter plugs with grounded chest power strips. Unmodified plugs and matching outlets reduce the risk of electric shock. Avoid body contact with earthed or grounded surfaces, as this increases the risk of electric shock. If the unit has two power supply cords, ensure both are unplugged before any servicing or cleaning.
- Extension Cord Use: If an extension cord is used, follow all manufacturer's warnings and instructions. Do not insert an extension cord through a hole without a grommet. Use only a three-wire extension cord with all three prongs intact, and never remove the round grounding prong. The extension cord must be connected to a 125 Volt GFCI protected outlet with proper ground. If a GFCI outlet is not available, use an extension cord with built-in GFCI protection. Always check the insulation and plugs of the extension cord before using, and do not use a worn or damaged cord. Do not overload the extension cord. Remove the extension cord from the hole before moving or transporting the storage chest. Only use an extension cord rated for outdoor use. Do not connect an extension cord to an outlet that also supplies critical safety equipment with power.
Maintenance Features
Proper maintenance ensures the longevity and optimal performance of the tool chest and cabinet set:
- Caster Maintenance: To ensure smooth mobility, grease the casters annually using high-quality bearing grease. This prevents friction and wear, extending the life of the casters.
- Drawer Maintenance: Lubricate the drawer slides semi-annually. This helps maintain the smooth operation of the drawers, preventing them from sticking or becoming difficult to open and close.
- Cleaning: Periodically clean the drawer fronts, drawer trim, and other surfaces with a mild detergent and water. For grease and oil stains, use a standard nonflammable cleaning fluid. Regular cleaning prevents dirt and grime buildup, preserving the appearance and functionality of the unit.
- Cordless Power Tool Battery Chargers: If the unit includes a charging station, refer to the charger's owner's manual for proper use and care of the charger and batteries. Place chargers and electrical connections in the till. Chargers are for dry location use only; do not expose them to liquid, vapor, or rain. If a charger becomes wet, do not attempt to use it. Unplug the extension cord from the supply before handling a wet charger or cords. Only use chargers and batteries that are intact and operating properly. Do not touch metal prongs when plugging the charger into an extension cord. Keep flammable materials like paper or rags away from the charger, cords, or connections. Do not place or attempt to charge lead-acid, car-type batteries in the storage chest.