Do you have a question about the Husqvarna 315, 320 and is the answer not in the manual?
Always disconnect power before performing cleaning or maintenance work.
Always use approved safety gloves. Use approved face mask or safety goggles.
Clean your chain saw regularly. Do not use a coiled extension cord. Voltage: 230 V.
CAUTION! Chain saws are dangerous! Read operating instructions carefully.
Do not expose saw to rain or moisture. Disconnect power in case of damage to power cable.
Maximum permissible guide bar length. Double-insulated design. Conforms to CE directives.
Rated voltage, output, frequency, slip clutch, controls, and saw weight information.
Chain lubrication capacity, consumption, and noise/vibration emission specifications.
Details on recommended bar length, chain speed, pitch, gauge, and drive links.
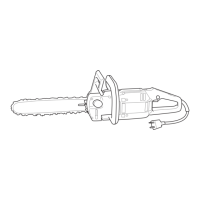
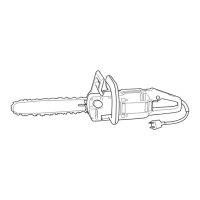
Identification of handles, controls, chain tensioner, oil reservoir, and other primary saw parts.
Identification of safety features like chain brake, kickback guard, chain catcher, and accessories.
CAUTION! Do not modify the saw. Use only original accessories for safety.
Read instructions, check chain/bar, start safely, ensure oil reaches chain.
Guidelines for extension cord use, wire gauge, length, and voltage requirements.
General principles for safe operation, including grip, work area, and avoiding hazards.
Recommended safety gear: helmet, goggles, hearing protection, safety boots, and gloves.
Keep area clear, maintain distance, avoid shock, handle cables carefully, don't operate in wet conditions.
Explanation of double insulation. Tighten chain firmly. Use saw only on wood.
Stand safely, grip with both hands, don't force cut, secure short logs before sawing.
Examine for damage, use authorized service, store safely out of reach of children.
Kickbacks are sudden and violent. Improper setup increases risk. Avoid ground contact.
Firm grip with thumbs and fingers. Know kickback causes to reduce surprise.
Be careful during limbing. Avoid cutting above shoulder height. Maintain full speed.
Use recommended combinations, smaller bar radius reduces kickback. Follow maintenance.
Manual and inertia activation of the chain brake. Slip clutch protects against overload.
Purpose of kickback guard. Use chain brake as parking brake. Release brake by pulling guard back.
Maintain firm grip. Chain brake activation depends on kickback strength and saw position.
Clean debris from brake band and clutch drum. Inspect guard for defects and free movement.
Test manual activation by twisting wrist. Test inertia activation by dropping saw onto stump.
Designed to catch broken or derailed chains. Ensure it is undamaged.
Protects right hand and prevents interference from debris during operation.
Slip clutch protects from overload. Electronic protection stops saw when tripped.
Always wear gloves. Ensure chain is properly tensioned to prevent derailment.
Steps for mounting the guide bar and fitting the chain around the drive sprocket.
Tension chain using screw until slack is gone but chain moves freely by hand.
Check new chain tension frequently during break-in. Regular tensioning compensates for wear.
Reduces kickback, derailing, and breakage. Achieves maximum cutting effect and chain life.
Use recommended equipment, ensure sharp cutters, maintain depth-gauge height.
Keep chain tensioned properly. Ensure automatic oiling system is functioning.
Automatic oiling. Use specific chain oil, consider viscosity. Avoid old motor oil.
Start saw and check for oil spatter. Full reservoir lasts approximately 20 minutes.
Check oil passage, guide bar groove, and nose sprocket if system seems faulty.
Inspect for cracks, stiffness, wear, cutter length. Discard worn chains.
Regularly check drive sprocket wear and replace if it becomes excessive.
Secure footing, grip handles firmly, engage lockout button and trigger.
Release power trigger. If saw doesn't stop, use chain brake and disconnect power.
Dull chains need more pressure, produce small chips. Improper filing increases kickback.
Pay attention to top-plate, cutting, and horizontal file angles. Use file guides for efficiency.
File from inside out, lift file on return. Ensure cutters are equal length. Discard worn chains.
Saw straight through, be careful of ground contact at breakthrough.
For one-end support, cut 2/3 through then from top. For two-end support, start top then bottom.
Most kickbacks occur during limbing. Pay attention to kickback danger zone on tensioned limbs.
Apply crosscutting principles. Cut complicated branches in stages. Ensure secure footing.
Felling requires experience. Observe danger zone around the tree. Do not attempt if unqualified.
Consider tree lean, wind, branches. Clear area and identify retreat path (135° angle).
Steps for making the notch (top/bottom cuts) and the felling cut for controlled tree fall.
Leave hinge wood (1/10 diameter) to steer the falling tree. Avoid sawing through it.
Disconnect power. Inspect cable, clean openings, check brake, lubrication, tension, and burrs.
| Recommended bar length | 35-40 cm |
|---|---|
| Vibration level (front/rear handle) | 4.5 m/s² |
| Chain pitch | 3/8" |
| Chain gauge | 1.3 mm |
| Spark plug | NGK |