NVR Quick Guide
Model No.SK-RN08, SK-RN16
Thank you for purchasing our product. If there is any
question or request, please do not hesitate to contact
dealer. This manual is applicable to SK-RN08, SK-
RN16.
Before you start
:
Before installing a hard disk drive (HDD), please make sure the
power is disconnected from the DVR. A factory recommended
HDD should be used for this installation.
Tools Required: Screwdriver.
To install a HDD on your DVR:
- 1 - - 2 - - 3 - - 4 -
- 5 - - 6 - - 7 - - 8 -
3) Connect the power cable to the HDD
4) Re-install the cover of the DVR and fasten screws.
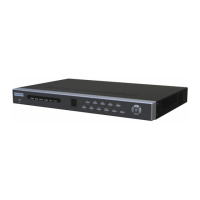
Rear Panel of SK-RN16
No. Item Description
1
2
3
4
5
6
7
8
9
10
11
12
VIDEO OUT
AUDIO OUT
AUDIO IN
VGA
HDMI
USB Port
GROUND
BNC connector for video output.
BNC connector for audio output.
BNC connector for audio input. (Also for voice talk)
Connector for RS-232 devices.
Connects USB disks and devices.
HDMI video output connector.
Connector for LAN (Local Area Network).
Proper startup and shutdown procedures are crucial to expand
ing the life of the DVR.
Before you start:
Check that the voltage of the extra power supply is the same
with the device’s requirement, and the ground connection is
working properly.
Starting up the device:
Steps:
1) Check the power supply is plugged into an electrical outlet. It is
HIGHLY recommended that an Uninterruptible Power Supply (UPS)
be used in conjunction with the device.
2) Press the POWER button on the rear panel. The Power indicator
LED should turn green indicating that the unit begins to start up.
Shutting down the device:
Steps:
1) Enter the Shutdown menu.
Menu > Shutdown
3) Click the Yes button. The following message box pops
up:
4) Turn off the power switch on the rear panel of DVR.
Chapter 5. Using the Setup Wizard
The Setup Wizard can walk you through some important settings
of the device. By default, the Setup Wizard starts once the
device has loaded.
Operating the Setup Wizard:
1) The Setup Wizard can walk you through some important settings
of the NVR. If you don’t want to use the Setup Wizard at that
moment, Time by leaving the “Start wizard when NVR starts?”
checkbox checked.
2) Click Next button on the Wizard window to enter the Login window.
3) Enter the admin password. By default, the password is 12345.
4) To change the admin password, check the New Admin Pass
word checkbox. Enter the new password and confirm the
password in the given fields.
5) Click the Next button to enter the date and time settings window.
7) Click Next button after you configured the network parameters,
which takes you to the HDD Management window.
1) Remove the cover from the DVR by unfastening the screws on
the back and side.
2) Connect the HDD to the motherboard of the DVR with the
included data cable.
2) Click the Shutdown button to enter the following dialog box:
11) Click Next button. Configure the recording for the searched IP Camera.
6) After the time settings, click Next button which takes you back to the
Network Setup window.
To connect RS-485 devices (e.g., pan/tilt unit) to the DVR:
Press and hold the orange part of the pluggable block; insert signal
cables into slots and release the orange part. Ensure signal cables
are in tight.
Note: Make sure the pan/tilt receiver unit is connected to the
D+ and D- of the RS-485 terminal of DVR.
Chapter 3. RS-485 Connections
Chapter 4. Startup and Shutdown
Chapter 1. Hard Disk Installation
Chapter 2. Rear Panel
Power Supply
Connector for RS-485 device. T+and T-pins conncet to
R-pins of PTZ receiver respectively.
Power Switch
Switch for turning on/off the device
DB9 connector for VGA output. Display local video
Output and menu.
RS-232 Interface
Connector for alarm input.
Connector for alarm output.
12VDC power supply.
12VDC power supply.
LAN Interface
RS-485 Interface
ALARM IN
ALARM OUT
8) initialize the HDD, click the Init button. Initialization removes all the
the data saved in the HDD.
9) Click Next button. You enter the Adding IP Camera interface.
10) Click Search to find online IP Camera. Select the IP Camera to
be added, and click the Add button.
12) Click Copy to Copy the settings to other channels.
13) Click OK to complete the startup Wizard.