EasyManua.ls Logo

HYDE 09165 User Manual

HYDE 09165
2 pages
To Next Page IconTo Next Page
Page #1 background imageLoading...
Page #1 background image
ASSEMBLY INSTRUCTIONS
INSTRUCTIONS DE MONTAGE
INSTRUCCIONES DE ENSAMBLAJE
Step 1.
Étape 1.
Peso 1.
Step 3.
Étape 3.
Peso 3.
Step 2.
Étape 2.
Peso 2.
Step 4.
Étape 4.
Peso 4.
Important. This product is meant to be used with wet dry
vacuums with fine particle filter of HEPA filter only. Not for
use with regular vacuums.
Important : Ce produit ne doit être utilisé qu’avec
un aspirateur d’atelier commercial ou industriel avec
un filtre de particule fine HEPA. Ne pas utiliser
d’aspirateur domestique.
Importante: Este producto se ha diseñado para ser usado
solamente con aspiradoras de medios secos y húmedos
con filtro de partículas finas o filtro HEPA. No utilice con
aspiradoras convencionales.
Parts Included:
Hand Sander
6’ Vacuum Hose
Universal Adapter (1” - 2-1/2”)
1 Medium Mesh Screen
(Supplied items illustrated in gray)
Pièces incluses :
Une ponceuse à vacuum manuelle
Un adaptateur universel (2.5cm – 6.4cm)
Une toile abrasive de grain moyen
( les items dans la boîte sont illustrés en gris )
Piezas incluidas:
Lijadora de mano
Manguera aspiradora de 6”
Adaptador universal (1”-2-1/2”)
1 Malla mediana
(Los artículos suministrados
se ilustran en color gris)
1” I.D.
1-1/4” O.D.
2-1/4” I.D.
2-1/2” O.D.
1-3/8” I.D.
1-1/2” O.D.
Control Valve
Adjust suction by rotating rings to open or close
air holes
Soupape de réglage
Ajuster la soupape de réglage de
l’aspiration en tournant la bague pour ouvrir ou
fermer l’orifice
Válvula de control:
Ajuste el poder de succión girando los anillos
para abrir o cerrar los orificios de aire
Dust-free Vacuum Sander - 09165
Ensemble de ponçage sans pous sière - 09165
Lijadora y aspiradora sin residuos de polvo - 09165
Question and Answer IconNeed help?

Do you have a question about the HYDE 09165 and is the answer not in the manual?

HYDE 09165 Specifications

General IconGeneral
BrandHYDE
Model09165
CategorySander
LanguageEnglish

Summary

Assembly Instructions

Control Valve Operation

Adjust suction by rotating rings to open or close air holes for optimal sanding.

Important Usage Requirements

Product requires wet/dry vacuums with fine particle/HEPA filters; avoid regular vacuums.

Detailed Assembly Steps

Step 1: Sanding Screen Attachment

Loosen clamp screws, insert sanding screen, tighten screws, and secure around sander.

Step 2: Head to Hose Connection

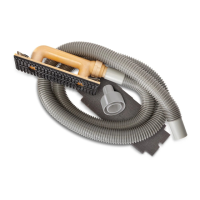
Connect the sanding head directly to the vacuum hose.

Step 3: Hose to Vacuum Connection

Connect the sander hose to the shop vacuum hose using the provided universal adapter.

Step 4: Suction Testing and Adjustment

Test suction, adjust control valves for smooth movement and proper dust collection.

Troubleshooting and Maintenance

Troubleshooting Common Issues

Addresses insufficient suction, difficult head movement, and hose connection problems.

Filter and Maintenance Checks

Clean filter after use or if suction reduces; check vacuum cleaner filter and hose connections.

Safety and Precautions

Personal Protective Equipment

Wear safety glasses and appropriate respiratory protection during operation.

Usage and Environmental Warnings

Use only with commercial vacuums; maintain high humidity to avoid electrostatic discharge.