EasyManua.ls Logo

HYDRA-RIB Portable Basketball System User Manual

HYDRA-RIB Portable Basketball System
29 pages
To Next Page IconTo Next Page
Page #1 background imageLoading...
Page #1 background image
1
04/05 ID# 21179004
© COPYRIGHT 2005 by HUFFY SPORTS
Toll-Free Customer Service Number for U.S: 1-800-558-5234,
For Canada: 1-800-284-8339,
For Europe: 00 800 555 85234 (Sweden: 009 555 85234),
For Australia: 1-800-632-792
Internet Address: www.huffysports.com
HUFFY
HUFFY
SPORTS
REQUIRED TOOLS AND MATERIALS:
Two People
Wood Board (Scrap)
Tape Measure
Step Ladder 8 ft. (2.4 m)
Tape
Garden Hose or Sand 360 lb. (163 kg)
Hammer
Wrenches: (Two) 3/4”, (One) 1/2” (Two) 9/16”or
equivalent sockets, (One) 1/2” Deep well socket
with extension and socket wrench
Support Table
Phillips Head Screwdriver
5/32 Allen Wrench
Portable Basketball System
Owners Manual
Customer Service Center
• N53 W24700 South Corporate Circle • Sussex, WI 53089 • U.S.A.
READ AND UNDERSTAND
OPERATOR'S MANUAL
BEFORE USING THIS UNIT.
FAILURE TO FOLLOW
OPERATING INSTRUCTIONS
COULD RESULT IN INJURY
OR DAMAGE TO PROPERTY.
WARNING!
Question and Answer IconNeed help?

Do you have a question about the HYDRA-RIB Portable Basketball System and is the answer not in the manual?

HYDRA-RIB Portable Basketball System Specifications

General IconGeneral
Backboard MaterialPolycarbonate
Base Capacity35 gallons
Height AdjustmentYes
Rim Height7.5' to 10'
Pole MaterialSteel
Rim Size18"
Base TypePortable
Adjustable Height Range7.5' - 10'

Summary

System Operation and Safety

Critical Safety Instructions

General Warnings for Use and Assembly

Important safety precautions to prevent injury and property damage during operation.

Parts List

Section A: Assemble the Poles

Steps 1-2: Connect Pole Sections

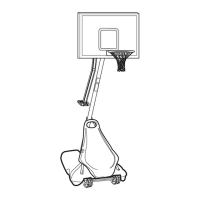
Connects middle pole to top pole and bottom pole to the assembly.

Step 3: Finalize Pole Assembly

Completes pole assembly, ensuring correct alignment and overlap.

Section B: Assemble the Base

Steps 1-2: Install Wheel Assembly

Installs wheels onto the axle and attaches the wheel assembly to the base.

Step 3: Mount Pole Assembly to Base

Secures the pole assembly into the base using various hardware and straps.

Step 4: Secure Tank Struts to Pole

Attaches tank struts to the pole section for structural support.

Steps 5-6: Attach Struts and Pivot Bracket

Secures the tank struts to the base and installs the upper pivot bracket.

Steps 7-8: Install Lower Pivot Bracket and Hinge Tubes

Installs the lower pivot bracket and hinge tubes to the base assembly.

Steps 9-10: Finalize Wheel Bracket Assembly

Re-installs wheels and secures the wheel bracket assembly to the base.

Section C: Assemble Elevator System & Backboard

Section E: Securing the System

Related product manuals