1
2
3
A
D
C
F
H
E
G
I
J
L M
1
2
3
4
B
5
6
5mm
Difusor
Spreader
Importante: Para la instalación y el uso correcto, siga las instrucciones de este
manual. Le recomendamos que utilice los servicios de un técnico calificado.
IMPORTANT: For installation and adequate use, follow the instructions in this manual
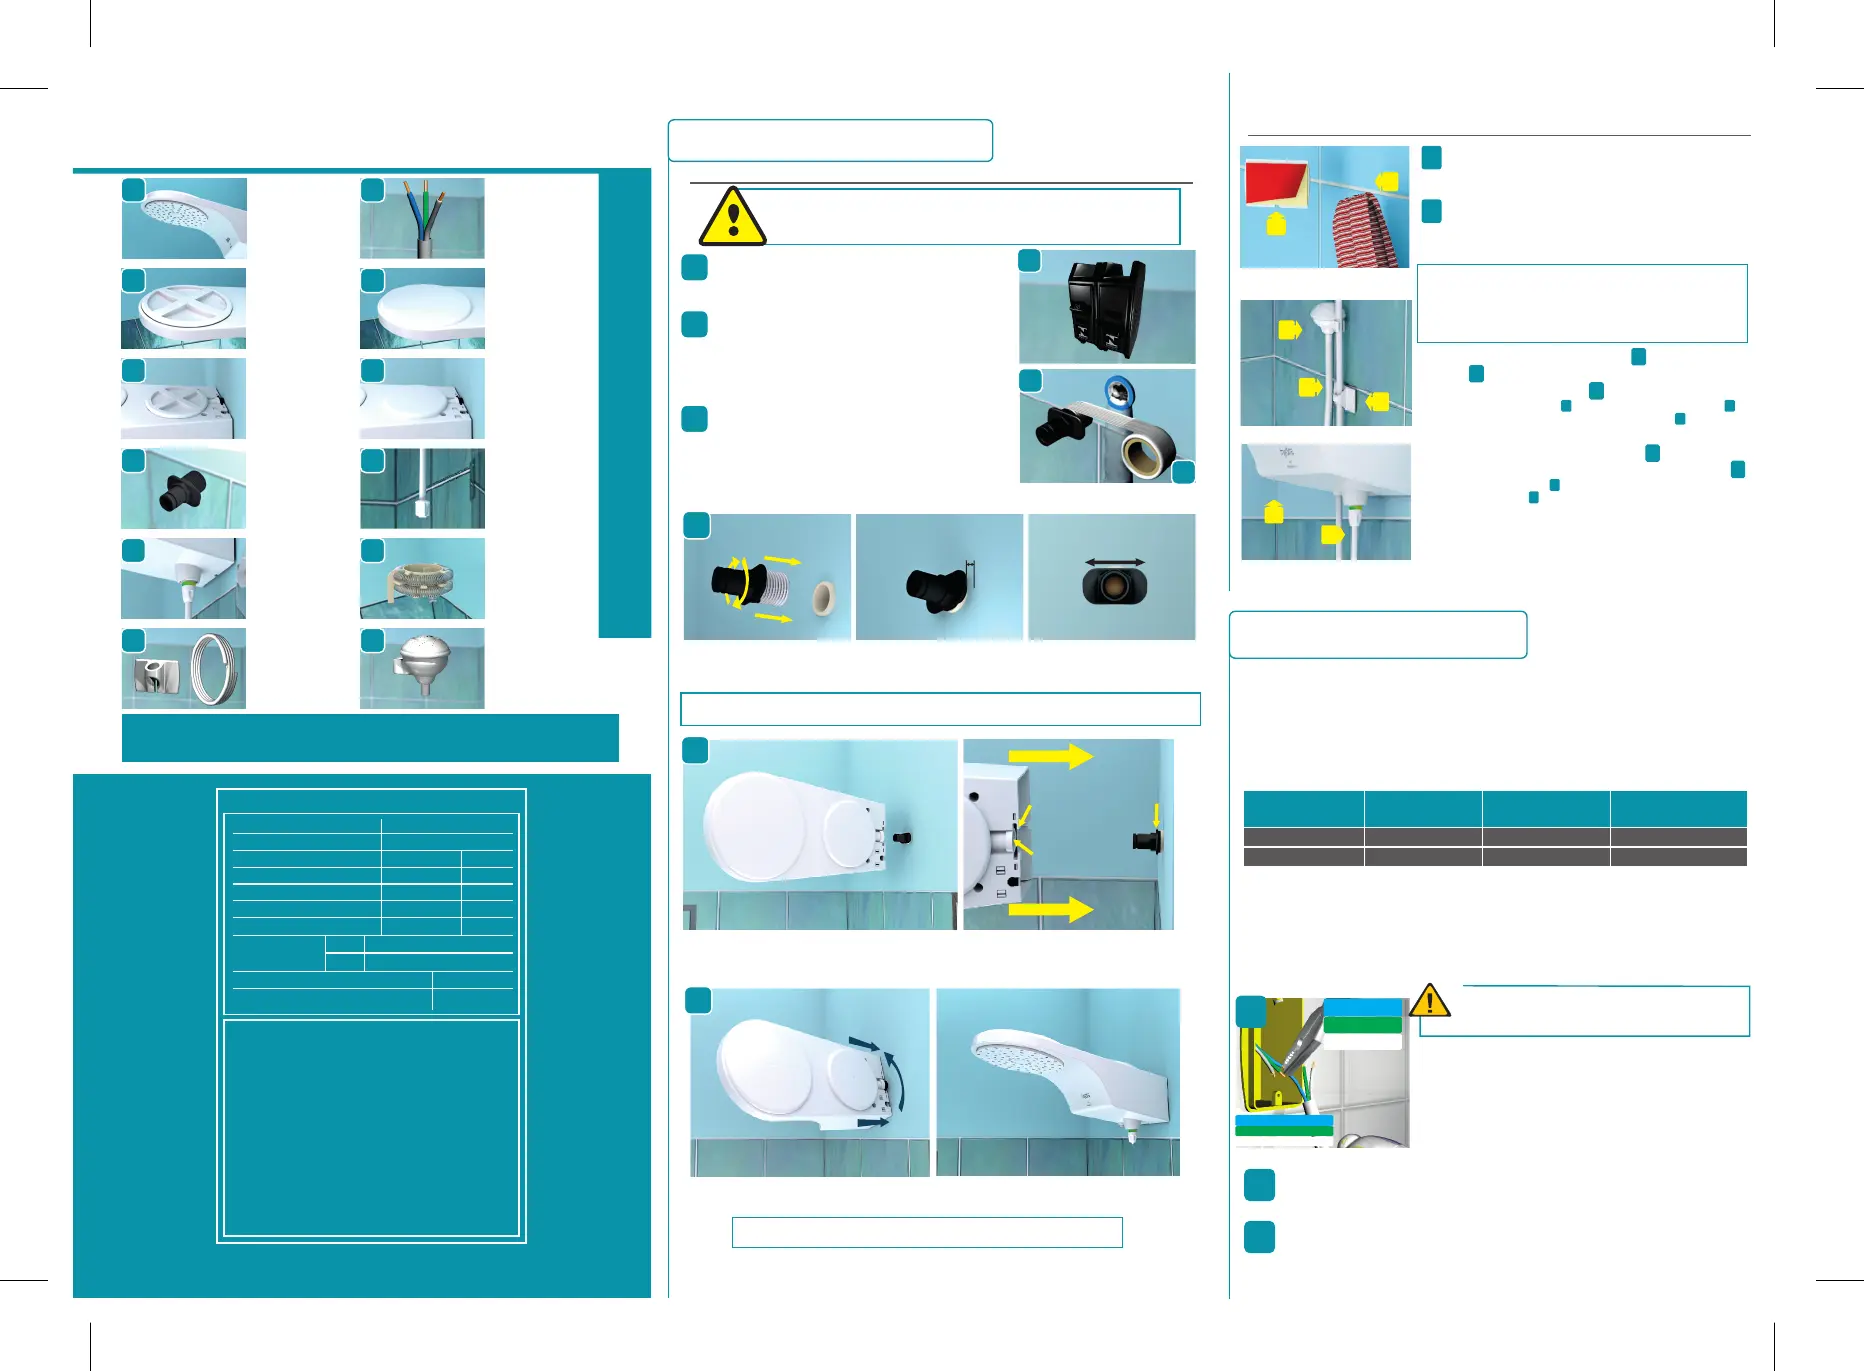
LISTA DE LOS COMPONENTES Y ACCESORIOS
LIST OF COMPONENTS AND ACCESSORIES
Tapa de la
cámara
caliente
Spreader cover
Tapa de la
cámara
caliente
Hot chamber cover
Acople fácil
Easy coupler
Botón
de control
Control Button
Manguerita
+ soporte
Hose + support
Baby Ducha
Baby Shower
Resistencia
Heating element
Vástago
de control
Control hod
Terminación
de la tapa de
la cámara
caliente
Hot chamber
cover topcoat
Terminación de
la tapa del
difusor
Spreader
cover topcoat
Conductor de
Alimentación
Eléctrica:
Encaje y enrosque
Fit and twine
Asa de fijación
del acople fácil
Easy coupler fix tab
Orifício de entrada
del acople fácil
Entry easy coupler orifice
acople
fácil
Easy
coupler tab
Gire la ducha a 90º (posición vertical) y encaje la ducha en el acople fácil,
empujando hasta tocar la pared.
Turn the shower at 90° (vertical) and fit the shower in the easy coupler, pushing until lean on the wall.
Enrosque el encaje fácil en la pared, respetando la distancia de 5mm del asa
hasta la pared, y con las asas en sentido horizontal.
Put the coupler in the wall and spin, respecting the 5mm distance from the tab to wall, with tabs on horizontal.
En caso de que el acople quede flojo, retírelo, coloque más cinta teflon y repita la operación.
If the coupling becomes loose, remove and put more thread seals and repeat.
01. INSTALACIÓN HIDRÁULICA
HYDRAULIC INSTALLATION
1.1 - DUCHA/SHOWER
Caso la tubería sea interna en la pared utilice un acople fácil
prolongado, encontrado en la red de asistencia técnica.
If tubes are inner the wall, use an extended easy coupler. Can bought on the store.
Desconecte la energía en la llave general
(disyuntor).
Turn off the general power key (switcher).
Abra el grifo y deje correr agua por algunos
instantes, para que la suciedad de la tubería
sea removida. Después cierre nuevamente
Open the register and let the water flow for a few moments to
clean the dirt from the tubes. Close it again aſter.
Pase cinta teflón en el encaje de 3 a 4 vueltas
en sentido horario, cuidando para no obstruir la
entrada de agua.
Pass 3 or 4 times the thread seal tape in the coupler for the
right, taking care so you do not obstruct the water entrance.
Distancia entre el asa y la
pared de 5mm
Distance between the tab
and the wall 5mm
Asas en el sentido horizontal
Tabs at horizontal
Tire de la ducha para adelante para probar la fijación.
Pull the shower along for fix test.
Después del encaje, gire la ducha para la posición de uso.
Aſter fitting, turn the shower to use position.
Limpie y seque la superficie donde se aplicará
el fijador de la manguerita.
Clean and dry the surface where the hose support will be applied.
Retire la cinta adhesiva y fije el soporte en la
pared la distancia máxima de 30 cm de la ducha.
Remove the adhesive tape and attach the support on the wall
with a maximum distance of 30 cm of the shower.
1
2
5
Después de haber completado todos los pasos de
instalación, abra el registro y comprobar la
estanqueidad de la ducha.
Aſter you have completed all installation steps, open the registry
and check the sealing of the shower.
IMPORTANTE: Para una buena adherencia, recomendamos
12 horas para una cura. Se puede fijar con buje y tornillo
de fijación, no acompaña.
IMPORTANT: For a good adhesion, we recommend 12 hours for a cure.
Can be fixed with bushing and screw attachment, does not follow.
4
3
2
1
6
7
Pase la manguerita por el apoyo y fije en el baby 3
shower . El baby shower tiene un soporte para 4
conectar en la manguerita .5
Pass the hose by the support and attach it in the baby shower . 3 4
The baby shower has a bracket to attach to the hose .5
Coloque la manguerita en la ducha y el botón de 6
control de la barra de control remoto en la ducha .7
Fit the hose in the shower and the remote control rod in the control6
button in the shower .7
azul - neutro
verde - tierra
Blue wire - Neutral
Green wire - Grounding
White wire - Faze
blanco - fase
2. INSTALACIÓN ELÉCTRICA
ELECTRICAL INSTALLATION
La alimentación debe ser un circuito eléctrico independiente, provisto de disyuntor de
protección no excediendo una longitud de 30m (en caso de que la distancia sea
superior, utilice conductor de diámetro solicitado).
The electrical feeding has to be an independent circuit, provided by a protection switcher and cannot
exceed 30m distance (In case of superior distance, use a conductor with the requested diameter).
Verifique el cableado eléctrico y el disyuntor conforme tabla de abajo:
Verify the electrical wire and the switcher considering sheet below:
POTENCIA (W)
POWER (W)
5500W
110V/127V
6mm²
40A
6800W
220V
4mm²
35A
TENSIÓN (V)
TENSION (V)
CABLE. (mm²)
WIRE (mm²)
PROTECCIÓN (A)
PROTECTION(A)
Antes de comenzar la instalación eléctrica
Verifique que el interruptor esté apagado.
Before starting the electrical installation, verify if the switcher is off
OBS.: Para instalación fase-fase (220V~), utilice disyuntor bipolar. Para instalación fase-neutro
(110V/127V~ o 220V~), utilice disyuntor unipolar. OBS: To faze to faze 220v connection use a two poles circuit
breaker. To faze neutral connection (127V or 220V) use na one pole circuit breaker.
Importante para su seguridad: Para evitar riesgos de descargas eléctricas, el CABLE A
TIERRA de este aparato debe ser conectado a un sistema de puesta a tierra. La instalación
debe seguir la norma NBR 5410. For your safety: To avoid risks of electrical shock, the ground wire of this
device must be connected to a grounding system. The installation shall follow the norms of NBR 5410.
Identifique los cables de su casa, y después identifique los
cables de su ducha. Identify your house wires and, right aſter, identify
your shower wires.
Nota: En caso de que los cablesde su casa, sean diferentes
de los cables de la ducha,aconsejamos que llame a un
técnico para hacer la instalación o identifique el cable
fase através del buscapolo. OBS: In case that your house wires
diverge from your shower wires, it is recommended calling a technic to
perform the installation or identify the faze cable with a test-key.
Conecte los respectivos cables a la ducha, dando3 vueltas y después aislando
con cinta aisladora. Connect the respective shower wires, giving it 3 spins and then isolating it with
isolating tape.
1
2
3
Conecte el disyuntor. La a ducha está lista para ser utilizada.
Turn on the switcher. Your shower is ready.
1.2 - INSTALACIÓN DE LOS ACCESORIOS / Accessories Installation
CARACTERÍSTICAS TÉCNICAS/TECHNICAL CHARACTERISTICS
Distancia Máxima del Disyuntor al Aparato
Maximum distance from the circuit breaker to the product
Mínima/
Minimum
Marca/brand
Modelo/Model
Tensión Nominal/Nominal tension
AWG
Cabelamiento Mínima*/Minimum wire*
Máxima/
Maximum
Hydra
FIT
10 kPa (1 m.c.a./m.w.c** - 1,5 PSI)
400 kPa (40 m.c.a./m.w.c - 58 PSI)
Nº. IP (Grado Protección)/Nº IP (Protection degree)
IP 24
Capacidád/capacity
Presión Operacional/
Operating pressure
Interruptor/Circuit Breaker
110V/127V~
8AWG
6mm²
5500W
40A
220V~
8AWG
4mm²
6800W
35A
30m
Para su seguridad:
Para evitar riesgos de descargas eléctricas el cable a tierra debe ser
conectado a un sistema de puesta a tierra conforme la norma de su país.
La instalación eléctrica y el sistema de puesta a tierra para este producto
debe ser ejecutado por personas calificadas. La resistividad del agua a
22° no debe ser inferior a 1.300Ωcm.
“El fabricante se reserva el derecho de modificar el producto sin aviso
previo”
* Cableado mínimo recomendado hasta 30metros del disyuntor, para valor
arriba del mencionado verificar cableado.
** m.c.a. = metro de colunna de agua.
For your safety:
To avoid risk of eletric shocks this products ground wire must be
connected to a grounding system as to your country rules. The eletric
installation and the grounding system for this product must be executed
by qualified personnel. Water resistivity at 22ºC should not be under
1300OΩcm.
"The fabricant reserves the right to modify the product with no preview
advice." *Minimun rocommended wire until 30 metters from switcher, for
values above the mentioned verify wirement.
** m.w.c. = meter water column.
 Loading...