The HydroMist Pro Mist 35 is a 1/3 HP high-pressure misting pump designed for specific misting applications, primarily evaporative cooling. This user manual provides comprehensive information for its proper use, installation, and maintenance, emphasizing safety and optimal performance.
Function Description:
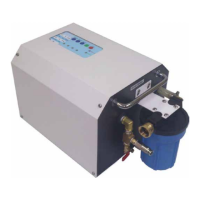
The Pro Mist 35 pump is engineered to generate high-pressure mist, suitable for cooling outdoor spaces. It connects to a water supply and a high-pressure misting system, forcing water through specialized nozzles to create a fine mist. The pump features a control panel with multiple operating modes, including continuous and intermittent misting, allowing users to customize the misting duration and intervals. A key safety feature is the thermal overload protection device, which acts as a circuit breaker to prevent damage from excessive heat or electricity. The pump also includes a pressure regulator to adjust the output pressure, ensuring compatibility with various misting system configurations and preventing over-pressurization.
Important Technical Specifications:
- Model: Pro Mist 35
- Part Number: F10-04-003
- Operating Pressure: Maximum 1000 psi
- Flow Rate: 0.2 GPM (Gallons Per Minute) at 1750 RPM
- Nozzle Capacity: Designed for #2 nozzles (.008″/0.2mm). Supports a minimum of 4 and a maximum of 16 nozzles. HydroMist recommends using stainless steel #2 nozzles for best performance.
- Motor: 115 Volt, Single Phase AC @ 60 Hz, 4 Amp, 1/3 HP Totally Enclosed Induction Motor
- Dimensions (L×W×H): 21.5 x 11.5 x 11.25 inches
- Weight: 41 lbs.
- Water Inlet Temperature: Must not exceed 50°C/120°F
- Water Supply Pressure: Should be at least 30 psi for continuous operation
- Oil Type: ISO 68 oil or equivalent (HydroMist Part# F02-06-001)
- Oil Capacity: Maximum 5 oz. (≈145 ml)
- Extension Cable: Do NOT use an extension cable longer than 30 ft. All extension cables must be outdoor rated with a grounding prong and rated for the required voltage and amperage.
- Warranty: HydroMist One (1) Year Limited Warranty, covering defects in workmanship and materials under normal use and service.
Usage Features:
- Installation: The pump requires installation near electrical and water connections. It should be placed in a location where water leaks or accumulation will not cause damage. The purge hose discharges approximately ½ oz of water when the pump stops or during intermittent modes. HydroMist offers specific hoses (F10-10-009 for 5 ft, F10-10-010 for 10 ft) for permanent connection to a standard garden hose bib. The pump outlet connects to a high-pressure misting system using a slip-lock fitting for 3/8" nylon tube. It is only compatible with high-pressure misting components designed for 1000 PSI.
- Control Panel: Features 5 buttons (OFF, ON, MODE1, MODE2, MODE3) and 6 LED lights (POWER, WARNING, CONTINUOUS ON, MODE 1 ON, MODE 2 ON, MODE 3 ON).
- POWER (Green): Always on when plugged in.
- WARNING (Red): Illuminates if the water pressure cutoff switch detects insufficient water pressure at the inlet. To reset, connect to water, press OFF, then ON or any mode button.
- ON (Continuous Misting): Pump operates continuously until OFF is pressed or water supply is turned off.
- MODE 1 (Intermittent Misting): 15 seconds on, 20 seconds off, repeat.
- MODE 2 (Intermittent Misting): 25 seconds on, 30 seconds off, repeat.
- MODE 3 (Intermittent Misting): 40 seconds on, 40 seconds off, repeat.
- OFF (System Off): Turns the pump off at any time.
- First Time Operation (Purging Air):
- Plug in the pump, turn on the water source, and open the ball valve at the high-pressure misting outlet (keep pump off).
- Remove a misting nozzle from the furthest end(s) of the system.
- Turn on the pump to continuous run. Close the ball valve once a constant stream of water flows from it.
- Allow water to fill misting lines, forcing air out. Turn off the pump once a continuous stream flows from the end(s) of the system.
- Install all removed nozzles.
- Turn on the pump; the system will pressurize.
- Check for leaks or blockages in fittings and nozzles (turn off pump before fixing).
- Pressure Adjustment: The pump comes preset at a maximum outlet pressure of 1000 PSI for a system with 4 nozzles. The pressure regulator knob, located underneath the pump cover on the brass pump head, allows adjustment. Turning counterclockwise decreases pressure, and clockwise increases it. A pressure gauge designed for at least 1000 PSI is required for safe adjustment.
- Storage: For winter months or extended non-use, drain water from the pump and misting system to prevent freezing and cracking.
- Disconnect water supply.
- Run the pump briefly with the ball valve open to expel water from internal cavities.
- Turn off the pump once water stops coming out.
- Drain misting lines, pipes, and rings.
- Safety Precautions:
- Do NOT use during severe storms, flooded areas, or near open bodies of water.
- Only trained personnel should operate the machine.
- Power source must have overload circuit breaker protection.
- Do NOT move the machine during operation.
- Mount on a solid, flat, level, and dry surface.
- Do NOT operate before reading the manual.
- Do NOT open the cover or touch the motor/pump during operation.
- Check electrical cords for good condition before running.
- Do NOT operate below freezing (0°C/32°F).
- Check for oil leakage before use; fix leaks and refill oil if necessary.
- Do NOT increase operating pressure over 1000 psi.
- Ensure all hose and high-pressure fittings are FIRMLY attached and fully seated.
- Using fewer nozzles than recommended can over-pressurize the system and deteriorate pump seals.
- A valve at the end of the misting system is recommended for purging air.
- Check for blocked nozzles during misting; clean or change as needed.
- Keep indoors when not in use.
- If exposed to rain, stop and unplug immediately.
- Use caution when disassembling high-pressure components due to potential residual pressure (up to 1000 psi).
- Running the pump with ice in hoses or pump will cause damage and dangerous over-pressure.
- Do NOT attempt to adjust the pressure regulator without a 1000 PSI pressure gauge.
- Operating above 1000 PSI will quickly degrade internal pump seals.
Maintenance Features:
- Periodic Check and Inspection Schedule:
- Before Operation: Check all fittings for tightness, water lines for leakage, pump for oil leakage, and pump cover for damage.
- Every 50 hours: Check connectors and hoses for damage/loose fittings, check/clean inlet water filter, check nozzles for leaks/blockage, check control panel operation, check electric cord for damage, check oil quality/quantity.
- Every 100 hours: Check oil quality/quantity.
- Every 200 hours: Check connectors and hoses for damage/loose fittings, check/clean inlet water filter, check nozzles for leaks/blockage, check control panel operation, check electric cord for damage, check oil quality/quantity.
- Every 300 hours: Check all fittings for tightness, water lines for leakage, pump for oil leakage, inspect pump cover for damage, check connectors and hoses for damage/loose fittings, check/clean inlet water filter, check nozzles for leaks/blockage, check control panel operation, check electric cord for damage, check oil quality/quantity, change oil, check oil seals, check plungers, check rubber motor mounts.
- Oil Change Procedure:
- Oil must be changed after the first 50 hours of operation, and then every 250-300 hours.
- Use ISO 68 oil (HydroMist Part# F02-06-001).
- Steps:
- Purge pressure and water from the system by opening the ball valve on the pump outlet.
- Remove water supply hose and high-pressure misting hose connections.
- Unplug the pump from the power supply.
- Remove the pump cover by loosening the eight screws.
- Check for oil leakage from the pump body and clean any spills.
- Place a catch pan under the oil drain plug on the bottom side of the pump and unscrew it to drain oil.
- Reinstall and tighten the drain plug after oil has drained.
- Unscrew the oil fill plug on top of the pump housing.
- Add up to 5 oz. of oil through the fill hole using the included squeeze bottle or a funnel.
- Tighten the oil fill plug. Wipe up any spilled oil.
- Visually check pump and motor for tight bolts, screws, and connectors.
- Replace the top cover and tighten screws.
- Cautions for Oil Change:
- Always power off and disconnect before maintenance.
- Irregular maintenance or failure to change oil will damage parts and shorten service life.
- Remove old oil completely; too much old oil affects new oil quality.
- Change oil on a level surface.
- Do NOT change hot oil; pump operation increases oil temperature to dangerous levels.
- Recycle used oil properly; do NOT dump into environment.
- Ensure oil drain and fill plugs are not leaking and are securely fastened.
- Ensure cover screws are securely tightened after oil change.
- Oil Change Guidelines:
- Follow hourly schedule; overdue changes cause component damage.
- Use proper quality oil (ISO 68 or ISO VG 68); avoid dirty or used oil.
- Ensure used oil is drained as much as possible to preserve new oil quality.
- In harsh environments (excess heat, air pollutants, direct sunlight, rain, dust, high humidity, bad air quality), shorten oil change intervals.
- If unused for a long time, oil will deteriorate; check condition before running.
- Reset Button: The pump has a thermal overload protection device with a reset button. If activated, remove the pump cover, press the button, plug in the pump, and ensure it doesn't immediately activate again. Check power supply if the button doesn't stay pressed. Do NOT attempt repairs while plugged in.