Do you have a question about the Hydrofarm COSYS and is the answer not in the manual?
Setup of the distribution ring for CO2 delivery over growing areas.
The Hydrofarm CO2 system is designed to enrich the growing environment with carbon dioxide, a crucial element for plant photosynthesis and growth. This system aims to optimize plant development by maintaining ideal CO2 levels, especially in enclosed growing areas where natural CO2 can be depleted.
The core function of the Hydrofarm CO2 system is to deliver supplemental CO2 gas into a growing area. It achieves this by connecting to a compressed CO2 tank, regulating the gas pressure, and then distributing the CO2 through a flowmeter and a network of tubing. The system is designed to raise CO2 levels to an optimal range, typically around 1500 PPM (parts per million), which is significantly higher than the atmospheric average of 300 PPM. Maintaining these elevated CO2 levels can lead to a 20-100% increase in plant growth rates and flowering under good growing conditions with sufficient light.
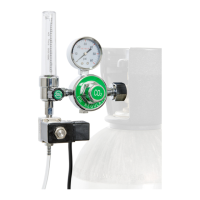
The system includes a regulator assembly that attaches to the CO2 tank. This regulator controls the pressure of the CO2 gas released from the tank. A solenoid valve, integrated into the system, acts as an on/off switch for the CO2 flow, controlled by a programmable timer. This allows for precise scheduling of CO2 enrichment, ensuring that gas is only released when needed, typically during the lights-on period for plants. The flowmeter, a key component, allows users to set and monitor the exact rate at which CO2 is released into the growing environment.
CO2 gas is heavier than air, so the distribution ring, a circular network of tubing, is designed to be suspended above the plants. This placement ensures that the CO2 spreads downward, effectively enriching the air around the plants. The system is intended for use from the seedling stage through harvest.
Setting up the Hydrofarm CO2 system involves several steps to ensure proper and safe operation. Before attaching the regulator to a CO2 tank, it is crucial to slowly open the tank valve for a few seconds to clear any sediment, then reclose it tightly. When attaching the regulator, a washer must be seated evenly in the regulator valve. The tank valve should then be opened very slowly to avoid damaging the internal seals of the regulator.
The distribution tubing is assembled by connecting a shorter extension tube from the flowmeter to a "T" fitting, and then connecting the return end of the circular distribution ring to the other side of the "T" fitting. The distribution ring itself is assembled by screwing in eyelets and threading the tubing through them to create a circular pattern over the growing area. It is important to secure the distribution tubing to prevent interference with lighting or light movement systems.
Adjusting the regulator involves plugging the solenoid cord into a timer and rotating the dial to an "ON" position. The tank valve is then opened very slowly until it is fully open. A screwdriver and crescent wrench are used to adjust the PSI gauge on the regulator to read 30 PSI, and then the locknut is tightened. The solenoid valve is then unplugged.
The programmable timer is a critical feature for controlling CO2 delivery. The recommended setting is to have the system run continuously for 2.5 hours at the beginning of the lights-on period to bring the room's CO2 level up to the desired range. After this initial period, the timer should be set for an intermittent cycle, typically 15 minutes OFF and 15 minutes ON, repeating throughout the lighted period until one hour before the lights turn off. This intermittent delivery helps maintain optimal CO2 levels while accounting for plant usage and room leakage.
Determining the correct flow rate for a specific growing area is a detailed process. It involves calculating the cubic volume of the room (height x width x length). Then, the desired CO2 level (1500 PPM) is used to subtract the existing atmospheric CO2 level (300 PPM) to determine the amount of CO2 needed (1200 PPM). This amount is then multiplied by the room volume and a conversion factor (0.0012) to find the cubic feet of CO2 to add. This calculated amount is then divided over a three-hour period, accounting for the intermittent ON cycles, to determine the flowmeter setting. For example, an 800 cubic foot room might require a flowmeter setting of 0.2 cubic feet per 15 minutes of flow. Once the flow rate is calculated, the flowmeter adjusting knob is used to set the desired flow.
A system check is recommended after setup and adjustment. This involves plugging in the system and slowly rotating the timer dial clockwise to observe the on/off function of the solenoid valve and to verify the CO2 flow using the flowmeter.
The manual emphasizes the importance of careful setup and adherence to instructions to prevent problems. In case of issues, a systematic troubleshooting approach is provided. Users are advised to re-read all instructions to ensure proper setup.
Leakage is a common issue that can affect system performance. The regulator assembly can be tested for leaks using soapy water. All connections up to the flowmeter should also be checked for tightness. If a leak is suspected in any fitting, it can often be remedied by re-attaching it firmly with Teflon tape, which is readily available at hardware stores.
A crucial safety and maintenance instruction is to ALWAYS TURN OFF THE TANK VALVE BEFORE DETACHING ANY PARTS. This prevents uncontrolled release of CO2 and potential damage to the system or injury. The solenoid valve's functionality can be checked by plugging and unplugging it directly into an outlet to ensure it is switching on and off correctly.
If the system is plugged back into the timer, slowly rotating the dial clockwise allows for verification of its on/off functions. If these troubleshooting steps do not resolve a problem, users are instructed to contact the place of purchase to obtain a Return Authorization for the faulty part. The guarantee covers the original owner for three years from the date of purchase, but misuse, abuse, or failure to follow instructions are not covered. For any warranty work, a copy of the purchase receipt or invoice is required. This highlights the importance of retaining purchase documentation for potential future maintenance or warranty claims.
| Voltage | 120V |
|---|---|
| Dimmable | Yes |
| Lifespan | 50, 000 hours |
| Type | LED Grow Light |
| Fuel Type | Electric |
| Product Type | LED Grow Light |
| Light Type | LED |
| Coverage Area | 2' x 2' |
| PPF | 270 µmol/s |
| Spectrum | Full Spectrum |
| Weight | Varies by model |
| Dimensions | Varies by model |