P A G E
22
Pull or loosen the cable wire slightly. Tighten the cable clamp
WARNING: Do not overtighten the cable clamp.
Overtightening the cable clamp may cut the cable and cause injury to the rider or to
others.
Do Step 3 until the brake shoes are the correct distance from the rim.
Turn the locknut(s) against the brake lever and the caliper brake.
WARNING: Do not move the brake shoes away from a wheel
rim that is not true (straight). This can cause the caliper brake to be less effective and
unsafe. To allow safe adjustment of the caliper brake, have a BMX Scooter service shop
true the wheel.
4. Check sheath position:
Make sure both ends of the sheath are fully recessed in the brake lever, sheath stops (if equipped) and
brakes. If not, install sheath in correct position and do Step 3 again. Do this test again, until the sheath
is in the correct position.
5. Test the tightness of the cable clamp:
Squeeze each brake lever with firm pressure. Make sure the cable does not move in the cable clamp. If
the cable moves in the cable clamp, do Steps 3 and 4 again but tighten the cable clamp tighter than
before. Do this test again, until the cable does not move in the cable clamp.
6. Adjust the brake lever reach so the distance from the grip is comfortable to the rider.
Turn the adjustment screw (if equipped) to change the distance of the brake lever from the grip. Make
sure the back of each grip is no more than 3 ½ inches from the front of each brake lever.
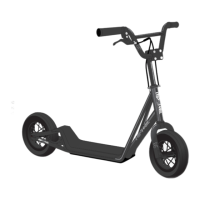
ADJUSTMENT
BMX Scooter
ASSEMBLY