The Hyundai HY4TR26 Petrol Grass Trimmer is a robust and efficient garden machinery designed for maintaining lawns and tackling overgrown areas. This user manual provides comprehensive instructions for its safe operation, assembly, maintenance, and disposal, ensuring users can maximize the trimmer's performance and longevity.
Function Description
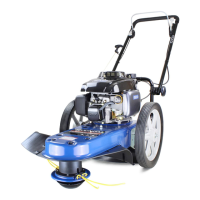
The HY4TR26 is a petrol-powered grass trimmer, primarily used for cutting grass and light vegetation in areas where a lawnmower might be impractical or unable to reach, such as around trees, fences, and edges. Its petrol engine provides the necessary power for effective trimming, offering mobility without the constraint of power cords. The trimmer features a bump feed cutting head, which allows for easy extension of the cutting line by simply tapping the spool head on the ground while the engine is running at high speed. This mechanism ensures continuous cutting without interruption. The machine is designed for outdoor use in well-ventilated areas, emphasizing safety precautions against carbon monoxide poisoning and fire hazards associated with petrol-powered equipment.
Usage Features
Operating the HY4TR26 requires adherence to specific procedures and safety guidelines to ensure both user safety and optimal performance. Before starting, users must perform pre-operation checks, including verifying engine oil and fuel levels. The trimmer is shipped without oil and fuel, making these initial checks crucial to prevent engine damage, which would void the warranty. It uses semi-synthetic 4-stroke SAE 10W30 engine oil and straight unleaded petrol, with a strict warning against mixing fuel with oil. Fueling should always be done outdoors in a well-ventilated area, away from ignition sources, and with the engine cool and off.
Starting the trimmer involves a cold start procedure for initial use or after a long period of inactivity, and a warm start procedure for subsequent uses. For a cold start, the machine is placed on flat ground, the ignition switch is turned to 'ON', the primer bulb is pressed 5-10 times until fuel is visible, and the choke button is pushed in to set it to FULL CHOKE. The recoil starter handle is then pulled swiftly 3-5 times until the engine turns over or starts. Once the engine runs for 10 seconds, the throttle is squeezed to release the choke to the RUN position. The warm start procedure is similar but focuses on ensuring fuel in the primer bulb and pulling the recoil starter until the engine starts.
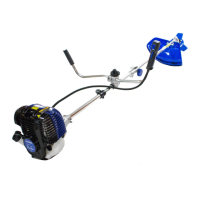
When using the machine, it is crucial to hold it with both hands, maintaining a firm grip on the rear and front handles. The trimmer should be positioned on the operator's right side, with the rear handle at about hip height, to avoid contact with hot surfaces and potential burns. The cutting line should run parallel to the ground surface, and cutting should always be done from top to down to prevent grass from wrapping around the shaft housing and string head, which could lead to overheating and damage. Users are advised to use the tip of the line for trimming and avoid forcing the trimming head into uncut grass, as well as avoiding contact with trees, flowers, stones, walls, and other objects that can cause line breakage. Regular checks and feeding of the line are recommended to maintain full cutting width and performance.
Stopping the machine involves allowing the engine to idle for 20 seconds under no load, then turning the ignition switch to the 'STOP' position. The ignition switch automatically returns to the 'ON' position.
For transport, the fuel tank should not be overfilled, and if the generator has been used, it should be allowed to cool for at least 15 minutes before loading into a vehicle. The generator must be secured upright with the start switch in the OFF position and the fuel cap vent lever in the OFF position to prevent fuel spillage. Transporting over rough terrain may require removing all fuel from the tank. Dropping or striking the generator, or placing heavy objects on top of it, should be avoided.
For storage longer than 30 days, specific steps are outlined to prepare the trimmer. This includes draining all fuel from the fuel tank and carburetor into a suitable container, removing the spark plug HT lead cap, and pulling the recoil starter handle several times to remove fuel from the lines. The engine oil should be changed, and a tablespoon of fresh engine oil poured into the cylinder bore, followed by pulling the recoil starter handle to distribute the oil before refitting the spark plug. The trimmer should be stored in a dry place away from ignition sources, and no items should be stacked on top of it.
Maintenance Features
Regular maintenance is vital for the HY4TR26's safety, efficiency, and longevity. Before any cleaning, inspection, or repair, the engine must be stopped and allowed to cool, and the spark plug HT lead cap disconnected to prevent accidental starting. All maintenance should be performed in a well-ventilated area, with appropriate Personal Protective Equipment (PPE) worn, including sturdy footwear, work gloves, long trousers, and hearing protection. Only manufacturer-specified spare parts should be used, as non-compliant parts can create safety hazards and void the warranty. Major servicing or part replacements should be carried out by a qualified service technician.
The manual provides a detailed maintenance schedule, indicating tasks to be performed at different intervals: every usage, 1st month or 20 hours, every 3 months or 50 hours, every 6 months or 100 hours, and every 12 months or 200 hours.
Engine oil maintenance involves checking the level before every use and changing it after the 1st month or 20 hours, and then every 6 months or 100 hours. To add oil, the attachment is removed, and the power head is placed on a flat, level surface. The oil filler cap is unscrewed, and 60ml of semi-synthetic 4-stroke SAE 10W30 engine oil is slowly poured into the crankcase until it reaches the top of the oil fill hole, being careful not to overfill. Overfilling can cause excessive smoke, oil loss, and engine damage. The oil filler cap is then replaced and tightened securely. If overfilling occurs, excess oil should be drained through the filler cap into a suitable container.
Air filter maintenance is crucial, as running the engine without a filter can cause piston and/or cylinder damage, which is not covered by warranty. The air filter should be checked every usage and cleaned every 3 months or 50 hours (more frequently in dusty environments). To clean, the latch tab on the air filter housing is pressed, the cover opened, and the filter removed. It is then cleaned with a jet of dry compressed air until all dust and debris are removed, taking care not to let dirt enter the carburetor chamber. The air filter is then reinstalled, and the cover closed.
Spark plug maintenance includes checking and adjusting it every 6 months or 100 hours, and replacing it every 12 months or 200 hours. The spark plug HT lead cap is carefully removed, and the spark plug is removed using the provided box spanner in an anti-clockwise direction. The spark plug is checked for visible damage and electrode erosion; if damaged, it must be replaced. Carbon deposits are removed using a soft wire brush. The spark plug gap should be 0.6 – 0.8mm, checked with a feeler gauge, and adjusted by carefully bending the side electrode. The cleaned and adjusted spark plug is refitted by hand to avoid cross-threading, then tightened as necessary (avoiding over-tightening), and the HT lead cap and maintenance cover re-attached.
Valve clearance and combustion chamber cleaning are recommended every 300 hours and should be carried out by a qualified engineer or service dealer. Fuel tank and filter cleaning are also recommended every 12 months or 200 hours. The fuel line should be cleaned every 2 years or replaced if necessary.
The cutting line spool has a bump feed function. To replace or wind the cutting line, the spool is opened by pressing two release buttons on the side, and the winding core is removed. The cutting line is divided into two equal halves, fixed into the winding core, and wound into the two separated rails as indicated. The two line ends are fixed at the opening (15cm) to keep the line tightly wound, and then guided into the holes on the spool housing before refitting the spool cover.
Troubleshooting guidance is provided for common issues such as the engine cranking or starting hard, or not starting, and the engine running but not accelerating properly. This section helps users identify potential causes like blocked fuel filters, dirty air filters, or spark plug issues, and suggests remedies, emphasizing that all corrective actions should be carried out by suitable qualified personnel.