Do you have a question about the Hyundai HYJS-950 and is the answer not in the manual?
Essential safety guidelines for operating the jump starter and handling batteries to prevent hazards.
Detailed specifications including battery type, capacity, peak current, outputs, and operating temperatures.
Identification and function of key buttons, displays, and output ports on the jump starter unit.
Details of the air compressor features, input port, cables, and included inflation adapters.
How to check the jump starter's internal battery charge status using the indicator button.
Instructions for charging the unit using the AC adapter and a wall socket.
Procedure for charging the unit from a vehicle's 12V DC power outlet.
Steps for vehicle preparation, identifying battery polarity, and ground type before jump starting.
Detailed steps for connecting clamps to vehicle battery terminals, including polarity warnings.
Instructions for starting the engine, cranking limits, and post-start disconnection.
How to turn on and use the built-in LED flashlight by pressing the dedicated button.
Instructions for connecting devices to USB ports and enabling USB power output.
How to power 12V DC devices using the unit's 12V DC power outlets.
Step-by-step guide for accessing and replacing the 12V DC power outlet fuses.
Instructions for using the air compressor, including connecting the hose and adapters.
Important guidelines on inflation pressure, unattended operation, and cooling downtime.
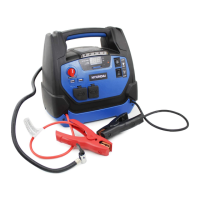
The HYUNDAI HYJS-950 is a versatile jump starter designed for emergency use with 12V lead-acid batteries. It is not intended for frequent commercial use. This device is equipped with several additional features, including an LED flashlight, USB power output, 12V DC power output, and an air compressor, making it a comprehensive portable power solution.
The primary function of the HYJS-950 is to jump-start vehicles with 12V lead-acid batteries. It provides a powerful current to help start an engine when the vehicle's battery is depleted. The unit features a digital display that shows the battery voltage and charge percentage, allowing users to monitor its internal battery status. A warning LED and an audio alarm are integrated to alert users to incorrect connections, such as reverse polarity, enhancing safety during jump-starting operations.
Beyond jump-starting, the HYJS-950 offers multiple utility functions. The built-in LED flashlight provides illumination, useful in low-light conditions or emergencies. For charging portable electronic devices, the unit includes two USB ports, delivering 5V/2A output. Additionally, it provides two 12V DC power outlets, each capable of supplying up to 10A (with a maximum of 15A combined), allowing it to power various 12V DC accessories. The integrated air compressor, with a maximum pressure of 150 PSI, is designed for inflating tires and other inflatable items, further extending the device's utility.
Before using the HYJS-950, it is crucial to read and understand all safety and operating instructions, as well as the battery and vehicle manufacturer's instructions and cautionary markings. The device should only be used to jump-start 12V lead-acid batteries and never with non-rechargeable or defective batteries. Users must ensure the HYJS-950's internal battery capacity is above 30% before attempting a jump start.
For jump-starting, the vehicle's ignition and all accessories (radio, lights, air conditioners, etc.) should be turned off, and electronic devices disconnected. Users need to identify the polarity of the battery posts (positive marked POS, P, or +; negative marked NEG, N, or -) and determine if the vehicle is negative or positive grounded. For negative grounded vehicles (most common), the RED POSITIVE jumper clamp is connected to the positive battery terminal first, followed by the BLACK NEGATIVE jumper clamp to the negative battery terminal or vehicle chassis. For positive grounded vehicles (uncommon), the BLACK NEGATIVE clamp connects to the negative battery terminal first, then the RED POSITIVE clamp to the positive battery terminal or vehicle chassis. If clamps are connected backward, an audio alarm will sound, and the warning LED will illuminate; in this case, the ON/OFF switch must NOT be turned on, and connections should be reversed. It is critical never to allow the clamps to touch each other or the same piece of metal when the ON/OFF switch is in the ON position, as the jump-starting function lacks reverse polarity or short circuit protection. Once connected correctly, the ON/OFF switch is turned to the ON position, and the engine is cranked for no more than 8 seconds. If the engine doesn't start, a 3-minute wait is recommended before trying again. After the engine starts, the switch should be immediately turned OFF, and the HYJS-950 disconnected from the battery.
The flashlight is activated by pressing its On/Off button upwards. To use the USB power, an electronic device is plugged into one of the two USB ports on the front panel, and the USB On/Off button is pressed. For powering 12V DC devices, the device is plugged into one of the two 12V DC power outlets, and the Jump start + 12V DC power On/Off switch is turned on. Users should avoid running appliances that draw more than 15A DC, as this can lead to excessive battery drain.
The air compressor function requires users to read the instructions for the product being inflated to avoid overinflation and to not exceed recommended pressures. The air compressor hose is removed from its storage compartment, connected to the valve stem, and the thumb latch is closed. If needed, additional adapters can be used. The Air Compressor On/Off button is pressed to start inflation, and the gauge is monitored until the desired pressure is reached. The compressor should not be left unattended during use. After inflation, the thumb latch is opened, and the connector removed. The compressor should not run for more than 10 minutes at a time, requiring a 10-minute cool-down period before subsequent use. The hose should be wrapped around the cleats when not in use.
To ensure optimal performance and prolong the product's life, the HYJS-950 should be fully recharged immediately after purchase and after each jump-starting operation. Even if unused, it should be recharged every month. The internal battery's charge status can be checked by pressing the Battery Voltage and % Indicator button; if the display shows under 100%, recharging is necessary. For accurate readings, the jump starter should be disconnected from all devices and charging sources for a few hours before checking the charge level.
The HYJS-950 can be charged via AC or DC. For AC charging, the AC charging adapter is inserted into the unit's charging jack and then plugged into a wall socket. For DC charging in a vehicle, the vehicle engine must be on. One end of the accessory cable is inserted into the 12V DC power outlet on the HYJS-950, and the other end into the vehicle's accessory outlet (lighter socket). It is important to monitor DC charging progress and disconnect the charger immediately once the battery is fully charged, as continuous DC charging can overcharge the battery. The charger cable must be completely disconnected when the engine is not running.
The unit contains a sealed, non-spillable lead-acid battery, which must be disposed of properly at the end of its life. If any accessory is damaged, it should not be operated, and any repairs must be carried out by the manufacturer or an authorized repair agent to prevent danger. The device should be handled with caution; if it receives a direct hit or is dropped, it should be checked and repaired if damaged. It should not be exposed to rain or wet conditions. To prevent damage to the electric plug and cord, users should pull by the plug, not the cord, when disconnecting.
In case of a need to replace 12V DC power fuse(s), specific steps must be followed. First, a screwdriver is used to remove the screws, starting with the rubber bottom panel, then the rear panel. This reveals the fuse box(es). The fuse cover is then removed, and the fuse(s) replaced. Finally, the rear panel and bottom rubber panel are put back in position, and the screws are reinstalled.
| Engine Start | Yes |
|---|---|
| Keyless Entry | Yes |
| Security System | Yes |
| Smartphone Control | No |
| Compatibility | Vehicles with automatic transmissions |
| Remote Range | Up to 3000 feet |