EasyManua.ls Logo

iblinds v3 - User Manual

iblinds v3
15 pages
Print Icon
To Next Page IconTo Next Page
Loading...
For detailed installation instructions and
installation video guides visit our website
support.myiblinds.com.
IBLINDS KIT CHECK LIST IBLIND MOTOR
IBlind motor
v3
USB Adapter
Battery Charge Adapter and Clip
Height Adapter
Z-Wave Include/
Exclude Button
CLBR Reset
Button
iblinds Motor Charge Adapter
Battery
Connector
Solar
Connector
String Pass-Through
Channel
iBlind Motor
Tilt Shaft
Micro USB
Connector
USB Charging
Power Cable
Tilt Shaft
Hex Wrench
WINDOW BLIND COMPONETS
Window Blind Mounting Bracket
Tilting Mechanism
Tilt Drum
End Cap
Tilt Rod
End Cap
Headrail
CHARGE BATTERY
IMPORTANT:
Charge battery before
rst use.
Connect battery cable
to the red battery
connector. Connect
USB Charging Power
Cable to the Micro
USB connector. Move
battery switch to the
ON [I] position.
Plug USB power
adapter into wall outlet.
The Battery is fully
charged when the Green
LED is illuminated.
BUTTON FUNCTIONS
IN /EXPress 3 times
Z-Wave network include /
exclude
IN /EXPress 5 timesZ-Wave Device Reset Locally
CLBR Press 5 timesReboot
CLBR
Press and hold
7-10 seconds
Set All Z-Wave Parameters
to Default Values
Charge Adapter
Push Button
Press 1 time,
release, and wait
5 seconds
Toggle blind between
closed and last open position
Charge Adapter
Push Button
Press 3 times
Z-Wave network include /
exclude
Charge Adapter
Push Button
Press and hold
7-10 seconds
Start manual calibration
BUTTON PRESS FUNCTION
INSTALLATION
Z-WAVE DEVICE SPECIFIC KEY (DSK)
IMPORTANT NOTICE
Step 1
Raise existing blind then
remove from wall mount.
This page contains important Z-Wave S2 Information about
your device. You can scan below QR code to connect with
any Security 2 (S2) Z-Wave controller directly or enter the rst
5 digits of the DSK if prompted. Please keep in a safe place.
Z-Wave Device Specic Key (DSK)
Step 2
Remove existing tilt
mechanism.
(RED) 5V USB or Direct Power is connected
(YELLOW) Battery in charging mode
(GREEN) Battery is fully charged
LED INDICATION
Question and Answer IconNeed help?

Do you have a question about the iblinds v3 and is the answer not in the manual?

iblinds v3 Specifications

General IconGeneral
CategoryController
App CompatibilityiBlinds app
Warranty1 year
Power SourceBattery powered
Control RangeUp to 100 feet (30 meters)
Voice ControlAmazon Alexa, Google Assistant
Smart Home IntegrationSmartThings

Summary

iBlinds Kit Components

iBlind Motor

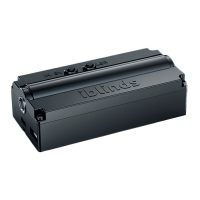
The main motor unit for the smart blind system.

Battery

The rechargeable power source for the iBlind motor.

iBlind Motor Features

Z-Wave Pairing Button

Button for adding or removing the device from a Z-Wave network.

Device Reset Button

Button used to reset the iBlind motor to factory settings.

Button and Functionality Guide

iBlind Motor Button Functions

Details on using IN/EX and CLBR buttons for Z-Wave and resets.

Charge Adapter Button Functions

Functions of the charge adapter's push button for control.

Charging the iBlind Battery

Initial Battery Charging Procedure

Steps to connect the battery and charger before first use.

Installation Steps

Important: Charge Adapter Compatibility

Use the new kit's charge adapter to prevent damage.

Step 6: Connect Power Cables

Connect battery, charge adapter, and solar cables to ports.

Step 7: Install iBlind Motor Unit

Insert motor into headrail, aligning tilt shaft with tilt drums.

Step 10: Z-Wave Network Inclusion

Place controller in inclusion mode and press motor's IN/EX button.

Z-Wave Security Information

Charging Methods

USB Charging

Charge the battery using USB cable and adapter approx. every 5-6 months.

Solar Panel Charging

Use the solar panel accessory for continuous, worry-free charging.