Do you have a question about the ICS Schneider Messtechnik Anton Paar DMA 1001 and is the answer not in the manual?
| Brand | ICS Schneider Messtechnik |
|---|---|
| Model | Anton Paar DMA 1001 |
| Category | Measuring Instruments |
| Language | English |
Guidelines for proper installation by authorized personnel and safe usage practices for the instrument.
Explicit warning against operating the density meter in potentially explosive environments due to its design.
Essential safety measures covering substance handling, equipment checks, and environmental considerations during operation.
Safety protocols for handling flammable materials, including ignition sources and ventilation requirements.
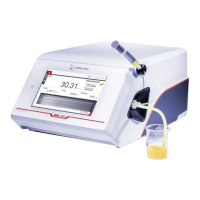
Detailed identification and description of the instrument's front, side, and rear functional components and connectors.
Optimal laboratory conditions, including temperature, humidity, and lighting, for accurate instrument performance.
Step-by-step instructions for the physical setup and connection of the instrument and its accessories.
Procedure for attaching the syringe holder and connecting filling hoses to the instrument's sample inlet.
Guidelines for safely connecting the instrument to the electrical power supply, adhering to voltage standards.
Concludes initial setup with air and water checks to verify instrument accuracy post-installation.
Configuration of key parameters affecting measurement accuracy and duration.
Selecting measurement speed (Fast, Standard, Precise) to balance accuracy and time.
Steps to initiate a measurement, either by selecting a predefined product or defining settings on the fly.
Detailed procedures and precautions for filling the measuring cell with samples, ensuring bubble-free operation.
Step-by-step guide for filling the measuring cell using a syringe with a Luer tip.
Executing the measurement after verifying settings and filling, including temperature conditioning and initiating the process.
The final step to start the measurement, displaying progress and saving results automatically.
Procedures for performing air and water checks to verify instrument accuracy and identify potential issues.
Steps for adjusting instrument constants using known standards (air/water, wide range) to ensure accuracy.
Detailed steps for air and water adjustments, including media preparation and execution.
Routine cleaning frequency and procedure for the measuring cell to maintain accuracy.
Step-by-step guide for cleaning the measuring cell using specified liquids and drying with air.