EasyManua.ls Logo

ICW Elite - User Manual

ICW Elite
4 pages
Print Icon
To Next Page IconTo Next Page
Loading...
1) Do not attempt to adjust your Elite arm until everything you intend to mount to
the arm is mounted.
2) Arm must be completely horizontal (extended) before adjusting the arms tension.
Failure to do so will damage the arm and void the warranty.
3) Never loosen or remove any of the shoulder bolts. Doing so will cause the
arm to immediately come apart with tremendous force, and could cause seri-
ous injury.
4) If equipment requiring AC power is mounted to this unit, have a certified electri-
cian inspect the installation.
5) Failure to install this unit according to these instructions will void all ICW warran-
ties. If installed incorrectly, ICW is not liable for any damage or injury caused by
the unit.
ICW Elite Single Arm Ceiling Mount
DANGER!
The Elite arm contains high pressure gas springs.
The following cautions MUST be observed to
avoid serious injury.
Shoulder bolt
Question and Answer IconNeed help?

Do you have a question about the ICW Elite and is the answer not in the manual?

Overview

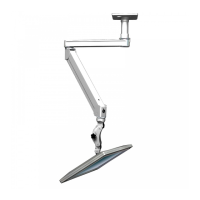
The ICW Elite Single Arm Ceiling Mount is a specialized mounting solution designed to hold monitors and other equipment, offering flexibility and adjustability through its articulated arm. This device is intended for ceiling installation, providing a space-saving and ergonomic setup for various environments, including medical facilities, offices, and industrial settings.

Function Description:

The primary function of the ICW Elite Single Arm Ceiling Mount is to securely suspend a monitor or other compatible equipment from a ceiling. It features a single articulated arm that allows for a wide range of motion, enabling users to position the mounted device precisely where needed. The arm incorporates high-pressure gas springs, which facilitate smooth and effortless adjustment of the arm's position. This design is crucial for maintaining the desired height and angle of the monitor, enhancing user comfort and productivity. The mount is equipped with a T-REX mount, which is a universal VESA-compatible interface, accommodating monitors with 75mm or 100mm VESA patterns. This ensures broad compatibility with a variety of display devices. The arm also includes internal cord channels, allowing for neat and organized cable management, which is essential for safety and aesthetics, especially in professional environments.

Important Technical Specifications:

  • Mounting Type: Ceiling mount, designed to be secured to a solid stud.
  • Arm Mechanism: Articulated arm with high-pressure gas springs for tension adjustment.
  • Monitor Compatibility: Universal VESA T-REX mount, supporting 75mm and 100mm VESA patterns.
  • Hardware for Installation: Requires 4 #14 wood screws for ceiling mount attachment (provided in hardware bag).
  • Tools for Assembly/Adjustment:
    • Philips head screwdriver for long arm cover screws (2 6-32 flathead screws).
    • 1/8" hex key for end cover screws (2 10-24 flathead screws).
    • T-handle adjustment wrench for arm tension adjustment.
  • Cable Management: Integrated cord channels within the arm and plastic bushings in end covers for cord routing.

Usage Features:

  • Installation: The ceiling mount is secured to a solid ceiling stud using four #14 wood screws. The arm then threads onto the ceiling mount and is secured with a set screw.
  • Monitor Attachment: Monitors are attached to the T-REX mount using 4mm screws provided in the hardware bag. The T-REX mount's slider handle allows for horizontal movement of the monitor along a slide rail.
  • Arm Adjustment: Once the monitor is mounted, the arm's tension can be adjusted using the provided T-handle adjustment wrench. It is crucial to extend the arm to a completely horizontal position before adjusting tension to prevent damage and voiding the warranty.
  • Tilt Adjustment: The monitor's tilt can be adjusted using buttons on the mount. Users are advised to gently lift the monitor to relieve its weight from the buttons during adjustment.
  • Cable Routing: Cords are routed along the arm through designated cord channels and then up into the ceiling mount. Plastic bushings in the end covers facilitate cord passage and can be removed, opened, and slipped over cords if necessary.
  • Safety Precautions:
    • Do not adjust the arm until all intended equipment is mounted.
    • The arm must be completely horizontal (extended) before adjusting tension.
    • Never loosen or remove any shoulder bolts, as this can cause the arm to disassemble with force, leading to serious injury.
    • If AC-powered equipment is mounted, a certified electrician must inspect the installation.
    • Incorrect installation voids all ICW warranties and absolves ICW of liability for damage or injury.

Maintenance Features:

  • Cord Management: The design allows for easy access to cord channels by removing the long arm cover (using a Philips head screwdriver) and end covers (using a 1/8" hex key). This facilitates maintenance or replacement of cables.
  • Component Access: The covers are designed to be reinstalled carefully, ensuring no cords are pinched, which helps protect the cables and maintain the unit's aesthetic.
  • Tension Adjustment: The arm's gas springs can be re-tensioned as needed to accommodate changes in mounted equipment weight or to restore optimal arm movement. This is done via an adjustment port using the T-handle wrench.

The ICW Elite Single Arm Ceiling Mount is a robust and versatile solution for mounting monitors, emphasizing safety, adjustability, and clean cable management. Its design caters to environments where precise positioning and a streamlined appearance are paramount.

ICW Elite Specifications

General IconGeneral
BrandICW
ModelElite
CategoryRacks & Stands
LanguageEnglish