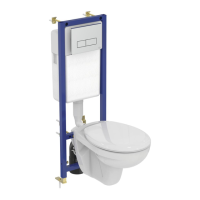
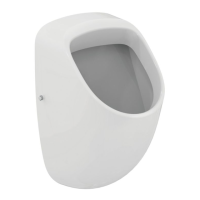
This document provides installation and maintenance instructions for a wall-mounted toilet with a concealed cistern, specifically models W3718AA and W3719AA. The device is designed for modern bathrooms, offering a sleek and space-saving solution by integrating the flushing mechanism within the wall structure.
Function Description
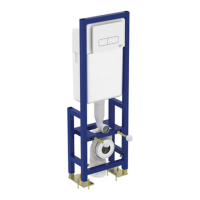
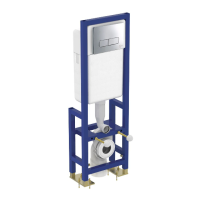
The device functions as a complete toilet system, comprising a wall-hung toilet bowl and a concealed cistern. The cistern is designed to be installed within a wall cavity, providing a clean aesthetic by hiding all plumbing and the water tank. The toilet bowl is then mounted directly to the frame of the concealed cistern, which is anchored to the floor and wall. Water supply to the cistern is managed by an internal filling valve, and flushing is initiated by a push-button mechanism, typically mounted on the wall above the toilet bowl, which activates a flush valve inside the cistern. The system is designed for efficient water usage, offering dual-flush options for liquid and solid waste. The wall-hung design also facilitates easier cleaning of the bathroom floor beneath the toilet.
Important Technical Specifications
Dimensions:
- Concealed Cistern Frame:
- Width: 350 mm (top), 200 mm (bottom)
- Height: 1100 - 1300 mm (adjustable)
- Depth: 97 mm (from wall)
- Toilet Bowl Mounting:
- Mounting bolt spacing (A): 180 mm or 230 mm (adjustable)
- Minimum height from finished floor to mounting bolts: > 230 mm (for proper installation)
- Recommended height from finished floor to top of toilet bowl: 400 - 480 mm
- Pipe Connections:
- Drainage pipe diameter: 100 mm
- Water supply pipe diameter: 16-80 mm (flexible connection)
- Fasteners:
- M12 x6 bolts for frame attachment to the floor.
- M10 x4 bolts for securing the toilet bowl to the frame.
- 8x22 x8 screws for various internal components.
- Drill Bit Size: Ø10 mm for wall anchors, with a minimum drilling depth of ≥55 mm.
Materials:
The frame is constructed from a robust metal, likely steel, to support the weight of the toilet and user. The cistern is made of durable plastic, and the toilet bowl is ceramic. Connection pipes are typically PVC or similar plumbing materials.
Water Supply:
The system requires a standard water supply connection. The internal filling valve is designed to quickly and quietly refill the cistern after each flush.
Flush Mechanism:
Features a dual-flush system, allowing for different volumes of water to be used depending on the waste type, contributing to water conservation. The flush plate (not included in the initial parts list but shown in later installation steps) provides the user interface for activating the flush.
Usage Features
- Wall-Hung Design: Offers a modern aesthetic, maximizes floor space, and simplifies bathroom cleaning.
- Concealed Cistern: Hides all plumbing and the water tank within the wall, contributing to a minimalist and uncluttered bathroom design.
- Adjustable Height: The frame allows for adjustment of the toilet bowl height during installation, accommodating user preferences and accessibility requirements. The recommended height range for the top of the toilet bowl is 400-480 mm from the finished floor.
- Dual-Flush System: Promotes water efficiency by offering two flush volumes, reducing overall water consumption.
- Easy Activation: The flush plate provides a simple and intuitive way to operate the toilet.
- Robust Construction: The sturdy metal frame ensures stability and durability for long-term use.
Maintenance Features
The manual outlines several maintenance procedures, primarily focused on the internal components of the cistern and the flush mechanism.
- Flush Plate Removal: The flush plate can be easily removed by pushing it upwards (step 1a) and then pulling it out (step 1b, 1c). This provides access to the internal cistern components.
- Accessing Internal Components: Once the flush plate is removed, the internal mechanism can be accessed by unscrewing retaining screws (step 2) and removing the support frame.
- Water Shut-off: The water supply to the cistern can be shut off using the integrated stopcock (step 4a). This is crucial before performing any internal maintenance or repairs. The stopcock can be turned clockwise to close (step 4a) and counter-clockwise to open (step 4b) using a wrench (size 17).
- Replacing the Filling Valve: The filling valve (part 6) can be removed and replaced. This involves disconnecting the water supply and detaching the valve from its mounting. A "NEW" label indicates a replacement part.
- Replacing the Flush Valve: The flush valve (part 8) can also be removed for maintenance or replacement. This typically involves rotating it counter-clockwise to unlock and lift it out. A "NEW" label indicates a replacement part.
- Cleaning: The wall-hung design of the toilet bowl makes it easier to clean the floor underneath. Regular cleaning of the ceramic bowl and the flush plate is recommended.
- Lubrication: During installation and potentially for maintenance, lubricant is used on the rubber seals of the connection pipes (step 13) to ensure a tight and leak-free fit.
- Troubleshooting: The manual implicitly suggests that issues like continuous water flow or insufficient flushing can often be resolved by inspecting and potentially replacing the filling valve or flush valve.
- Durability and Warranty: The document mentions a 10-year warranty for the ceramic products and fittings, indicating the manufacturer's confidence in the product's longevity. This warranty covers manufacturing defects and excludes wear and tear or improper installation. Specific warranty details vary by region and product type (e.g., 10 years for ceramic products and accessories, 10 years for concealed installation systems, 10 years for fittings).