EasyManua.ls Logo

IKEA GRANEMO GLASS DOOR CABINET 64X68" User Manual

IKEA GRANEMO GLASS DOOR CABINET 64X68"
28 pages
To Next Page IconTo Next Page
Page #1 background imageLoading...
Page #1 background image
GRANEMO
Question and Answer IconNeed help?

Do you have a question about the IKEA GRANEMO GLASS DOOR CABINET 64X68" and is the answer not in the manual?

IKEA GRANEMO GLASS DOOR CABINET 64X68" Specifications

General IconGeneral
CategoryIndoor Furnishing
TypeGLASS DOOR CABINET
BrandIKEA
ModelGRANEMO
Assembly RequiredYes
MaterialGlass

Summary

GRANEMO Cabinet Overview

Assembly Preparation and Safety

Required Tools and Safety Guidelines

Lists necessary tools and provides essential safety instructions before assembly.

Hardware Identification Part 1

Component List and Quantities

Details and quantifies various hardware components required for assembly.

Hardware Identification Part 2

Additional Component Listing

Lists and quantifies further hardware components for the assembly.

Initial Frame Assembly

Step 1: Base Panel Connection

Connects base panels using dowels.

Step 2: Side Panel Attachment

Attaches side panels to the base using screws.

Frame Assembly Continuation

Step 3: Top Support Connection

Connects top supports to the side panels using dowels.

Step 4: Cross Brace Attachment

Attaches cross braces to the frame using dowels.

Internal Structure Assembly

Step 5: Attaching Internal Connectors

Attaches internal connectors using cam locks.

Step 6: Securing Internal Panels

Secures internal panels using cam locks.

Step 7: Attaching More Connectors

Attaches additional internal connectors using cam locks.

Vertical Support Installation

Step 8: Inserting Vertical Dowels

Inserts vertical dowels into the frame.

Step 9: Securing Dividers

Secures internal dividers using dowels.

Internal Divider Setup

Step 10: Attaching Divider Connectors

Attaches connectors to internal dividers.

Step 11: Inserting Dowels

Inserts dowels into the assembled structure.

Divider Connection

Step 10: Attaching Connectors

Attaches connectors to internal dividers.

Internal Panel Assembly

Step 11: Inserting Dowels

Inserts dowels into the assembled structure.

Securing Internal Structure

Step 12: Securing with Screws

Secures the internal structure using screws.

Base Structure Attachment

Step 13: Attaching Base Brackets

Attaches base brackets to the cabinet frame.

Base Frame Assembly

Step 20: Attaching Base Feet

Attaches threaded rods and feet to the base.

Step 21: Securing Base Structure

Secures the base structure with nuts and washers.

Base Frame Finalization

Step 22: Securing Base Panels

Secures base panels with screws.

Step 23: Adjusting Base Feet

Adjusts the base feet for leveling.

Back Panel Attachment

Step 24: Inserting Dowels

Inserts dowels into the back panel.

Step 25: Securing Back Panels

Secures back panels with screws.

Back Panel Securing

Step 26: Rotating Unit

Rotates the unit for back panel access.

Step 27: Hammering Nails

Secures the back panel by hammering nails.

Back Panel Nailing

Step 28: Nailing Top Edge

Nails the top edge of the back panel.

Step 29: Nailing Bottom Edge

Nails the bottom edge of the back panel.

Back Panel Nailing Completion

Step 30: Nailing Side Edges

Nails the side edges of the back panel.

Step 31: Final Nailing

Completes back panel securing with nails.

Wall Securing Preparation

Step 32: Wall Securing

Illustrates securing the unit to the wall.

Wall Securing and Door Attachment

Step 33: Attaching Safety Strap

Attaches the safety strap to the unit.

Step 34: Attaching Door Hinges

Attaches hinges to the cabinet doors.

Glass Door Installation

Step 35: Attaching Glass Doors

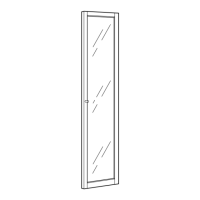
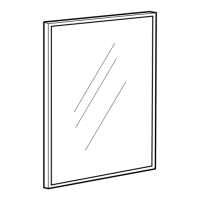
Installs the glass doors onto the cabinet.

Glass Door Fitting

Step 36: Securing Glass Doors

Secures the glass doors with screws.

Step 37: Inserting Door Stops

Installs door stops into the cabinet.

Door Adjustment and Securing

Step 38: Adjusting Door Position

Adjusts the position of the doors.

Step 39: Securing Door Hardware

Secures door hardware with screws.

Sliding Door Mechanism

Step 40: Attaching Sliding Mechanism

Attaches the sliding mechanism to the doors.

Step 41: Attaching Door Guides

Attaches guides to the bottom of the doors.

Final Door Attachment

Step 42: Inserting Doors

Inserts the doors into the cabinet runners.

Shelf Installation and Adjustment

Step 43: Adjusting Shelf Height

Adjusts shelf height using shelf pins.

Step 44: Inserting Shelves

Inserts shelves into the cabinet.

Related product manuals