Do you have a question about the IKEA HIMMELSO and is the answer not in the manual?
Keep flames and heat sources away from tent fabric; it is flame resistant but will burn if in continuous contact.
Prohibits open flames, cooking, and refueling fuel-powered items inside the shelter.
Build campfires away from the tent and ensure they are fully extinguished before leaving.
Use fuel-powered lanterns/heaters with extreme caution; prefer battery-operated ones.
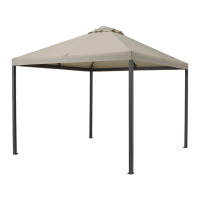
Lists all components and hardware needed for assembly with quantities.
Provides guidance on the proper disposal of the product.
Connect base connectors to vertical poles using screws and a wrench.
Connect horizontal frame poles to the base structure.
Continue connecting frame poles to form the base.
Connect additional frame poles to extend the structure.
Secure frame supports to the base structure using screws.
Attach and secure additional frame supports to the structure.
Connect upper frame pieces and attach the central hook.
Secure the frame by tightening fittings with the provided tool.
Raise the assembled frame sections into their upright positions.
Fasten the top frame connections to ensure stability.
Install the connectors at the top of the frame poles.
Attach the central hook to the apex of the gazebo.
The central hook supports a maximum of 5 kg (11 lbs).
Connect the first set of roof poles to the central hub.
Connect the second set of roof poles to the central hub.
Attach small connectors to the ends of the roof poles.
Drape and position the canopy onto the assembled frame.
Insert ground stakes into the base of the gazebo legs.
Use caution when hammering stakes to prevent damage or injury.
Screws for floor fixing are not included; consult a retailer for suitable options.
Secure the edges of the canopy to the frame structure.
Complete the canopy attachment by securing it to the frame.
Adjust and tighten the canopy for a snug and secure fit.
Instructions on how to adjust or release tension on the canopy.
| Water Repellent | Yes |
|---|---|
| Weather Resistance | Yes |
| Assembly Required | Yes |
| Fabric Material | Polyester |
| Frame Material | Steel |
| UV Protection | Yes |
| Material | Polyester, Steel |
| Color | Gray |