Do you have a question about the IKEA RINNEN and is the answer not in the manual?
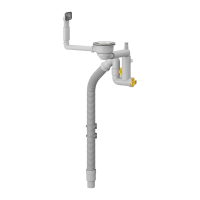
Connect the drain pipe to the sink outlet using provided parts, ensuring proper alignment.
Install and secure the drain flange assembly into the sink basin from below.
Assemble the primary drain pipe sections and trap.
Position the assembled drain pipe under the sink and measure for cutting the hose.
Insert and tighten the securing bolt for the drain assembly from the top.
Cut the flexible drain hose to the required length using a saw.
Connect the cut flexible hose to the main drain pipe sections.
Final attachment and securing of the drain pipe assembly to the sink.
Warning regarding correct flexible hose connection and potential pitfalls.
Connect the flexible hose to the outlet, showing correct and incorrect methods.
Final tightening of the connection securing the flexible hose.
After a period of use, check all connections to ensure they are tight.
Follow instructions enclosed with other appliances for integration.
| Brand | IKEA |
|---|---|
| Model | RINNEN |
| Category | Plumbing Product |
| Language | English |