TB100
USER MANUAL (Ver 3.0)
ENGLISH
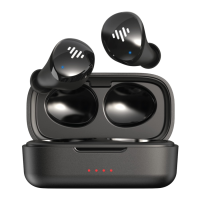
PRODUCT OVERVIEW
Status LED
Microphone
Charging Pin
Touch
Controls
Charging Pin
Case Status LED
CONTENTS
1. How To Pair
2. How To Wear
3. How To Fit
4. Baery Playme
5. Baery Status
6. How To Charge
7. Touch Controls: Power
8. Touch Controls: Music
9. Touch Controls: Volume
10. Touch Controls: Calls
11. Touch Controls: Voice Assistant
12. Water Resistance
13. Replacement Parts
14. Specificaons
TOUCH CONTROLS
POWER
Please follow the instrucons below
PRESS & HOLD
2 SECONDS
LEFT & RIGHT
On
Le Right
PRESS & HOLD
5 SECONDS
LEFT OR RIGHT
Off
Le Right
TOUCH CONTROLS
CALLS
Please follow the instrucons below
DOUBLE TAP
LEFT OR RIGHT
ANSWER/END
Le Right
PRESS & HOLD
2 SECONDS
LEFT OR RIGHT
REJECT
Le Right
TOUCH CONTROLS
MUSIC
Please follow the instrucons below
PLAY/PAUSE
Le Right
DOUBLE TAP
LEFT OR RIGHT
Le Right
SKIP
SINGLE TAP
LEFT OR RIGHT
TOUCH CONTROLS
VOLUME
Please follow the instrucons below
INCREASE
Le Right
PRESS & HOLD
LEFT
Le Right
DECREASE
PRESS & HOLD
RIGHT
TOUCH CONTROLS
VOICE ASSISTANT
Availability of Google Assistant voice control feature will
vary by different Android Phone models.
TRIPLE TAP
LEFT OR RIGHT
Le Right
ACTIVATE ASSISTANT
HOW TO FIT
Select the desired earp size (x-small, small, medium, large) and place
it onto the earbud. Once selected, firmly push the earp onto the
earbud. There should be no gap inbetween the earp and earbud.
The medium size earps are premounted onto the earbuds.
onto the earbudonto the earbud
3
HOW TO PAIR
1
Take both earbuds out of the charging case to pair to your device; the
earbuds will automacally power on. With the earbuds powered on, go
to your Bluetooth seng on your audio device and select ‘iLuv TB100’.
Once paired you’re good to go!
Take earbuds out
of charging case
on audio device
Select iLuv TB100
iLuv
Connected
BATTERY STATUS
The charging case is equipped with LED baery life indicators which
helps idenfy the baery level. The LED will stay lit when charging is at
full capacity. Baery level percentages listed below:
5
BATTERY PLAYTIME
The TB100 earbuds will provide a playme of 20 hours. Get up to 8
hours on a single charge and an addional 12 hours from the included
charging case. For quick charge, place both earbuds back into the
charging case for 20 minutes and get 2 hours of listening me. A full
charge for the earbud and charging case will take 2 hours.
Single Charge Total Charge
with Case
Rapid Charge
20 mins
*
4
HOW TO CHARGE
6
Place both earbuds into
the charging case and
close the case lid
Earbuds
Plug the Type-C USB cable to
the charging case and
a power adapter
Charging Case
Please follow the instrucons below to properly charge the earbuds
and charging case. The LEDs on the earbud and charging case will
signify the status of charge; the earbud LEDs will be off when fully
charged while the charging case LEDs will all be lit.
WATER RESISTANCE
The earbuds are rated IPX6 water resistant. They are designed to be
sweat and weather resistant but aren’t meant to be suberged under
water. The IPX6 is not a permanent condion and the resistance may
decrease as a result of normal wear.
Please do NOT do the following:
*CAUTION*
Swim or shower
with earbuds
Submerge earbuds
under water
Place wet earbuds
into charging case
7
8 9
10 11
12
14
13
REPLACEMENT PARTS
Replacement or addional accessories can be purchased online at:
iLuv Website: www.iLuv.com
iLuv Amazon Storefront: www.Amazon.com/iLuv
Charging Case
Le & Right Earbud
Earps
SPECIFICATIONS
Bluetooth Version 5.3
*Playme and standby me may vary due to usage condions*
Bluetooth Range 10 meters (30 feet)
Baery Composion Lithium-ion
Play Time 8 hours*
Charge Time 2 hours
Quick Charge 20 minutes = 2 hours play me
Charging Method Type-C USB
Waterproof Protecon IPX6
Microphone Type MEMS
Microphone Technology
Connecon Type Independent
Earbud Dimensions 27.5 (W) x 18 (D) x 24 (H) mm
Case Dimensions 67.4 (W) x 30.5 (D) x 31 (H) mm
Earbud Weight 4.6 grams
Case Weight 32.7 grams
Omnidireconal
TB100
NOTE: This equipment has been tested and found to comply with the limits for a Class B digital device, pursuant
to part 15 of the FCC Rules. These limits are designed to provide reasonable protecon against harmful
interference in a residenal installaon. This equipment generates uses and can radiate radio frequency energy
and, if not installed and used in accordance with the instrucons, may cause harmful interference to radio
communicaons. However, there is no guaran
tee that interference will not occur in a parcular installaon. If
this equipment does cause harmful interference to radio or television recepon, which can be determined by
turning the equipment off and on, the use is encouraged to try to correct the interference by one or more of the
following measures:
- Reorient or relocate the receiving antenna.
- Increase the separaon between the equipment and receiver.
- Connect the equipment into an outlet on a circuit different from that to which the receiver is connected.
- Consult the dealer or an experienced radio/TV technician for help.
Changes or modificaons not expressly approved by the party responsible for compliance could void the user’s
authority to operate the equipment.
The device complies with Part 15 of the FCC Rules. Operaon is subject to the following two condions: (1) this
device may not c
ause harmful interference, and (2) this device must accept any interference received, including
interference that may cause undesired operaon.
Hereby, iLuv Creave Technology declares that the radio equipment type TB100 is in compliance with Direcve
2014/53/EU. The full text of the EU declaraon of conformity is available at the following internet address:
Printed in China.
www.iluv.com
Cauon: The device paired with this iLuv product may emit an involuntary alert such as government alerts,
AMBER alerts, emergency alerts, etc. Please note that these alerts will prompt a message at a high volume
which is dictated by the operaonal system of the device. These alerts maybe disabled through the device
sengs.
2
HOW TO WEAR
Both earbuds are marked with a L or R to indicate the appropriate ear
The earbuds are differently angled to fit either the le or the right ear
The proper fit will ensure the best sound quality. Insert the earbud in
your ear and rotate slightly clockwise (as shown in image below).
Insert earbud
into ear canal
Slightly rotate
earbud in ear canal