GB-6
NOTE: Never start the engine with the shoulder strap
hang up.
FUEL AND OIL
FUEL
For a maximum performance of your trimmer, use regular
petrol (two-star, unleaded) mixed with a special 2-stroke
engine oil (40:1). Please adhere to the mixing instructions.
ATTENTION : Do never use pure fuel without oil.
This will damage the engine and you will loose your
warranty rights. Do not use fuel mixtures that have
been stored for more than 90 days.
ATTENTION : Only use high-quality 2-stroke mixing
oil for air-cooled engines, mixture ratio 40:1.
FUEL MIXTURE
Mix the fuel with 2-stroke oil in an approved container.
Refer to the mixing table to nd the required mixture ratio
for the fuel and oil. Shake the container to properly mix
the two uids.
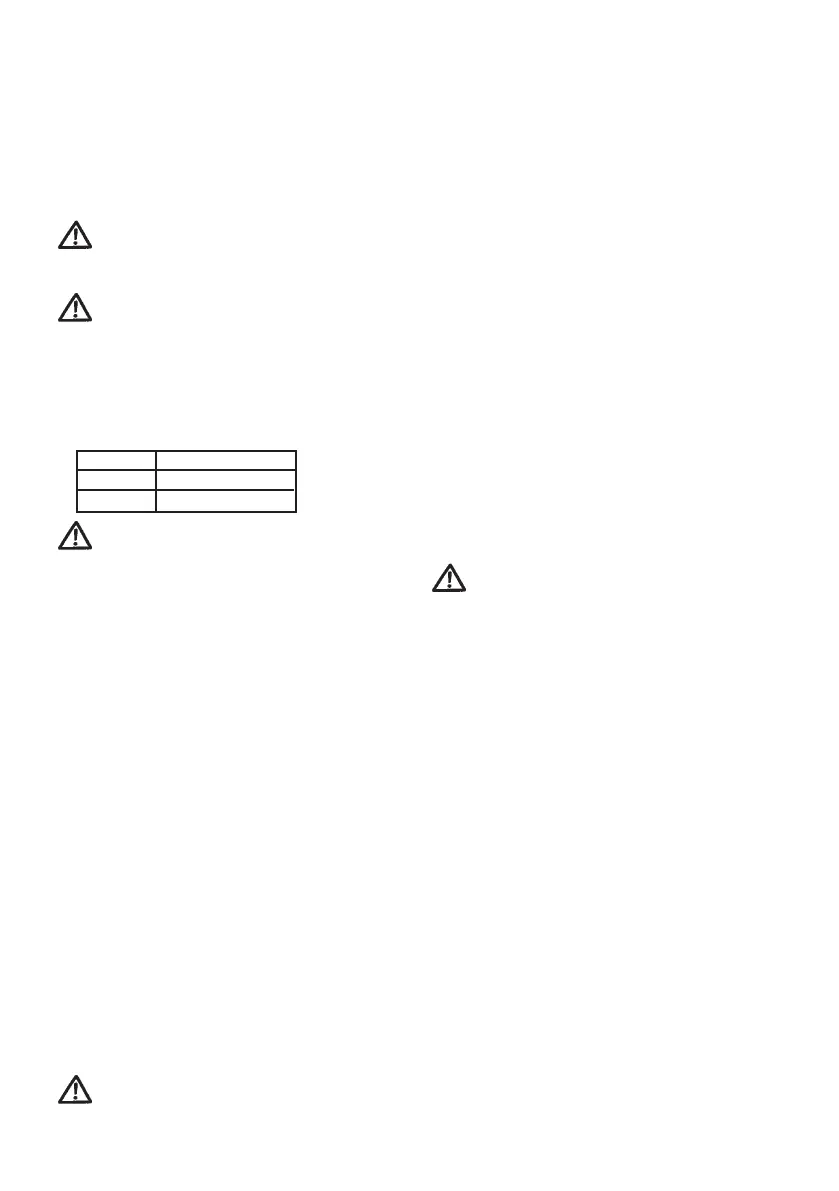
Mixing table for fuel mixture
Petrol 2-stroke oil / 40:1
1 litre 25 ml
5 litres 125 ml
ATTENTION: If you should you use an improper
mixture ratio you will loose your warranty rights.
STARTING THE ENGINE
Cold start
In order not to overtax the engine when starting it, cut the
trimmer cord to 17 cm (Fig. 7).
1. Put the ignition switch in position ‘I’ (Fig. 8).
2. Slide the choke to position ‘Start’ (Fig. 9). This is not
required in case of a warm start.
3. Push the fuel pump (A) 8 times (Fig. 10).
4. Pull the starter rope 2-3 times (Fig. 11); to start the
motor it is required to evenly, quickly pull the rope.
5. Slide the choke to ‘RUN’ position (Fig. 12), slightly
push the throttle lever (9) and pull the starter rope
again until the motor starts running. (To push the throt-
tle lever (6) it is necessary to rst push the locking
lever (8) (g. 13.
6. Let the motor idle for about 10 seconds to warm up.
7. If the motor does not start repeat the steps 1-6.
NOTE:If the engine should not start after several tries
proceed as described in the chapter ‘Trouble-shooting’.
NOTE : Always pull out the starter rope straight. If you
do not pull straight the rope will chafe at the eyelet. This
chafe will cause the rope to fan out and thus to a higher
wear and tear. Always hold the starter rope handle when
the rope is pulled back. Do not let the rope ick back
when it is pulled out. This could lead to a hook-up of
the rope and/or a damage to the starter housing.
STOPPING THE ENGINE (Fig. 14)
Release the throttle lever. Let the engine idle. Push the
ignition switch to position “Stop”. The motor will now stop.
Emergency stop: If it should be necessary to
stop the tool immediately push the “STOP”
button.
OPERATING ADVICE
- If you are not familiar with the trimmer train the handling
of the device with the engine not running (AUS / OFF).
- Always check the territory; solid objects as metal parts,
bottles, stones etc. may be hurled away and cause seri-
ous injuries or permanently damage the device. Should
you touch a solid object with the trimmer shut the engine
off immediately (AUS / OFF) and examine the trimmer for
possibly existing damages. Do not use the device when
it is damaged or shows sign of defects.
- Always trim and cut with the engine running in the higher
speed range. Do not let the engine run at low speed at
the beginning of or during the trimming.
- Use the device for its provided purpose only, i.e., trimming
and cutting grass and weeds.
- Never hold the cutting head higher than your knees during
operation.
- If working on a slope always stand with the cutting unit
above you. Only work on sloping sites if you stand on
rm ground.
TRIMMING
The trimmer – properly equipped with protection cover and
cutting head – trims high grass, brushwood and weeds
at places that are difcult to access along fences, walls,
foundations and around tree trunks. The trimmer may also
be used for cutting down to the ground (e.g., clean-out
works in the garden and in broken, thickly covered areas).
NOTE: When trimming near foundations, stone
walls etc., even extreme care cannot avoid an
increased wear of the cutting cord.
TRIMMING / MOWING
Swing the trimmer in sickle-like movements from side to
side. Always hold the cutting head parallel to the ground.
Examine the territory and determine the desired cutting
height. Lead and hold the cutting head in the desired height
to achieve an even cutting result (Fig. 15).
TIGHT TRIMMING
Lead the trimmer straight with a slight angle in forward
direc-tion so that it moves just over the ground. Always trim
away from your body, never lead it towards the operator.
TRIMMING AT FENCES AND FOUNDATIONS
To trim at fences, posts, stone walls and foundations lead
the device slowly and carefully without letting the cutting
cord touch any obstacles. If the cutting tool encounters any
solid obstacle (stone, wall, log etc.) there is the danger of
a kickback and higher wear and tear of the cutting cord.
TRIMMING AROUND TREE TRUNKS
Lead the trimmer carefully and slowly around tree trunks
so that the cutting cord does not touch the bark. Cut
around trees from left to right. Capture grass and weeds
with the tip of the cord and slightly tilt the cutting head in
forward direction.
MOWING AWAY
When mowing away, you capture the whole vegetation
down to the ground. To do so tilt the cutting head to the
left with an angle of 30 degrees. Adjust the handle to the


 To Next Page
 Loading...
