Pre-warm cup, see "E) Using Hot Water"
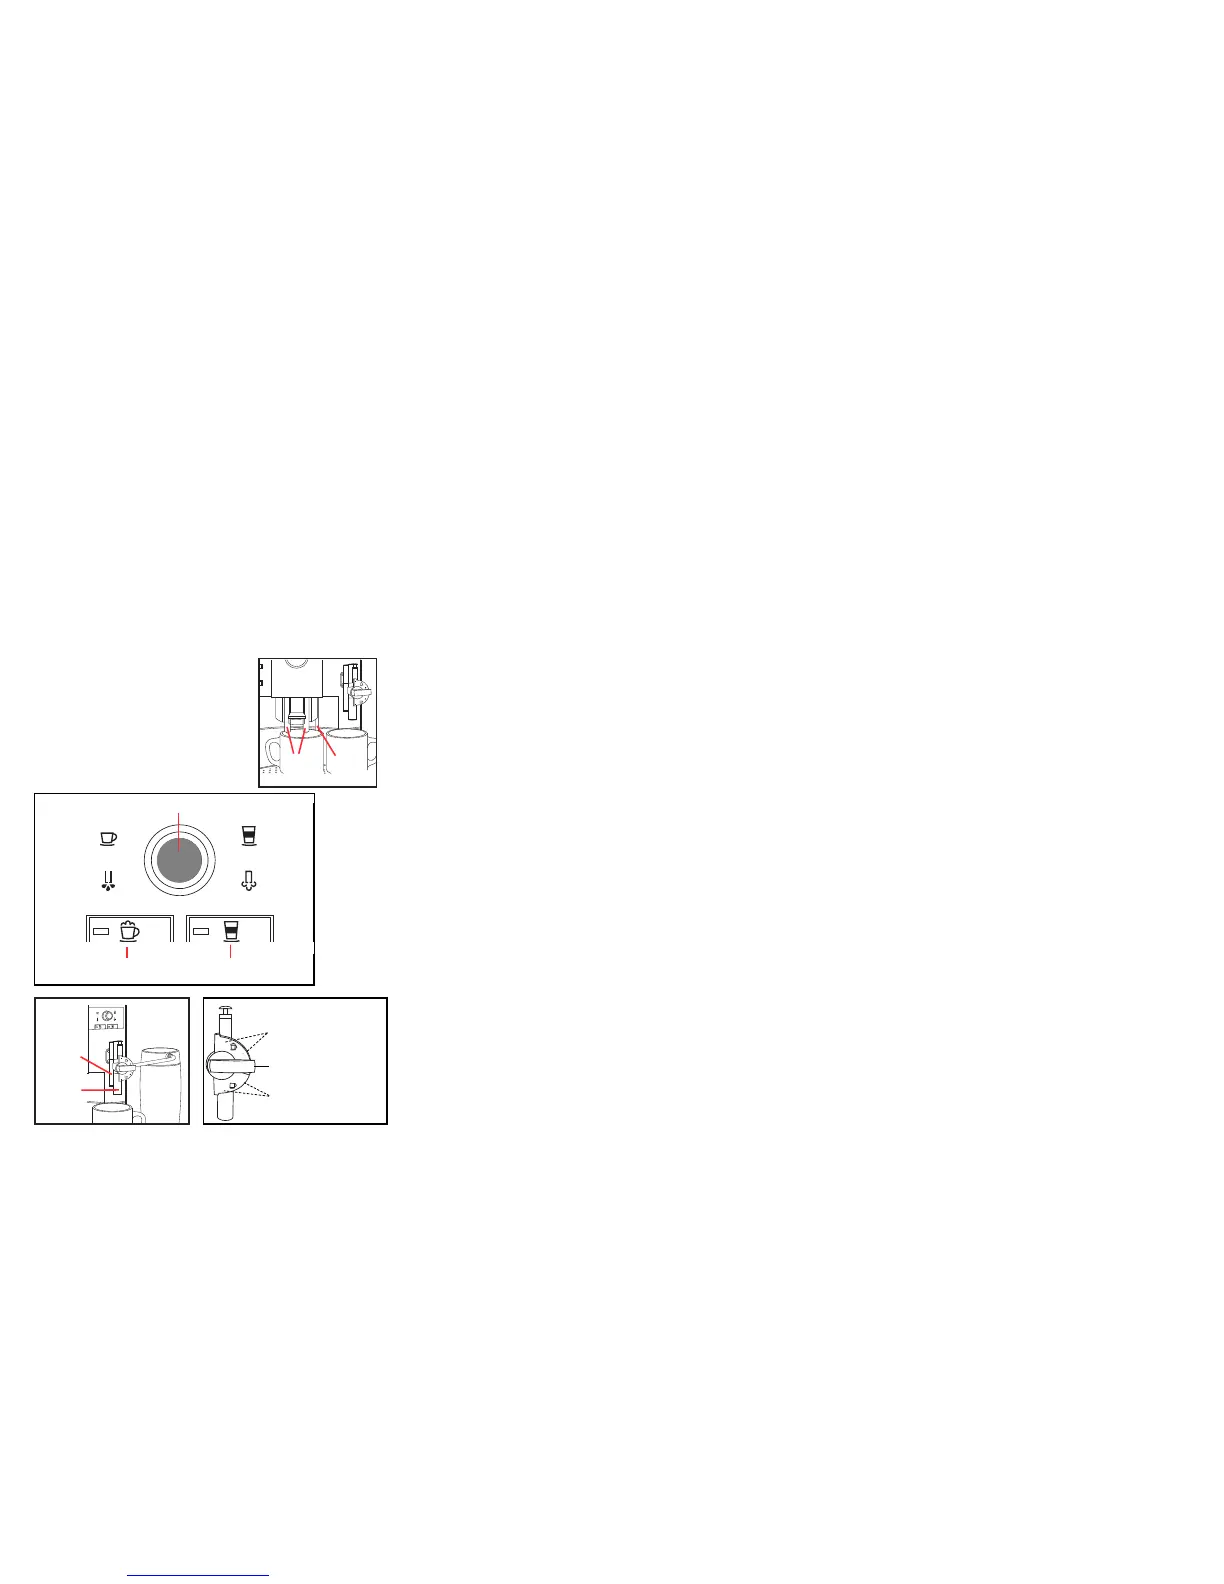
COFFEE READY. Place a cup under the Dual Coffee Spouts
and push one of the four coffee buttons. Display shows e.g.
1 ESPRESSO and coffee flows into your cup and stops
automatically.
ENJOY then COFFEE READY.
During brewing you can override the strength and the cup
size by turning the
Rotary Dial (behind the door on the left
side). NOTE: Cup size for 2-cup buttons is shown PER CUP!
Important: You can always stop the flow of coffee by
pushing any of the coffee buttons.
A LA CARTE button see Instruction Book, page 17.
D) Changing the Grinder Fineness
Important: You can only adjust the fineness during the
actual grinding process.
1. Open the bean container lid and turn the dial while grinding:
larger dots: coarser; smaller dots: finer.
2. For darker, oily beans, grind somewhat coarser. For lighter
beans, grind somewhat finer.
E) Using Hot Water. Place a cup
underneath the Hot Water Spout
and turn the Selector Dial until
display shows
WATER. Push the
Selector Dial, water begins flowing,
push again to stop the water flow.
F) One Touch Cappuccino. The S9 OT features the Auto
Cappuccino System with two spouts
located behind each
other
. The fr
ont spout produces steam (steam nozzle). The
rear spout produces high pressure brewed coffee. Attached
to the steam nozzle is the removable frothXpress system.
It siphons, steams and froths milk.
3. Push Cappuccino button. Display shows
COFFEE 2.0 OZ.
4. Push the Dial, COFFEE 2.0 OZ and turn until
display shows
COFFEE 4.0 OZ.
5. Push Dial to confirm:
CONFIRMED✓then
COFFEE 4.0 OZ.
6. Turn the Dial until display shows AROMA and the
current strength setting of three beans.
7. Push the Dial,
NORMAL and turn until display
shows XSTRONG with five beans.
8. Push Dial
CONFIRMED ✓ then XSTRONG.
9. Turn the Dial until display shows
MILK 14 SEC
10.Push dial, MILK 14 SEC, and turn until display
shows MILK 20 SEC.
11.Push Dial:
CONFIRMED ✓ then MILK 20 SEC.
12.Turn Dial until the display shows
EXIT and push.
SELECT PRODUCT.
13.If you do not want to change another button, turn
Dial until the display shows
EXIT and push.
COFFEE READY.
For more programming options see Instruction Book,
pages 24 through 29.
J) Installing the Clearyl Cartridge
• Rinse cartridge under running water. Snap the
extension rod onto the top of cartridge. Insert into
Water Tank reception, make sure tapered end fits
snugly inside the fins. Close cartridge holder.
• Fill tank with cold water and replace.
Activating the Clearyl Cartridge:
You must activate the cartridge for the machine to
monitor it properly. Otherwise the S9 OT assumes
decalcifying mode.
COFFEE READY.
1. Push Rotary Dial. Display shows MAINTENANCE.
2.Turn Dial until display shows FILTER NO. Push Dial
to enter the program.
3.Turn Dial until
FILTER YES and push to confirm.
CONFIRMED ✓ then INSERT FILTER/PRESS
STEAM
. The Rinse button illuminates.
4.Place a 20 oz. container under the frothXpress and
turn the frothXpress dial to the 3 o'clock position.
5.Push the
Rinse button. FILTER RINSING. For the
next 60 seconds the machine will push water
thr
ough the car
tridge and the fr
othXpr
ess system.
Initially
, the water may have a slight discoloration. The
program stops automatically.
COFFEE READY.
6. T
ur
n fr
othXpr
ess dial back to your pr
efer
r
ed setting.
Please note: As long as the filter is activated, the
water har
dness setting is automatically tur
ned off.
1. Fill the thermal milk container with milk and attach to the
frothXpress system.
Important: Make sure all parts are
connected tightly, otherwise siphoning does not work.
2. Set the frothXpress dial to the 12 o’clock position for
frothing for cappuccino or to the 6 o’clock position for
steaming for latte.
3. Place a cup underneath the Cappuccino System.
4. Push the
Cappuccino button. The S9 OT starts grinding,
the display shows CAPPUCCINO, then coffee strength
(bean graphic). It siphons, heats and froths milk for 14
seconds and adds 2 oz. of high-pressure brewed coffee.
Display shows
ENJOY then COFFEE READY.
5. For hotter milk in either position move the frothXpress dial
towards the (+) plus symbols.
NOTE: For preparing Café Mocha, Latte Macchiato, Hot Milk
and Hot Chocolate see Instruction Book (page 19).
G) Cappuccino Rinsing:
After preparing a beverage with milk, the S9 OT shows
COFFEE READY / RINSE CAPPUCCINO and the Rinse
button illuminates. It takes a few seconds and makes sure
that your frothXpress is free of any milk.
• Turn frothXpress dial to the 3 o’clock position and place a
cup underneath the cappuccino system.
• Push
Rinse button CAPPU. RINSING. Hot water flows
through the frothXpress and stops. COFFEE READY.
• Turn the frothXpress dial back to your preferred position.
H) Factory Settings, Beverage Buttons:
• All coffee buttons are set to temperature HIGH.
• The hot water temperature is set to XHIGH.
• 1-CUP Espresso button – 2 oz./ STRONG.
• 2-CUP Espresso button – 2 oz. per cup /
XSTRONG.
• 1-CUP Coffee button – 5 oz./ STRONG.
• 2-CUP Coffee button – 5 oz. per cup / XSTRONG.
• A La Carte button – 7 oz.
• Cappuccino; one-touch button – 14 seconds milk,
0 seconds pause, 2 oz. coffee /
NORMAL.
• Latte Macchiato; one-touch button – 14 seconds milk,
15 seconds pause, 2 oz. coffee /
STRONG.
• Milk portion; Selector Dial – 14 seconds milk,
• Water Portion; Selector Dial – 5 oz.;
XHIGH.
All other settings see chapter 5, Operating Instructions.
I) Re-Programming, Beverage Buttons:
Example: Re-program the Cappuccino button to:
4.0 oz. of coffee, extra strong, milk production for
20 seconds, temperature stays as is (HIGH).
COFFEE READY
1. Open Front Cover and push and hold the Rotary Dial
until the display shows MAINTENANCE.
2. Turn Dial to PRODUCTS and push Dial. Display shows
SELECT PRODUCT.
Dual
Coffee
Spouts
Hot
Water
Spout
Cappuccino Latte Macchiato
button button
Selector Dial with Push-Button
Hot Water
Portion
Hot W
ater
Milk Portion
Milk
Coffee
spout
Milk/Steam
spout
Frothing range
Steaming
range
Steam only
no siphoning
DIAL
+
+
_
_
frothXpress System
 Loading...