Do you have a question about the Incra Miter Express and is the answer not in the manual?
Determine whether to use the left or right miter slot based on blade tilt for sled placement.
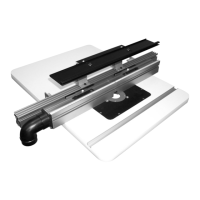
Attach the large and small panels to the utility plate and panel connector using provided screws.
Adjust the utility plate's expansion mechanisms for a smooth, no-play fit in the miter slot.
Raise the saw blade to cut off excess material from the large panel for the drop panel.
Adjust the aluminum miter bar expansion mechanisms for a smooth, no-play fit in the miter slot.
Secure the drop panel to the aluminum miter bar using flat head screws.
Cut off the overhang of the drop panel that extends beyond the line of cut.
Attach T-slot retainers to the utility plate assembly for non-T-slot miter channels.
Slide and lock the drop panel assembly adjacent to the saw blade using expansion mechanisms.
Place the miter gauge into the utility plate's receiving slot for various cutting positions.
Firmly tighten all three cam screws against the miter bar for secure locking.
Set the miter angle, check clearance, and make your cut using the Miter Express.
Provides solid backing for the end of your miter gauge fence for heavy duty applications.
Attach fence to outboard fence support and Miter Gauge's fence mounting bracket.
Slide support to contact fence rear and tighten clamping knob.
Shift panel connector backward or forward for angle settings.
Slide clamp into T-slots for a secure grip on workpieces of any size.
| Material | Aluminum |
|---|---|
| Type | Miter Gauge |
| Compatibility | Table Saws with Standard Miter Slots |
| Angle Range | 0 to 60 degrees |
| Angle Stops | 15, 22.5, 30, 45 degrees |
| Miter Bar Dimensions | 3/8" x 3/4" |