EasyManua.ls Logo

Infiltrator CM-1060 - User Manual

Infiltrator CM-1060
6 pages
Print Icon
To Next Page IconTo Next Page
Loading...
SupportPosts(2) SeamClips(64) Bae
Lids (2)
Before you Begin
The following is a complete list
of tank components:
•Tanktophalf
•Tankbottomhalf(withpre-installed
mid-seamgasket)
•Bae(two-compartmentcongurationonly)
•Seamclips(64)
•Supportposts(2)
•Lids(2)
•Lidshippingscrews(4)andwashers(4)
•Lidspacers(1)
•Lidscrewkits(2)
•Plumbingkit
The following tools facilitate
tank assembl
y:
•Forklift(5,000lb[2,268kg]capacity,
32”[0.81m]loadcenter,min.66”[1.68m]
arm,min.12’[3.66m]pickheight)
•InltratorLiftingStrapAssembly*
•22oz.[0.6L]spraybottle*
•16oz.[0.5L]liquidsoap*
•Utilityknife
•Coarse-bristledpaintbrush
•Metalhammer(16-20oz.[0.5kg])
•Rubbermallet
•Holesaw(5”[125mm]diameter)
•Nutdriver(3/8”,5/16”sockets)
•Cleanrags
•Headlamporashlight
•Screwgun
•Safetyglasses
*Supplied in Inltrator CM-1060 Starter Kit
Infiltrator CM-1060 Tank
Assembly Instructions
Itisrecommendedthataminimumoftwopeopleparticipatetosafelyassemblethetank.
Assemblers must wear safety glasses during the entire assembly. The top half of the
tankweighsapproximately169pounds(77kg)andthebottomhalfofthetankweighs
approximately162pounds(74kg)foratotalapproximateweightof331pounds(151kg).
Eachtankhalfmustbeliftedapproximately30 inches (750 mm) above groundduring
the assembly process. There must be enough side and overhead clearance to freely
maneuverthetankcomponentsandtooperateliftingmachinerywhenused.
TheCM-1060tankmustbeassembledbyanInltratorWaterTechnologiesAuthorized
Assembler. Tanks assembled by unauthorized assemblers will not be warrantied by
InltratorWaterTechnologies.AsignedcopyoftheCM-1060TankAssemblyChecklist&
AssemblyAuthorizationisrequiredforallAuthorizedAssemblers.
IMPLOSIONS MAY CAUSE SERIOUS INJURY
Follow Infiltrator Water Technologies, vacuum test instructions
NEVER EXCEED 2.5 inches mercury vacuum pressure
WARNING: These assembly instructions do not include a protocol for vacuum testing the CM-1060 tank. If required,
vacuumtestsontheCM-1060shallonlybeperformedinstrictaccordancewithInltrator’sCM-1060tankvacuumtesting
guidance documents. Failure to follow an Inltrator vacuum-testing protocol and/or exceeding 2.5 inches (63 mm) of
mercuryvacuumpressurecouldresultinpersonalharm.NeverapplyapositiveairpressuretotheCM-1060tank.Inltrator
willnotbeliableforanyproblemsthatarisefromsuchunauthorizeduse.
WARNING
Tanktopand
bottomhalves
Contact Infiltrator Water Technologies Technical Services Department for assistance at 1-800-221-4436
MARCH2022
Contact Infiltrator Water Technologies’ Technical Services Department for assistance at 1-800-221-4436
(2-compartmentcongurationonly)
Question and Answer IconNeed help?

Do you have a question about the Infiltrator CM-1060 and is the answer not in the manual?

Summary

Before You Begin

Assembly Safety Warning

Critical safety notice regarding vacuum pressure limits to prevent personal injury and damage.

Tank Pallet Handling

Forklift Specifications for Pallet Handling

Minimum forklift specifications for safely handling and offloading CM-1060 tank pallets.

Safely Removing Tank Halves

Instructions for using the Infiltrator Lifting Strap Assembly to remove tank halves from the pallet.

Tank Assembly Process

Initial Tank Half Separation

Procedure for lifting and separating the inverted tank bottom half from the nested top half.

Tank Bottom Half Positioning and Inspection

Placing the tank bottom half on supports and inspecting the gasket for integrity and cleanliness.

Baffle Preparation and Insertion

Steps for preparing the baffle, including identifying port openings and folding for insertion.

Gasket Lubrication and Tank Halves Joining

Applying soapy water to the gasket and aligning/lowering the tank top half onto the bottom half.

Seam Clip Installation

Attaching seam clips at specific locations along the mid-seam to secure the tank halves.

Lid Spacer and Lid Attachment

Installing lid spacers and attaching lids using shipping screws for storage or delivery.

Support Post Installation

Inserting and seating the support posts into the bottom and top corrugations of the tank halves.

Baffle Tie Wrap Securing

Fastening the baffle to the support post on the outlet side using plastic tie wraps.

Overview

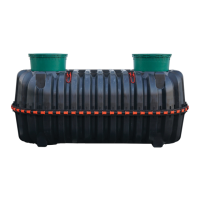
The Infiltrator CM-1060 Tank is a septic tank designed for wastewater management, requiring assembly before installation. It is composed of two main halves (top and bottom), a baffle (for two-compartment configurations), seam clips, support posts, lids, lid spacers, lid screw kits, and a plumbing kit.

Function Description:

The CM-1060 tank serves as a septic tank, designed to hold and treat wastewater. Its modular design allows for on-site assembly, which can be advantageous for transport and handling. The baffle, when installed, creates a two-compartment configuration, which is often required for enhanced wastewater treatment processes, separating solids from liquids more effectively. The tank is designed to be watertight, ensuring containment of wastewater.

Important Technical Specifications:

  • Tank Halves Weight: The top half weighs approximately 169 pounds (77 kg), and the bottom half weighs approximately 162 pounds (74 kg), totaling approximately 331 pounds (151 kg) for the assembled tank.
  • Pallet Dimensions (for 10-tank pallet):
    • Stacked tanks: 134"L x 62"W x 79"H (3.4 m L x 1.6 m W x 2.0 m H)
    • Stacked tanks on pallet: 136"L x 67"W x 86"H (3.5 m L x 1.7 m W x 2.2 m H)
    • Weight: 3,600 lbs (1,633 kg)
  • Forklift Requirements: A forklift with a minimum capacity of 5,000 lb (2,268 kg), a 32" (0.81 m) load center, a minimum 66" (1.68 m) arm, and a minimum 12' (3.66 m) pick height is required for safe handling and off-loading of the CM-1060 pallet.
  • Vacuum Testing: The tank must be vacuum tested in strict accordance with Infiltrator's CM-1060 tank vacuum testing guidance documents. The vacuum pressure must NEVER EXCEED 2.5 inches (63 mm) of mercury. Positive air pressure must never be applied to the tank.
  • Baffle Configurations: The standard baffle configuration (25) is used in most states and provinces. Specific configurations like 15 (Kentucky), 15E (Alaska, Arizona, New Mexico – requires elbow attachment), 15T (Delaware, Pennsylvania – requires tee attachment), and 35 (Minnesota, Indiana) are available for regional requirements.
  • Access Port Diameter: A 5" (125 mm) diameter hole saw is needed for creating access ports.

Usage Features:

  • Assembly Requirement: The tank requires on-site assembly by an Infiltrator Water Technologies Authorized Assembler. This ensures proper construction and adherence to warranty conditions.
  • Two-Person Assembly: A minimum of two people are recommended for safe assembly.
  • Lifting Strap Assembly: The Infiltrator Lifting Strap Assembly, provided in the starter kit, is crucial for safely lifting tank halves. It is designed to pick up a maximum of four tank halves at a time.
  • Gasket System: The tank halves feature a mid-seam gasket that must be properly seated in its groove to ensure a watertight connection. Soapy water is used as a lubricant to facilitate gasket engagement during assembly.
  • Molded-in Alignment Dowels: These dowels and corresponding receiving holes ensure precise alignment of the top and bottom tank halves during assembly.
  • Seam Clips: 64 seam clips are used to secure the joined tank halves, locking them in place. These clips are designed to click into place with two or three swift blows of a hammer.
  • Baffle Installation: The baffle is folded along perforations and inserted into a dedicated slot on the outlet side of the tank bottom half. Tie wraps secure the baffle to the support post.
  • Support Posts: Two support posts are inserted through the tank access ports to provide internal structural support, particularly when a baffle is installed.
  • Lid Spacers: For tanks without pre-drilled inlet and outlet holes, lid spacers are used on the inlet end to allow air exchange during storage and delivery.
  • Plumbing Kit: A plumbing kit is included for necessary connections.

Maintenance Features:

  • Visual Inspection: Regular visual inspection of the gasket during assembly is critical to ensure it is undamaged, properly seated, and free of dirt or debris. This prevents leaks and ensures the watertight integrity of the tank.
  • Cleanliness: Maintaining a clean assembly surface is emphasized to prevent dirt and debris from compromising the gasket or mid-seam area.
  • Tool Requirements: Specific tools are recommended for assembly, including a fork lift, Infiltrator Lifting Strap Assembly, spray bottle with soapy water, utility knife, coarse-bristled paint brush, metal hammer, rubber mallet, hole saw, nut driver, clean rags, headlamp or flashlight, screw gun, and safety glasses. These tools facilitate proper assembly and maintenance checks.
  • Authorized Assemblers: The tank must be assembled by an Infiltrator Water Technologies Authorized Assembler, and a signed checklist and authorization are required. This ensures proper assembly and adherence to warranty guidelines, which can be seen as a form of preventative maintenance through quality control.
  • Documentation: Referencing additional documents like the "Infiltrator IM- and CM-Series Septic Tank General Installation Instructions," "Riser Connection Guidance," and "Buoyancy Control Guidance" is advised for proper installation and use, contributing to the long-term maintenance and performance of the tank.

Infiltrator CM-1060 Specifications

General IconGeneral
BrandInfiltrator
ModelCM-1060
CategoryTank Equipment
LanguageEnglish