29
EN
LIST OF COMPONENTS
Frame
g. 1
T1 'SPOUXIFFMBTTFNCMZ
T2 3FBSXIFFMBTTFNCMZ
T3 Feeding bottle holding unit
T4 Storage basket
Carrycot
g. 2
C1 $BSSZDPUIPPE
C2 $BSSZDPUCMBOLFU
Transport Seat | Car seat
g. 3
R1 Handrail
R2 Transport seat hood
S )VHHZDBSTFBU
FRAME
ASSEMBLY/REMOVAL OF REAR WHEEL ASSEMBLY
g. 4 *OTFSUUIFXIFFMBTTFNCMZPOUIFSFBSQJQF
g. 5 Hook the ring (T5) on the bracket (T6); then, press the
lever (T7) until its complete hooking, making sure that the
ring (T5JTQSPQFSMZQPTJUJPOFEJOJUTTFBU
CAUTION: make sure that the wheels are properly hoo-
ked before use.
g. 6 5PSFNPWFUIFSFBSXIFFMBTTFNCMZMJGUUIFMFWFST7)
and unhook the ring (T5) from the bracket (T6), until it is
DPNQMFUFMZGSFF
ASSEMBLING THE FRONT WHEEL ASSEMBLY
g. 7 $MJQGSPOUXIFFMTVOUJMZPVIFBSB$-*$,
WARNING: be sure that wheels are correctly linked before
use.
FRAME OPENING
g. 8 (SJQQJOHUIFGSBNFCZUIFIBOEMFTMJGUUIFMFWFST8).
g. 9 Pulling the handle towards the user, the frame opens
BVUPNBUJDBMMZ
g. 10$PNQMFUFUIFPQFOJOHCZQVTIJOHXJUIUIF GPPUPO
the rear footboard until hearing a CLICK.
g. 11 Make sure that all closure mechanisms are pro-
perly locked on both sides before use.
FRAME CLOSING
g. 12 Press button (T9) and lift the handle.
g. 13 Pulling the handle upwards the frame closes automa-
UJDBMMZ
g. 14 Be sure the lever (T8JTQSPQFSMZMJOLFEUPUIFDFOUSBM
joint.
ADJUSTMENT OF THE HANDLE
g. 15 The frame is equipped with an adjustable unit handle.
5PBEKVTUJUQSFTTTJNVMUBOFPVTMZUIFTJEFCVUUPOTT10) till
the wished position.
BRAKES
g. 16 To engage the brake, push downwards the lever (T11)
QPTJUJPOFEPOUIFSJHIUSFBSXIFFMTBTTFNCMZ
Always engage the brake during stops.
SWIVEL WHEELS
g. 17 Operate both levers (T12) with the foot.
STEP-SKIPPING KIT
g. 18 Operate the rear footboard with the foot to skip small
obstacles.
STORAGE BASKET
g. 19 Insert the basket buttonhole on the support and fas-
ten all the press studs.
CAUTION: Maximum allowed load: 3 kg.
FEEDING BOTTLE HOLDING UNIT
g. 20 Hook the feeding bottle holding unit (T3) to the
GSBNFBOENBLFTVSFJUJTQSPQFSMZJOJUTTFBU
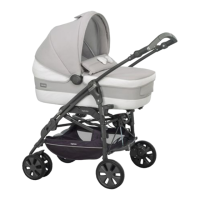
CARRYCOT
FITTING THE CARRYCOT TO THE FRAME
g. 215IF 056550 DBSSZDPU öUT UIF GSBNF UIBOLT UP UIF
&"4:$-*1QBUFOUFETZTUFN$PSSFDUMZQPTJUJPOUIFDBSSZDPU
on the frame until hearing a CLICK.
CAUTION: make sure that the carrycot is always rmly
engaged before use.
RELEASING THE CARRYCOT FROM THE FRAME
g. 22 Act on the lever (C3QPTJUJPOFEFYUFSOBMMZPOUIFGFFU
TJEFBOETJNVMUBOFPVTMZMJGUUIFDBSSZDPUCZIPMEJOHJUGSPN
the handle.
FITTING THE HOOD
g. 23)PPLUIFQSFTTTUVETPOUIFDBSSZDPUTUSVDUVSF
g. 24 Wrap the hood around the handle fastening it using
the suitable press studs.
HANDLE AND HOOD ADJUSTMENT
g. 25 To adjust the handle and the hood act on the two la-
UFSBMCVUUPOTJNVMUBOFPVTMZ
g. 265IFIPPEJTFRVJQQFEXJUIBOFUUIBUBMXBZTBMMPXT
ZPVSCBCZTWJFX
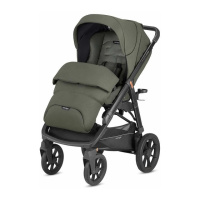
FITTING THE COVER
g. 27'BTUFOBMMUIFDPWFSQSFTTTUVETUPUIFDBSSZDPU
INTERNAL VENTILATION
g. 28*UJTQPTTJCMFUPBEKVTUJOUFSOBMWFOUJMBUJPOCZVTJOHUIF
lever (C4).
REMOVING THE LINING
g. 29 It is possible to remove the lining as shown in the -
gure.
BACKREST ADJUSTMENT
g. 30 Operate the lever (C5) to adjust the backrest: once the
desired position is reached, set the lever to the starting posi-
tion.
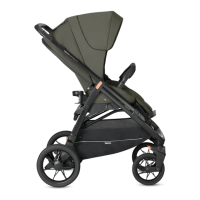
SEAT UNIT
FITTING THE SEAT UNIT TO THE FRAME
g. 31 The OTUTTO seat unit ts the frame thanks to the
&"4: $-*1 QBUFOUFE TZTUFN QPTJUJPO UIF TFBU VOJU PO UIF
frame until hearing a CLICK.
CAUTION: make sure that the seat unit is always rmly
engaged before use.
SEAT UNIT FACING THE MUM OR THE STREET
g. 32 It is possible to use the seat unit facing the mum or
the street, and fold the frame with the seat unit tted in.
INSTRUCTIONS
 Loading...