4
INSTALLATION REQUIREMENTS
Tools and Parts
Tools needed
Gather the required tools and parts before starting installation.
Read and follow the safety instructions provided with any tools
listed here.
Parts supplied
Remove parts package from the dryer drum. Check that all parts
listed are included.
Parts needed
Check local codes, existing electrical supply and venting, and
see “Venting Requirements” and “Electrical Requirements”
before purchasing parts.
Mobile home installations require metal exhaust system
hardware. For ordering information, please refer to the
“Assistance or Service” section of this manual. You may also
contact the dealer from whom you purchased your dryer.
Options
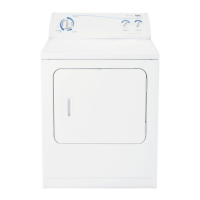
Pedestal
You may order a pedestal separately for this dryer. This pedestal
will add about 12" (30.48 cm) to the height of your unit for a total
height of approximately 45" (114.3 cm).
To order, call the dealer from whom you purchased your dryer or
refer to the “Assistance or Service” section of this manual. Ask
for Model Number LAB0050PQ.
Stack Kit
Are you planning to stack your washer and dryer? To do so you
will need to purchase a Stack Kit.
To order, call the dealer from whom you purchased your dryer or
refer to the “Assistance or Service” section of this manual. Ask
for Part Number 8182452.
Location Requirements
You will need
■ A location that allows for proper exhaust installation. See
“Venting Requirements.”
■ A separate 30-amp circuit.
■ Flat-blade screwdriver
■ Adjustable wrench
■ T20 TORX
®†
screwdriver
■ Caulking gun and
compound (for installing
new exhaust vent)
■ Tin snips (new vent
installations)
■ Wood block
■ Level
■ Vent clamps
Coupling
†®TORX is a registered trademark of Textron Innovations Inc.
Optional pedestal
WARNING
Explosion Hazard
Keep flammable materials and vapors, such as
gasoline, away from dryer.
Place dryer at least 18 inches (46 cm) above the floor
for a garage installation.
Failure to do so can result in death, explosion, or fire.