Important
• Ensure battery contacts and pod is clear of debris
and e-liquid residue.
• Keep pod at least 1/3 full for best longevity and
flavors.
• Do not vape if pod is empty.
• If there is a burnt taste, replace pod.
• Replace pod when there is a reduction in flavour or
vapour.
• Battery under 10% (3.30~3.50V): Red LED flashes
twice within 2 seconds.
• Battery at 10%~50% (3.50~3.65V): Red LED light
on 2 seconds.
• Gently insert TYPE-C USB cable correctly.
• Charge with a certified 5V wall charger and
included TYPE-C USB cable.
• Do not leave device charging unattend.
• Do not store device with a depleted battery.
• Keep at least 1/2 charged when not in use.
• Do not store device in direct sunlight or excessively
hot environments.
CHARGING & SAFETY
1. Fill the MVP Pod.
2. Insert pod into the MVP Mod.
3. Adjust wattage: Press the rapidly twice to
adjust power level.
How to Fill
• Pull tab to open
• Add E-Liquid carefully
• Push tab to securely
close
Fill Port
EN
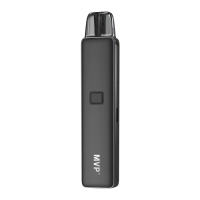
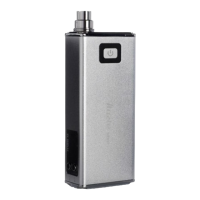
Airflow inlet
Power Level
USB-C Charging
Port
Battery LED
COMPONENTS HOW TO USE
POD
MOD
We hope
you enjoy your
new device!
Low 11W
High 12.5W
Low 11W
High 12.5W
IMPORTANT:
Wait at least 5 minutes
after filling a new pod
with e-liquid before vaping.
Device Charging, battery below 90%
Device Charging, battery 90% Charged
Device Fully Charged
Device Dimensions
Tank Capacity
Battery mAh
Minimum / Maximum
Wattage
Charging Current
Coil and Recommend
Wattage
107.9*22.7*13.4mm
2.7ml / 2ml(TPD)
500 mAh
11W / 12.5W
650mA / 5V
0.65Ω (11/12.5W)
SPECIFICATIONS
Importante
RICARICA E SICUREZZA
1. Riempire la Pod dell’MVP.
2. Inserire la Pod nell’MVP Mod.
3. Impostare il Wattaggio: Premere rapidamente
due volte per selezionare il wattaggio
Come riempire
• Tirare la linguetta per aprire
• Aggiungere con
attenzione l’E-liquido
• Premere la linguetta
per chiudere saldamente
Apertura per la
ricarica
IT
Foro d’ingresso
aria
Livelli di potenza
Porta di ricarica
USB-C
LED livello batteria
COMPONENTI UTILIZZO
POD
MOD
Basso 11W
Alto 12.5W
Basso 11W
Alto 12.5W
IMPORTANTE:
Attendere 5 minuti prima dell’
utilizzo per consentire la
saturazione della resistenza.
Dispositivo sotto carica, batteria al di sotto del 90%
Dispositivo sotto carica, batteria carica al 90%
Dispositivo completametne carico
Dimensioni Dispositivo
Capacità Pod
Batteria
Wattaggio
Minimo/Massimo
Corrente di Ricarica
Resistenza e Wattaggio
Minimo / Massimo
107.9*22.7*13.4mm
2.7ml / 2ml(TPD)
500 mAh
11W / 12.5W
650mA / 5V
0.65Ω (11/12.5W)
SPECIFICHE
• Quando la batteria è inferiore al 10% (3.30~3.50V):
Il LED rosso si illumina due volte in due secondi.
• Quando la batteria è al 10%~50% (3.50~3.65V): Il
LED rosso rimane acceso per due secondi.
• Inserire gentilmente il cavo USB di tipo C.
• Ricaricare con un caricatore da parete da 5V
certificato e il cavo USB di tipo C incluso.
• Non lasciare il dispositivo incustodito durante la
ricarica.
• Non conservare il dispositivo con la batteria scarica.
• Mantenere il dispositivo a metà carica quando non
in uso.
• Non conservare il dispositivo sotto luce solare
diretta o in ambienti caldi.
•
Mantenere i contatti puliti da sporcizia/liquidi.
• Tenere la pod piena per almeno 1/3 per una
durata e un gusto ottimali.
• Non svapare se la pod è vuota.
• Se si percepisce un sapore di bruciato, sostituire
immediatamente la resistenza.
• Sostituire la resistenza quando si verifica una
riduzione del sapore o del vapore.
Importante
CARGANDO Y SEGURIDAD
1. Llena el pod MVP.
2. Inserte el pod en el pod MVP.
3. Ajustar el vataje: Presione dos veces de manera
rápida para ajustar el nivel de energía.
Cómo llenar
• Tire de la tapa para abrir
• Agrega el e-líquido
con cuidado
• Empuje la tapa para
cerrar de forma segura
Puerto de llenado
ES
Entrada de flujo
de aire
Puerto de carga
USB-C
Nivel de energía de
la batería LED
COMPONENTES CÓMO USARLO
POD
MOD
Bajo 11W
Alto 12.5W
Bajo 11W
Alto 12.5W
IMPORTANTE:
Espere al menos 5 minutos
después de llenar una nueva
cápsula con e-líquido antes de vapear.
Carga el dispositivo, batería por de bajo del 90%
Carga el dispositivo, batería cargada al 90%
Dispositivo cargado por completo
Tamaño del dispositivo
Capacidad del tanque
mAh de batería
Vataje mínimo/máximo
Corriente de carga
Resistencia y vataje
recomendado
107.9*22.7*13.4mm
2.7ml / 2ml(TPD)
500 mAh
11W / 12.5W
650mA / 5V
0.65Ω (11/12.5W)
CARACTERÍSTICAS
• Batería a menos del 10% (3,30~3,50 V): El LED rojo
parpadea dos veces en 2 segundos.
• Batería a menos del 10%~50% (3,50~3,65 V): El
LED rojo se enciende 2 segundos.
• Inserte correctamente el cable USB TIPO-C con
cuidado.
• Cargue con un cargador de pared de 5 V
certificado y el cable USB TIPO-C incluido.
• No deje el dispositivo de carga desantendido.
• No guarde el dispositivo con la batería agotada.
• Mantenga al menos la mitad de la carga cuando no
esté en uso.
• No guarde el dispositivo bajo la luz solar directa o
en ambientes excesivamente calientes.
•
Asegúrese que los contactos de la batería y el pod
estén libres de desechos y restos de e-líquido.
• Mantenga el pod al menos 1/3 de su capacidad
para una mejor longevidad y sabores.
• No vaporice si la cápsula está vacía.
• Si hay un sabor a quemado, reemplace el pod.
• Reemplace el pod cuando haya una reducción de
sabor y vapor.
Wichtig
LADEN & SICHERHEIT
1. Füllen des MVP Verdampfers.
2. Setzen Sie den Verdampfer in den MVP Mod ein.
3. Stellen Sie die Wattzahl ein: Drücken Sie zweimal
schnell auf die Taste , um die Leistungsstufe
einzustellen.
Wie man ihn füllt
• Die Lasche zum Öffnen ziehen
• E-Flüssigkeit
vorsichtig einfüllen
• Die Lasche zum sicheren
Verschließen andrücken
Füllanschluss
DE
Luftstrom-Einlass
Leistungsstufe
USB-C-
Ladeanschluss
Akku-LED
BAUTEILE ANWENDUNG
POD
MOD
Niedrig 11W
Hoch 12.5W
Niedrig 11W
Hoch 12.5W
WICHTIG!
Warten Sie nach dem Befüllen
eines neuen Verdampfers mit
E-Flüssigkeit mindestens 5 Minuten,
bevor Sie vapen.
Gerät wird aufgeladen, Akku unter 90%
Gerät wird aufgeladen, Akku zu 90% aufgeladen
Gerät vollständig aufgeladen
Abmessungen des Geräts
Tankinhalt
Akku mAh
Minimale / maximale
Wattzahl
Ladestrom
Verdampferkopf und
empfohlene Wattleistung
107.9*22.7*13.4mm
2.7ml / 2ml(TPD)
500 mAh
11W / 12.5W
650mA / 5V
0.65Ω (11/12.5W)
TECHNISCHE DATEN
• Akku unter 10% (3,30~3,50 V): Rote LED blinkt
zweimal innerhalb von 2 Sekunden.
• Akku bei 10%~50% (3,50~3,65 V): Rote LED leuchtet 2
Sekunden lang auf.
• Stecken Sie das TYP-C-USB-Kabel vorsichtig und
korrekt ein.
• Laden Sie mit einem zertifizierten 5-V-Wandladegerät
und dem mitgelieferten TYP-C-USB-Kabel auf.
• Lassen Sie das Gerät beim Aufladen nicht
unbeaufsichtigt.
• Bewahren Sie das Gerät nicht mit leerem Akku auf.
• Halten Sie es mindestens zu 1/2 aufgeladen, wenn Sie
es nicht benutzen.
• Bewahren Sie das Gerät nicht in direktem Sonnenlicht
oder in übermäßig heißen Umgebungen auf.
•
Stellen Sie sicher, dass die Akkukontakte und der
Verdampfer frei von Ablagerungen und
E-Flüssigkeitsrückständen sind.
• Der Verdampfer sollte mindestens zu 1/3 gefüllt
sein, damit er lange hält und die besten
Geschmacksnoten liefert.
• Vapen Sie nicht, wenn der Verdampfer leer ist.
• Ersetzen Sie bei verbranntem Geschmack den
Verdampfer.
• Ersetzen Sie den Verdampfer, wenn die
Geschmacksnote oder die Dampfentwicklung
nachlässt.