www.insize.czwww.insize.skwww.insize.huwww.insize.at
4. BUTTONS
*short press -» shorter than 2 seconds; long press -» longer than 2 seconds
”on/off - set”
» Short press: Power on/off.
» Long press: Set the initial value in absolute measurement mode.
”data - mm/inch”
» Short press: To switch between absolute and relative measurement modes. The standard mode is absolute
measurement mode (the display shows “ABS”). Pressing the button at any point enters the relative
measurement mode (this point is called the “relative zero point”) (the display shows “INC”), the reading is zero.
In this measurement mode, the reading is the distance to the “relative zero point”. Another press of the button
will return you back to the absolute measurement mode.
» Long press: Conversion between mm/in units.
5. BEFORE MEASURING
1. Clean the measuring surfaces of the micrometer and the surface of the workpiece with a soft clean cloth.
2. Check the setting of the initial (zero) position of the micrometer.
» For a micrometer with a range of 0-25 mm/0-1":
Rotate the friction thimble so that both measuring surfaces come into close contact, then start rotating the
ratchet stop so that both measuring surfaces come into full contact. Continue with a long press of the “on/off -
set” button, this will set the initial (zero) position.
» For other ranges:
First measure the setting standard, hold the ends of the setting standard in full contact with the measuring
surfaces of the micrometer, then long press the “on/off - set” button and the display will show the length of the
setting standard.
If the zero mark on the friction thimble does not coincide with the longitudinal mark of the sleeve at this time, you
need to tighten the locking screw and use the spanner to slightly rotate the sleeve to set the value to zero.
The micrometer should be regularly checked to ensure that it is correctly set for the initial reading.
6. DURING MEASUREMENT, FIRST LET THE FIXED CONTACT POINT CONTACT THE WORKPIECE, THEN
ROTATE THE FRICTION THIMBLE OR RATCHET STOP.
When the measuring surfaces are close to the workpiece but are still not in contact with it, at this time only rotate
the ratchet stop (do not rotate the friction thimble anymore, as it would damage the precise internal threads).
Wait until you hear the “clicking” of the ratchet stop.
Warning: When the measuring surfaces are close to the workpiece but are not in contact with it, do not use
excessive force to rotate the ratchet stop, as this would lead to inaccurate results and could damage the precise
internal threads.
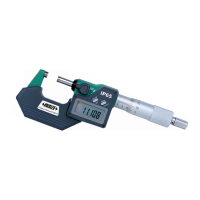
7. WHEN INSTALLING THE SPHERICAL FIXED CONTACT POINT, THE MICROMETER CAN MEASURE
THE THICKNESS OF THE TUBE.
3. INSTALL THE BATTERY
» Turn the battery cover 45° counterclockwise using the spanner (fig. 1), then remove it.
» Insert the CR2032 battery into the battery compartment, the positive side of the battery (+) should face out (fig.
2).
» Return the battery cover back and secure it by turning clockwise (fig. 3).
fig. 1
fig. 3
Positive side
fig. 2
 Loading...