Do you have a question about the Intek KT-380EE and is the answer not in the manual?
The use of VHF FM transceivers is subject to country-specific regulations.
Users must understand transceiver risks, avoiding use in explosive environments or hazardous locations.
Precautions to prevent fire, personal injury, or damage, including transmission limits and environmental care.
Carefully unpack the product and identify all included parts before discarding packaging.
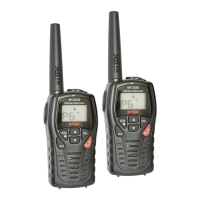
Lists the items included with the product, such as antenna, battery pack, and charger.
Connect the charger to the transceiver or battery and ensure the Red LED confirms power.
Battery must be fully recharged before use; avoid multiple recharges and overheating.
Align battery slots with the transceiver's fit runner and press down until the locker fastens it.
Press the battery locker on the rear side and slide the battery away from the radio.
Connect the antenna to the top panel connector and turn clockwise until locked.
Slide the belt clip along the fit runner on the battery's rear side until it hooks.
Install the rubber cover on the earset-microphone jack to maintain splash-proof integrity.
Remove the protection cover and insert the external microphone connector into the right jack.
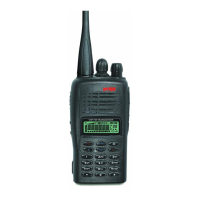
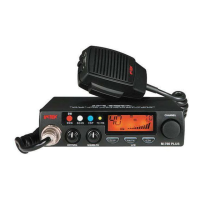
Identifies and describes key components like Antenna, Rotary Switch, Power ON/Volume control, and LCD Display.
Explains the function of Menu Key, EXIT Key, Numeric Keypad, and C (Clean) Key.
Details FUN Key, UP/DOWN Keys, Microphone, Speaker, RX/TX LED, PTT, LAMP, MONITOR keys, and charger contacts.
Describes the earset-microphone jack cover and desktop charger contacts.
Explains LCD indicators like Signal Meter, CT/DCS, Battery Level, VOX, and Keypad Lock.
Instructions on how to switch on the transceiver and adjust volume using the Power/Volume knob and MONITOR key.
How to select desired channels or frequencies using UP/DOWN keys or the channel selector.
Steps for transmitting using PTT key and receiving signals, including LED indicator status.
How to enter the menu using the FUN key and navigate through items with UP/DOWN keys.
Explains the role of C Key, UP/DOWN Keys, Menu/Confirmation Key, and EXIT Key in menu mode.
Procedure to initiate and stop scanning to find active channels or frequencies.
How to interchange receiving and emission frequencies using the T->R function.
Configuring CTCSS or DCS codes for transmission and reception.
How to switch between channel mode and frequency mode using numeric keys or the FUN key.
Configuration options for keyboard lock and LED backlight behavior.
How to enable/disable warning sounds and select High/Low RF output power.
Details on setting Squelch level, Emission Timing, VOX level, and Channel Spacing.
Lists shortcut key combinations using FUN key and numeric keys for rapid access to features.
Steps to set up radio channels, including selecting the desired channel number (1-80).
Inputting receiving frequencies and setting the default frequency step.
Configuring CTCSS or DCS codes for receiving, including enabling code selection.
Inputting transmitting frequencies and setting the default frequency step.
Selecting CTCSS or DCS codes for transmitting, including the desired code number.
Setting the BCL function to prevent transmission on occupied channels.
Options to add or delete channels from the scanning list.
Choosing between high (H) and low (L) RF output power settings.
Procedure to restore the radio to its original factory settings using a key combination.
Selecting between CTCSS disabled, CTCSS selection, and DCS selection modes for RX/TX.
Details frequency, channels, spacing, voltage, temperature, dimensions, and weight.
Details receiver sensitivity, selectivity, intermodulation, and audio output.
Details RF power, modulation, spurious emissions, deviation, and frequency stability.
List of optional accessories like earset-microphones, speaker-microphones, and programming kits.
| Power Output | 5W |
|---|---|
| Modulation type | FM |
| Channel Capacity | 16 |
| Weight | 220 g |
| Power source | Li-ion battery |