EasyManua.ls Logo

Intellitec LPL822 - User Manual

Intellitec LPL822
2 pages
Print Icon
To Next Page IconTo Next Page
Loading...
Operation
Washing: 20 Seconds
1. Press the Wash Button. The lens will illuminate green and begin to blink.
2. Wash your hands using warm water and soap as the green LED Light/Timer is blinking. The speed of the green flashing light
indicates your progress: it will blink faster as you get closer to finishing.
3. The lens will turn red when the time is up.
Brushing: 2 Minutes
1. Press the Brush Button. The lens will illuminate green and begin to blink.
2. Brush your teeth using your favorite toothpaste as the green LED Light/Timer is blinking. The speed of the green flashing light
indicates your progress.
3. The lens will turn red when the time is up.
NOTE: If you accidentally press the wrong button, simply press the rest button to reset the unit.
Mounting the Timer
Hook and Loop Tape (included):
1. Check the location of where you want to place the Timer. Make sure it is clean and that there is no debris or dust.
2. Remove the suction cup from the back of the bracket by sliding it down and pulling it away from the bracket.
3. The two sides of the hoop and loop tape come pre-attached for ease of mounting. Remove the paper covering on one sticky
side of the tape.
NOTE: Hook and loop tape may be cut to desired size for easier removal.
4. Place the tape in the recessed area in the center on the back of the Mounting Bracket.
5. Remove the paper covering on the other sticky side of the tape.
6. Place the Mounting Bracket in the desired location. Press firmly and hold for five (5) seconds so that the tape adheres to
the surface.
CAUTION: Be cautious of what surface the hook and loop adhesive is attached to, as it may remove paint or damage surface.
Screw (included):
You can secure the Timer mounting bracket to almost any surface using a screw. To do so, remove the Timer from the bracket by
sliding it up and out of the bracket.
1. Drill a pilot hole in the location where you want to mount the Timer. Place screw (included) in pre-drilled hole. Tighten slightly
until secure, but do not tighten all the way. Slide the Mounting Bracket keyhole slot over screw head and into position.
2. Tighten screw to secure mounting bracket to wall. Take care to not over tighten.
3. Place the Timer in the mounting bracket.
Suction Cup (included):
Use the suction cup to secure the mounting bracket to surfaces such as tile.
1. Slightly moisten the suction cup and press it onto the mounting surface.
2. The suction cup has a small pull tab for ease of release from mounting surface.
NOTE: If suction cup releases from mounting surface over time, repeat step 1 above.
LED “WASH & BRUSH” TIMER
LPL822 Owner’s Manual
1
2
3
4
5
6
Location of Controls:
1. Wash Button
2. Brush Button
3. LED Light
4. Reset Button
5. Mounting Bracket
6. Battery Compartment*
Unit requires 3 x 1.5V
AAA Batteries (not included)
*On back of unit
Mounting Bracket
Hook & Loop
T a pe Area
Keyhole
Slot
LPL822 Manual.indd 2 4/20/11 11:11:18 AM
Question and Answer IconNeed help?

Do you have a question about the Intellitec LPL822 and is the answer not in the manual?

Summary

Timer Controls and Operation

Control Panel Overview

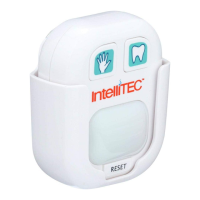
Identifies the Wash Button, Brush Button, LED Light, Reset Button, Mounting Bracket, and Battery Compartment.

Washing Timer Mode

Instructions for the 20-second handwashing cycle, including visual cues and completion signal.

Brushing Timer Mode

Instructions for the 2-minute teeth brushing cycle, including progress indication and completion signal.

Mounting the Timer

Hook and Loop Tape Mounting

Steps for attaching the timer to a surface using the included hook and loop tape.

Screw Mounting

Instructions on how to secure the timer mounting bracket using a screw.

Suction Cup Mounting

Guide for using the suction cup to attach the mounting bracket to smooth surfaces.

Battery and System Information

Battery Installation and Replacement

Guide for inserting and replacing the 3 AAA batteries in the timer.

Battery Precautions

Safety guidelines and important precautions for battery usage and handling.

FCC Compliance Statement

Details the device's compliance with FCC rules and potential interference guidelines.

Customer Support and Warranty

Customer Service

Information on where to find answers to common questions and support.

Limited 2 Year Warranty

Details regarding the product's 2-year limited warranty and return/repair process.

Overview

The IntelliTEC™ LED "WASH & BRUSH" TIMER, model LPL822, is a personal hygiene timer designed to encourage proper hand washing and teeth brushing durations. This device features a compact design with clearly labeled controls and multiple mounting options for user convenience.

Function Description:

The primary function of the LPL822 is to provide timed guidance for two common hygiene tasks: hand washing and teeth brushing. It utilizes an LED light to indicate progress and completion of the timed cycles.

For Washing (20 Seconds):

  1. Press the "Wash Button."
  2. The lens illuminates green and begins to blink.
  3. The green LED light/timer blinks faster as the user approaches the end of the 20-second cycle, indicating progress.
  4. The lens turns red when the 20-second timer is complete.

For Brushing (2 Minutes):

  1. Press the "Brush Button."
  2. The lens illuminates green and begins to blink.
  3. Similar to the washing function, the green LED light/timer blinks faster as the user progresses through the 2-minute cycle.
  4. The lens turns red when the 2-minute timer is complete.

A "Reset Button" is provided to correct accidental button presses, allowing the user to restart the unit.

Important Technical Specifications:

  • Power Source: The unit requires 3 x 1.5V AAA batteries (not included).
  • Battery Compartment: Located on the back of the unit.
  • LED Indicators: Green (for active timing and progress) and Red (for time completion).
  • Controls: Wash Button, Brush Button, Reset Button.

Usage Features:

The LPL822 offers versatile mounting options to suit various bathroom environments:

  1. Hook and Loop Tape (Included):

    • Ensures a clean, debris-free surface for adhesion.
    • The suction cup must be removed from the bracket first.
    • Pre-attached hook and loop tape simplifies application.
    • The tape is placed in the recessed area on the back of the Mounting Bracket.
    • Firm pressure for five seconds is recommended for secure adhesion.
    • Caution: Users should be mindful that the adhesive may remove paint or damage certain surfaces.
  2. Screw (Included):

    • Allows for secure attachment to almost any surface.
    • Requires removing the Timer from the bracket by sliding it up.
    • A pilot hole should be drilled, and the screw inserted, tightened slightly.
    • The Mounting Bracket's keyhole slot slides over the screw head for positioning.
    • The screw is then tightened to secure the bracket, avoiding overtightening.
    • Finally, the Timer is placed back into the mounting bracket.
  3. Suction Cup (Included):

    • Ideal for smooth surfaces like tile.
    • The suction cup should be slightly moistened before pressing it onto the mounting surface.
    • Features a small pull tab for easy release.
    • If the suction cup loses adhesion over time, re-moistening and re-applying is recommended.

Maintenance Features:

Battery Installation/Replacement:

  • Indication: A dim or non-illuminating lens indicates low batteries.
  • Procedure:
    1. Remove the Timer from its Mounting Bracket.
    2. Open the battery compartment by pulling up on the housing tab on the back of the unit.
    3. Remove old batteries (if applicable).
    4. Insert 3 new AAA batteries, ensuring correct polarity.
    5. Replace the battery compartment cover.

Battery Precautions:

  • Use only specified battery size and type.
  • Purchase the correct size and grade of battery.
  • Ensure correct polarity during installation to prevent device damage.
  • Do not mix alkaline, standard (Carbon-Zinc), or rechargeable (Nickel Cadmium) batteries.
  • Replace all batteries of a set simultaneously; do not mix old and new batteries.
  • Clean battery contacts on both the device and batteries prior to installation.
  • Do not dispose of batteries in fire.
  • Remove batteries if the device is not used for an extended period.

FCC Statement:

The device complies with Part 15 of the FCC Rules, ensuring it does not cause harmful interference and accepts any received interference. Users are advised that modifications not approved by the responsible party could void their authority to operate the product. Troubleshooting steps for interference include reorienting the antenna, increasing separation between equipment and receiver, connecting to a different circuit, or consulting a radio/TV technician.

Limited 2 Year Warranty:

For warranty details and directions on repair or replacement, users should visit www.lancerandloader.com. For recently purchased items, returning to the retailer is the quickest option, as return policies vary by retailer.

The IntelliTEC™ LED "WASH & BRUSH" TIMER is a user-friendly device designed to promote better hygiene habits through simple, visual timing cues and flexible installation options.

Intellitec LPL822 Specifications

General IconGeneral
BrandIntellitec
ModelLPL822
CategoryTimer
LanguageEnglish