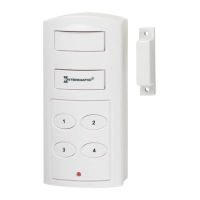
Mini - Alarm
Door/Window Alarm
SP440B
Location of Controls
1. Siren
2. On/Off Switch
3. Battery Compartment
4. Magnetic Contact
5. Double Stick Tape
Installation - Attach the siren next to a door or
window using the enclosed double stick tape.
Mount the magnetic contact no more than
1/2” to the right of the Siren and flush with its
edge using double stick tape.
Operation - When leaving the protected area,
make sure the mini-alarm is switched to the on
position. When the contact is broken, the alarm
will sound.
Battery Replacement - Access the battery com-
partment by lowering the cover. (A) Insert three
(3) AG13 Button Cell Batteries following polarity
diagram and replace cover (B).
NOTE: Not intended for use in exposed outdoor
applications. Will not operate properly if used
in below freezing temperatures (32˚F) or damp
locations.
WARNING: NOT INTENDED FOR USE AS A
RESIDENTIAL WATER HAZARD ENTRANCE
ALARM.
ART 618C
Système de mini alarme
Alarme de fenêtre/porte
SP440B
Emplacement des contrôles
1. Sirène
2. Interrrupteur marche/arrêt (ON/OFF)
3. Compartiment de pile
4. Contact magnétique
5. Ruban adhésif double-face
Installation - Placez la sirène à l’endroit voulu,
de préférence près d’une fenêtre ou d’une
porte, en utilisant le ruban adhésif double-face.
Montez le contact magnétique au plus à 1/2 po
à droite de la siréne et au même niveau que son
bord à l’aide du ruban adhésif double-face.
Fonctionnement - Lorsque vous quittez l’en-
droit protégé, assurez-vous que la mini alarme
est en position de marche. Lorsque le contact
est brisé, l’alarme retentira.
Remplacement de pile - Abaissez le couvercle
pour atteindre le compartiment de pile (A).
Insérez trois (3) piles bouton AG13 en respec-
tant le diagramme de polarité et replacez le
couvercle (B).
REMARQUE: Ce produit n’a pas été conçu pour
être utilisé dans des applications extérieures
exposées. Il ne fonctionnera pas à des
températures inférieures à 0 degré C ou dans des
emplacements humides.
AVERTISSEMENT : CETTE ALARME DÉTECTANT
LES ENTRÉES DANGEREUSES DANS L’EAU N’A
PAS ÉTÉ CONÇUE POUR DES APPLICATIONS
RÉSIEDENTIELLES.
(A)
(B)
1
2
3
4
5
Mini alarma
Alarma para puerta o ventana
SP440B
Ubicación de los controles
1. Sirena
2. Interruptor de encendido/apagado (On/Off)
3. Compartimiento de las pilas
4. Contacto magnético
5. Cinta adhesiva de ambas caras
Instalación - Coloque la sirena en el lugar
deseado, de preferencia cerca de la ventana
o la puerta, sirviéndose de la cinta adhesiva de
ambas caras. Monte el contacto magnético a no
más de 1/2 pulg. a la derecha de la sirena y al
nivel del borde de ésta, sirviéndose de la cinta
adhesiva de ambas caras que viene incluida.
Operación - Al alejarse del área protegida, cer-
ciórese de que la mini alarma esté en la posición
de encendido. Si se interrumpe el contacto, la
alarma se activará.
Cambio de pilas - Deslice la tapa del compar-
timiento de las pilas hacia abajo (A). Coloque
tres (3) pilas de botón AG13 según indica el
diagrama de polaridad y vuelva la tapa a su
sitio (B).
NOTA: No debe usarse en aplicaciones exteri-
ores al descubierto. No funciona si se usa a tem-
peraturas de congelación (menores que 32˚F) o
en lugares húmedos.
ADVERTENCIA: ESTA ALARMA DE ENTRADA
PELIGROSA DE AGUA NO ESTÁ DISEÑADAS
PARA SER USADA EN APLICACIONES
RESIDENCIALES.
REMOVE
BEFORE USING
QUITELO
ANTES DE USAR
ENLEVER AFIN
D’UTILISER