01-9932-00 ViewBladder 10 User Guide Revision 2 17
Appendix A - Software Installation
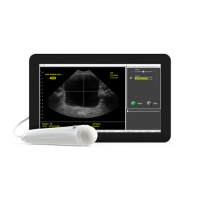
ViewBladder 10 is delivered with the software already installed in the tablet.
These software installation instructions only apply if you would like to load the software onto
another Windows 7 computer.
Email sales@Interson.com to get a copy of the ViewBladder 10 software.
Do NOT plug in the USB ultrasound probe until the software has been fully installed.
Software installation:
1. Plug in the Memory Stick to one of the computer’s USB 2.0 ports.
2. Navigate to the location that contains the file ViewBladder 10 Setup.exe
3. Click on the icon ViewBladder 10 Setup.exe
4. Follow the on-screen instructions - click Next when prompted.
5. When installation is complete, click Finish.
6. Do NOT launch the ViewBladder application - the drivers need to be installed.
7. Connect the ultrasound probe to an available USB 2.0 port.
8. Wait for the first driver to install. Windows 7 will confirm the installation.
9. Launch the ViewBladder application using the shortcut on the desktop.
10. The second driver will install. Windows 7 will confirm the installation.
11. ViewBladder 10 will now launch and you are ready to scan.