EasyManua.ls Logo

iProven BPM-617 - User Manual

iProven BPM-617
18 pages
Print Icon
To Next Page IconTo Next Page
Loading...
Thank you for choosing iProven. Please read the instructions
carefully in order to accurately and safely utilize this device.
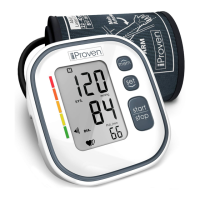
The BPM-617 measures blood pressure and heart rate and saves the
results. It offers real-time clinically accurate readings that are simple
and easy to read thanks to the Oscillometric Measuring method. This
method measures blood pressure while the cuff is inflating thereby
offering fast and accurate results. The inflation stops once
the maximum blood pressure measurement has been achieved.
This avoids any discomfort or excessive squeezing of the wrist.
Blood pressure measurements may be invalid or inaccurate if they are
not performed in accordance with the instructions provided in this
manual. Please keep this manual handy for future reference.
You can also find the digital version on www.iproven.com
Intended use of the BPM
The BPM-617 is an upper arm digital monitor that is used for measuring
blood pressure and heart rate with an arm circumference ranging from
8 ¾” - 16 ½” (22cm to 42cm). The device is intended for home use and
adults only. The cuff should be maintained at the same level as the
heart.
Special features
The BPM-617 comes with a user memory feature that can save up
to 250 measurements for two different users (500 total), aside
from a guest mode. You can sync your device with the app, to store an
unlimited number of measurements. The device provides an average of
the last three readings taken within 30 minutes so that you can keep
track of your health and check for hypertension.
Upon completing a new measurement, it will also display your prior
measurement for an easy instant comparison of readings. The voice
broadcast mode (which can be switched on or off) makes it easy to
know your results without having to check the screen.
The large, 5.7” wide,
high-contrast monitor
screen and backlit dis-
play help read results
easily, even in the dark.
The device is FDA-ap-
proved and comes with
a WHO indicator and a
five-year warranty. It is
also one of the quieter
devices with a noise
level of less than 48dB.
Before using your device
For an accurate result and the best insight into your blood pressure pat-
tern, please measure using the same arm every time. It is recommended
to use the left arm which has a better blood flow.
• Take your blood pressure at the same time(s) every day.
• Do not use the device in a cold environment.
• Avoid hot drinks, caffeine, tobacco, food, alcohol, and strenuous
exercises at least 30 minutes before taking your blood pressure.
• Empty your bladder before taking your measurement.
Preparing the measurement
Before a measurement sit down and relax for 3 minutes. Let your blood
pressure stabilize.
Make sure you remove all accessories from the wrist and arm
(bracelets, watch, etc) before strapping the cuff to your arm.
Roll up your sleeve to reveal the skin of your upper arm and ensure
your sleeve isn’t too tight.
Hold your arm with your palm facing up and slide the cuff onto
your upper arm approximately one inch above the bend in your
elbow.
Position the tube off-center toward the inner side of the arm in
line with the little finger. Or position the artery mark on the cuff
over the main artery.
Fasten the cuff to your arm tightly but not painfully. There should
be a one-finger space between the cuff and your skin.
Ensure that your test arm is resting on a flat surface, with your
palm facing up.
Sit comfortably with your back straight and supported.
Keep your feet flat on the floor and do not cross your legs.
Using the app
Our device works perfectly well even without an app. If you would
like to use it with the app, please follow the instructions in the insert
provided in the box.
Taking a measurement
1. Breathe slowly 5 times and press the START/STOP button to begin
the measurement. Keep your arm still.
2. First, the measured air pressure will calibrate to zero and then the
cuff will inflate and start reading the blood pressure and heart rate.
3. The symbol should indicate OK meaning the cuff is cor-
rectly secured. If the flashes that means there’s too much
movement and you need to hold your arm still.
4. When the measurement has been completed, the results will appear
on the screen. The measurement is also saved in the memory.
5. Remove the cuff and switch off the monitor.
World Health Organization(WHO) and International Society of Hypertension(ISH)
Basic info about blood pressure
Systolic pressure means that the ventricles contract and pump out
blood, increasing the blood pressure. This is sometimes referred to as
the “higher number”. The diastolic pressure means that the ventricles
relax so the blood pressure decreases. This is sometimes referred to as
the “lower number”.
Irregular heartbeat
The device is equipped with irregular heartbeat detection, IHB. The
algorithm of the device compares the longest and shortest intervals of
registered pulse waves (the time interval) and calculates the standard
deviation. If the differences in the time intervals are more than 25% you
have an irregular heartbeat and the IHB sign: will appear on the display.
If the device detects irregular heartbeat during consecutive measure-
ments and you are following the correct procedure, please consult your
doctor.
Changes in blood pressure
There are many factors that cause fluctuations in blood pressure.
Weather, emotions, stress, food, and physical activities, all these cause
variations in blood pressure. Bear in mind that measuring in clinical
settings tends to cause blood pressure to increase. This is called the
“white coat effect.
Using the memory function
Make sure that the date and time are set correctly.
(See “Setting up the device” section)
Every measurement is automatically saved in the memory. It has
a maximum capacity of 500 (250 x 2 users) measurements. To
view the recorded data press the MEM button while the monitor
is inactive.
Once the button is pressed, one of the user symbols starts blin-
king. To switch to the other user, press the SET button.
It will display the average value of the last 3 records first (if taken
within a 30-minute period) and indicated by the AVG symbol.
Use the MEM and SET buttons to go through the previous records.
Note: The most recent record is shown first followed by the
previous measurements.
Deleting the records
If you want to delete one of your recorded measurements, follow these
steps:
1. Make sure the monitor is inactive; press the START/STOP button
to put it off if needed.
2. Press MEM to go to Memory. One of the user symbols will start
blinking.
3. To switch to the other user, press the SET button.
4. Use the MEM and SET buttons to find the record you want to
delete.
5. Press and hold the START/STOP button for 3 seconds.
6. “DEL” will appear with “Y” blinking. Press the SET button to
confirm.
7. If you don’t want to delete it, press the MEM button to get “NO”
and SET to confirm.
8. “DONE” will appear, indicating that the selected stored data is
deleted.
In case you want to delete ALL of your recorded measurements for one
user, follow these steps:
1. When the device is in the memory function, select the user
whose records you want to delete and press the SET button for 3
seconds.
2. “DEL” will appear on the screen and “AL” will be blinking
3. Press the SET button to confirm.
4. “DONE” will show meaning all the selected stored data for that
user is deleted.
Components of the BPM
Cuff
Air Hose
PCBA
Pump
Valve
Understanding the results
Optimal
Normal
less than 120
90-99
100-109
160-179
80-84
less than 80
120-129
High normal
Mild
hypertension
Moderate
hypertension
130-139
140-159
85-89
And
And
Or
Or
And/Or
Blood Pressure
Category
Systolic
mmHg (upper#)
Diastolic
mmHg (lower#)
Severe
hypertension
SYMBOL DESCRIPTION EXPLANATION
Irregular heartbeat
Irregular heartbeat
Heartbeat Heartbeat dectetion during measurement
Systolic blood pressur igh pressure result
Diastolic blood pressure
Low pressure result
User ID
Current Time Time(year:month:day:hour:minute)
Battery Indicator Indicate the current battery
Data transmitting
Data is transmitting
Average value
The average value of the
blood pressure
The bluetooth icon blinks when the
bluetooth is working
Bluetooth icon
User 1/2/Guest
Hand shaking
Hand shaking makes results inaccurate
Measurement Unit of the blood pressure
Voice broadcast
The function of voice broadcast is turned off
Cuff wearing
The cuff is secured
mmHg
PULSE/min
Pulse display
Pulse in beats per minute
LATEST
PRIOR
The latest record
The Prior record
The latest record
The Prior record
Upper Arm Blood
Pressure Monitor
BPM-617
Instruction Manual
Manual Version: 15082022
©2022. All rights reserved.
CUFF
AIR HOSE
AIR CONNECTOR PLUG
LCD DISPLAY
DC POWER SOCKET
MEM BUTTON
START/STOP BUTTON
SET BUTTON
e
H
Installing the batteries
1. Open the battery cover.
2. Insert four AA batteries as
per the symbols in the battery
compartment.
3. Close the battery cover.
Setting the date and time
Firstly, ensure you set the time and date correctly so the device can
record the results with the correct details. You can also choose whether
to keep the voice mode on or off.
1. With the monitor OFF, press and hold the SET button. It will
display the Bluetooth symbol
2. Press the SET button again it will enter voice setting mode. You
will hear “Voice on” or “Voice off. Press the MEM button to change
it on or off and to increase the voice volume. Select the SET but-
ton to confirm the voice setting.
3. Press the MEM button to switch the date format between month/
day/year and day/month/year.
4. Press the SET button to confirm the date format, then the year
will flash. Press the MEM button to change the year and SET to
confirm.
5. Repeat step 4 for setting the date, month, and time.
6. After completing the settings, the LCD will display DONE and it
will turn off.
Professional Care Brought Home
1
2
3
1
Higher than 180
And/or
Higher than 120
8
4
5
Heartbeat dectection during measurement
10
Choose your power supply
This device can be used either with included batteries OR an AC adapter.
1. Battery mode: Use 4 AA batteries as indicated
2. AC Adapter mode: Use the adapter cable included in the box with
a 5V–1A charger
Note - The adapter cannot be used to charge or recharge the batteries
Scan for
online copy
2
3
6
7
9
WHO indicator
After each measurement, the indicator shows the corresponding cate-
gory color on the right of the display. The colors represent the different
categories of the World Health Organisation blood pressure classifica-
tion as depicted in the chart. The indicator helps you quickly interpret
the results of the measurement.
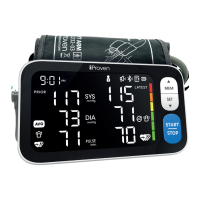
Upon completing your measurement, you will see on the display the
date and time of your reading, your systolic pressure, diastolic
pressure, heart rate, WHO blood pressure color indication,
user 1, 2 or guest who’s taking the measurement, if you have
an irregular heartbeat (See “Irregular Heartbeat” section for more) and
details of your prior measurement.
3
4
5
6
7
8
9
10
1
2
Setting the user ID
There are 3 user IDs. User 1 and user 2, with memory storage of 250
readings each, and a guest user with no memory space.
1. When the display is off, press the SET button and the user ID will
show. Press it again to switch between the users - user 1, 2 or
guest.
2. Press the START/STOP button to confirm the user ID and then
proceed to your measurement.
Indicates the capacity of the battery
Question and Answer IconNeed help?

Do you have a question about the iProven BPM-617 and is the answer not in the manual?

Summary

Intended Use and Key Features

Intended Use of the BPM

Specifies the device is for adult upper arm blood pressure and heart rate monitoring at home.

Special Features

Highlights memory storage, app sync, average readings, voice broadcast, large screen, and FDA/WHO compliance.

Power Supply Options

Initial Setup Procedures

Installing the Batteries

Guide to opening the battery cover, inserting four AA batteries, and closing the cover securely.

Setting the Date and Time

Instructions for setting the date, time, and voice mode for accurate measurement records.

Using the iProven App

Details on connecting and using the device with the companion mobile application for enhanced features.

Setting the User ID

How to select between User 1, User 2, or Guest mode prior to taking a blood pressure measurement.

Measurement Preparation and Best Practices

Before Using Your Device

Advice on selecting the correct arm, timing, and avoiding factors that can affect readings.

Preparing the Measurement

Steps for preparing the arm, positioning the cuff correctly, and ensuring a proper seated posture.

Performing and Understanding Measurements

Taking a Measurement

Step-by-step instructions on how to initiate, perform, and complete a blood pressure reading accurately.

Understanding the Results

Explanation of displayed readings: systolic, diastolic, pulse, and WHO color indicator.

Basic Blood Pressure Information

Explanation of systolic and diastolic pressure as the 'higher' and 'lower' numbers.

Interpreting Blood Pressure Readings

WHO Indicator Guide

Details the color-coded categories for blood pressure classification based on WHO/ISH standards.

Irregular Heartbeat Detection

Explains the IHB detection feature and when to consult a doctor for frequent occurrences.

Factors Affecting Blood Pressure

Lists factors influencing blood pressure and explains the 'white coat effect'.

Memory Function and Data Management

Using the Memory Function

How to view, navigate, and utilize saved measurement records and average values.

Deleting Recorded Measurements

Instructions for deleting individual or all measurements for a selected user profile.

Device Components and Interface Symbols

Components of the BPM

Identifies the physical parts of the blood pressure monitor and their functions.

Symbol Explanations

Details the meaning of various symbols displayed on the device screen, including SYS, DIA, AVG, etc.

Technical Specifications

Cautionary Warnings and Safety Precautions

Maintenance and EMC Guidance

Technical Description and Safety Information

Electromagnetic Emissions Compliance

Electromagnetic Immunity Compliance

FCC Statement and Troubleshooting Guide

Copyright and Product Warranty

Customer Support and Distribution

Overview

This document describes the iProven BPM-617 Upper Arm Blood Pressure Monitor, an upper arm digital monitor designed for measuring blood pressure and heart rate. It is intended for home use by adults and offers real-time, clinically accurate readings using the Oscillometric Measuring method. This method measures blood pressure while the cuff is inflating, providing fast and accurate results and stopping inflation once the maximum blood pressure measurement is achieved, thereby avoiding discomfort or excessive squeezing.

Function Description:

The BPM-617 measures systolic blood pressure, diastolic blood pressure, and pulse rate. It features a user memory that can save up to 250 measurements for two different users (500 total), in addition to a guest mode with no memory space. The device can sync with a mobile app to store an unlimited number of measurements. It provides an average of the last three readings taken within 30 minutes to help users track their health and check for hypertension. After a new measurement, it displays the prior measurement for easy comparison. A voice broadcast mode, which can be switched on or off, announces the results, eliminating the need to check the screen. The device is FDA-approved and includes a WHO indicator for blood pressure classification. It also features irregular heartbeat detection (IHB).

Important Technical Specifications:

  • Arm Circumference Range: 8 ¾" - 16 ½" (22cm to 42cm).
  • Display Mode: Digital LCD, V.A. 124mm × 76mm.
  • Measurement Mode: Oscillographic testing mode.
  • Rated Cuff Pressure: 0mmHg~299mmHg.
  • Measurement Pressure:
    • SYS: 60mmHg~230mmHg
    • DIA: 40mmHg~130mmHg
    • Pulse value: (40-199)beat/minute
  • Accuracy:
    • Pressure: 5 °C - 40 °C within ±3 mmHg
    • Pulse value: ±5%
  • Power Supply:
    • Battery powered mode: 6VDC 4×AA batteries.
    • AC adaptor powered mode: 5V ⎓ 1A (only use the recommended AC adaptor model).
  • Normal Working Condition:
    • Temperature range: +5°C to +40°C.
    • Relative humidity range: 15% to 90%, non-condensing, but not requiring a water vapor partial pressure greater than 50 hPa.
    • Atmospheric pressure range: 700 hPa to 1060 hPa.
  • Storage & Transportation Condition:
    • Temperature: -20°C to +60°C.
    • Relative humidity range: ≤ 93%, non-condensing, at a water vapor pressure up to 50 hPa.
  • Weight: Approx. 325g (Excluding batteries and cuff).
  • External Dimensions: Approx. 174mm×100mm×41mm.
  • Attachment: 4×AA batteries, user manual, AC adapter.
  • Mode of Operation: Continuous operation.
  • Degree of Protection: Type BF applied part.
  • Protection against Ingress of Water: IP21 (protected against solid foreign objects of 12.5mm and greater, and against vertically falling water drops).
  • Device Classification:
    • Battery Powered Mode: Internally Powered ME Equipment.
    • AC Adaptor Powered Mode: Class II ME Equipment.
  • Software Version: A01.
  • Noise Level: Less than 48dB.

Usage Features:

  • Large Display: A large, 5.7" wide, high-contrast monitor screen with a backlit display for easy reading, even in the dark.
  • Power Options: Can be powered by 4 AA batteries (included) or an AC adapter (cable included, requires a 5V-1A charger). The adapter cannot charge or recharge batteries.
  • Date and Time Setting: Essential for accurate record-keeping. The device allows setting the date format (month/day/year or day/month/year).
  • User ID Selection: Supports User 1, User 2 (each with 250 measurement memory), and a guest user. Users can switch between IDs by pressing the SET button when the display is off.
  • Measurement Preparation: Users should sit down and relax for 3 minutes before a measurement. All accessories should be removed from the wrist and arm, and the sleeve rolled up. The cuff should be placed on the upper arm, approximately one inch above the elbow bend, with the palm facing up. The tube should be positioned off-center toward the inner side of the arm, in line with the little finger, or the artery mark on the cuff over the main artery. The cuff should be fastened tightly but not painfully, allowing one finger space between the cuff and skin. The test arm should rest on a flat surface with the palm facing up, back straight and supported, and feet flat on the floor without crossing legs.
  • Taking a Measurement: Breathe slowly 5 times, then press the START/STOP button. The cuff will inflate, and the device will read blood pressure and heart rate. An "OK" symbol indicates correct cuff placement; a flashing "8" indicates too much movement. Results appear on the screen and are saved in memory upon completion.
  • Memory Function: Measurements are automatically saved. To view recorded data, press the MEM button when the monitor is inactive. The device displays the average of the last 3 records (if taken within 30 minutes) first, then allows scrolling through previous records using MEM and SET buttons.
  • Deleting Records: Individual records can be deleted by navigating to the desired record in memory, then pressing and holding START/STOP for 3 seconds, confirming with SET. All records for a specific user can be deleted by selecting the user in memory, pressing SET for 3 seconds, and confirming.
  • App Connectivity: The device can be synced with an app for unlimited measurement storage.

Maintenance Features:

  • Storage: Store the device away from direct sunlight and in a dry place.
  • Cleaning: Clean the device with a dry cloth. Do not immerse it in water or clean it with wet cloths.
  • Handling: Handle the device carefully; avoid shaking or throwing it.
  • Environment: Keep the device in a room with a stable temperature and away from dust for better performance.
  • Cuff Cleaning: The cuff should not be cleaned as it may affect reading accuracy.
  • Calibration: No calibration is needed during the two years of guaranteed service.

Safety Information and Warnings:

  • Intended for indoor, home use only, not for public use or continuous monitoring during medical emergencies/operations.
  • Not for use on extremities other than the arm or for purposes other than obtaining a blood pressure measurement.
  • For adults only; not for use on babies or infants unless medically instructed.
  • Not for use on pregnant women (including pre-eclamptic patients) or patients with implanted electrical devices (e.g., pacemakers, defibrillators).
  • Effectiveness not established for users with common arrhythmias (atrial/ventricular premature beats, atrial fibrillation), peripheral arterial disease, intravascular therapy, or arteriovenous (AV) shunt. Consult a medical professional in these cases.
  • Not for diagnosis or treatment of health problems; do not change medications without physician's advice.
  • Consult a physician for proper measurement time if taking medication.
  • Manufacturer is not liable for incidental, consequential, or special damages due to misuse or abuse.
  • Report any unexpected operation or events to the manufacturer.
  • Do not apply the cuff on an arm with an intravenous drip or blood transfusion.
  • Do not kink, fold, stretch, compress, or deform the tube during measurement, as continuous cuff pressure increase can prevent blood flow and cause injury.
  • Frequent measurements can disrupt blood circulation and cause injuries.
  • Do not apply the cuff to delicate or damaged skin; check cuff site frequently for irritation.
  • Do not place the cuff on the arm of a person undergoing medical treatment involving intra-vascular access, intra-vascular therapy, or an arteriovenous (A-V) shunt, as this could disrupt blood circulation and cause injuries.
  • Do not place the cuff on the same side of a mastectomy (especially if lymph nodes have been removed); use the unaffected side.
  • Do not wrap the cuff on the same arm as another monitoring device.
  • Check that device operation does not result in prolonged impairment of patient blood circulation.
  • In case of cuff remaining fully inflated due to a fault, loosen and remove it immediately to prevent bruising and discolored skin from prolonged high pressure (>300 mmHg or constant pressure >15 mmHg for over 3 minutes).
  • Do not use with high-frequency (HF) surgical equipment simultaneously.
  • Prolonged cuff inflation can lead to numbness, pain, and ecchymosis in the wrist and fingers.
  • The cuff complies with ISO 10993-5:2009 and ISO 10993-10:2010; it does not cause allergic reactions, but those allergic to polyester, nylon, or plastic should take caution.
  • The ME EQUIPMENT or ME SYSTEM is suitable for home healthcare environments.
  • Avoid proximity to active HF surgical equipment and RF shielded rooms of ME systems for magnetic resonance imaging where EM disturbances are high.
  • No modification of this equipment is allowed.
  • If the product does not work, contact customer service; do not disassemble or attempt repairs yourself.

iProven BPM-617 Specifications

General IconGeneral
BrandiProven
ModelBPM-617
CategoryBlood Pressure Monitor
LanguageEnglish

Related product manuals