EasyManua.ls Logo

Ironside 102777 - User Manual

Ironside 102777
5 pages
Print Icon
To Next Page IconTo Next Page
Loading...
Multi-Function Jump Starter
102777
Operation Manual
Thank you for choosing the Ironside jump starter.
Always follow basic safety precautions when using electrical device.
Read all instructions carefully.
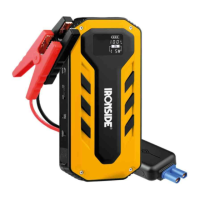
Identification parts
Products and accessories
Operating Instructions
1. How to get the engine started?
Make sure the Jump starter is fully charged.
Check the indicators (4). Make sure the smart clamp is plug to the jump starter
output jack (7), connect the positive and negative terminal to the car battery
red clamp to positive and the black to negative.
Start the car only when the green indicator lights long.
When the vehicle is started, unplug the jumper cable from the car battery. Leave
the vehicle running!
Indicator light
Indicators
Causes
Handling
Red lights long
Battery is not enough charged
C
harge the Jump start battery
Red & Green light one by
one
Check the clamp polarity
Connect the positive and
negative terminal to the car
Red flash
& buzzer gives
long sound
Clamps are short circuit or the
positive and negative poles are
reversed
Unplug the connector of the
battery clamp and take off the
clamp from the battery poles
Green
lights
Clamps are connected
Ready start the car
Turn
the key to start the car
R
ed & Green light together
Get the car started successfully
End the operating
2. LED flash light
Press the switch (5) to “ON” position, then press the button (3) for 3 seconds to
switch on the LED lighting system, and then press button (3) to change different
lighting way. The LED light will go on from normal to SOS signal, strong flash. Long
press can shut off the LED light.
3. How to charge devices with the jump starter?
Push the master switch button (5) of the jump starter to “ON” position, then short
press the button (3), the indicator lights which means the product can charge
phones and tablet PC.
4. How to charge the jump starter?
Connect the matching charger to the jack (6), the other to a power source terminal
(220V/110V grid or 12V car power). The indicators (4) on the starter begin to flash
when charging.
The jump starter is full charged if the indicators turn off.
Specifications
Capacity:11100mAh (3700mAh*3)
DC Input:15V 1A
USB Output 1: 5V 2.1A
USB Output 2: 5V 1A
DC Output: 12V 5A Start current: 200A
Peak current: 300A (can keep 400A for 0.5 seconds)
Start voltage: 12V
Operating Temperature: -20-60
Cautions
1. In case of no using the battery for long time, please keep some capacity in the
battery. We suggest to full discharge and charge the battery for at least one
time.
2. During the charging process the battery may heat a little this is normal process
3. Do not use or leave the battery in a high temperature environment and keep
away from humidity and explosive environment. Do not charge the jump
starter under zero degree please!
4. Do not transport or store the battery together with metal objects
5. Do not clean the product with rough chemicals, like soap or something with
strong acid or strong base!
6. Do not drop the product!
7. Keep away from children!
8. Do not leave or burn the product out of work!
9. Please wait at least 1 minute if continuously start a car!
10. Please keep away from car engine when start the car, in order to avoid body
harm from engine rotation!
11. Please disconnect the jump starter and the car battery after engine starting,
in order to avoid any damages!
12. Please try again if turning the key more than 3 seconds without start car
successfully! And do not turn the start key for too long time please!
13. Please take off the clamps after start the car successfully for prolonging the
cycle life of the product!
14. The start output jack is for starting car only.
15. Do not charge the jump starter immediately after starting car please, charge
it after 30 min.
16. Operating Temperature: -20-60
17. Storage Temperature: 0-40
18. Turn the master switch to "OFF"!
IRONSIDE INTERNATIONAL declares that this new product complies with the
following regulations:
ART 102777
WT-C101
DesignatIon JUMP STARTER
EMC DIRECTIVE 2014/30/EU
EN 55032: 2015
EN 55035: 2017
Certification number EMC AT18230EC001114 Report No.:
18230EC00111401 date 2018/6/28 issued by Shenzhen Anbotek
Compliance Laboratory Limited 1/F, Building D, Sogood Science and
Technology Park, Sanwei community,Hangcheng Street, Bao'an District,
Shenzhen, Guangdong, China.51812
Name and signature Date and place
Stéphane DERRIEN 14/05/2021
TREMBLAYE EN FRANCE
1. LED Light
2. 5V USB Output
3. Func Button
4. Capacity indicators
5. Master Switch
6. Charging Input
7. Output jack of the jump starter
Question and Answer IconNeed help?

Do you have a question about the Ironside 102777 and is the answer not in the manual?

Overview

The Ironside Multi-Function Jump Starter (Model 102777) is a portable power device designed for various applications, primarily to jump-start vehicles and charge electronic devices. It is a compact and robust tool, emphasizing safety and ease of use, suitable for both professionals and general users.

Function Description:

The primary function of this device is to jump-start a vehicle with a dead battery. It achieves this by providing a temporary power boost to the car's battery through smart clamps connected to the jump starter's output jack. The device incorporates a "smart cable" system with indicator lights that guide the user through the jump-starting process, ensuring correct polarity and sufficient charge before attempting to start the engine. Green lights indicate readiness to start, while red lights or flashing red with a buzzer signal issues like insufficient charge, incorrect polarity, or short circuits.

Beyond jump-starting, the device also serves as a portable power bank. It features two USB outputs (5V 2.1A and 5V 1A) for charging mobile phones, tablets, and other USB-powered electronic devices. A DC output (12V 5A) is also available for compatible accessories.

Additionally, the jump starter includes an integrated LED lighting system. This LED light can function in various modes: normal illumination, SOS signal, and strong flash, providing utility in low-light conditions or emergency situations. The lighting system is activated and cycled through modes using a dedicated function button.

Important Technical Specifications:

  • Capacity: 11100mAh (equivalent to 3700mAh x 3 cells).
  • DC Input: 15V 1A (for charging the jump starter itself).
  • USB Output 1: 5V 2.1A.
  • USB Output 2: 5V 1A.
  • DC Output: 12V 5A.
  • Start Current: 200A.
  • Peak Current: 300A (capable of sustaining 400A for 0.5 seconds).
  • Start Voltage: 12V.
  • Operating Temperature: -20°C to 60°C.
  • Storage Temperature: 0°C to 40°C.

The device complies with EMC DIRECTIVE 2014/30/EU, EN 55032: 2015, and EN 55035: 2017 standards, as certified by Shenzhen Anbotek Compliance Laboratory Limited.

Usage Features:

  1. Jump Starting a Vehicle:

    • Ensure the jump starter is fully charged by checking the capacity indicators.
    • Plug the smart clamp into the jump starter's output jack (7).
    • Connect the red clamp to the positive (+) terminal of the car battery and the black clamp to the negative (-) terminal.
    • Wait for the green indicator lights to illuminate steadily, indicating readiness.
    • Start the car's engine.
    • Once the car starts, immediately disconnect the jumper cables from the car battery and the jump starter.
    • If the car does not start after 3 seconds, release the key and try again after a short wait. Avoid prolonged cranking.
    • If the car fails to start after three attempts, wait at least 1 minute to allow the smart clamp to cool down before trying again.
  2. Charging Electronic Devices:

    • Push the master switch button (5) to the "ON" position.
    • Short press the function button (3). The indicator lights will illuminate, signifying that the device is ready to charge phones and tablets via the USB outputs.
  3. Using the LED Flashlight:

    • Push the master switch button (5) to the "ON" position.
    • Press and hold the function button (3) for 3 seconds to activate the LED lighting system.
    • Press the function button (3) again to cycle through different lighting modes (normal, SOS signal, strong flash).
    • Long press the function button (3) to turn off the LED light.
  4. Charging the Jump Starter:

    • Connect the provided charger to the charging input jack (6) on the jump starter.
    • Plug the other end of the charger into a 220V/110V AC power outlet or a 12V car power source.
    • The capacity indicators (4) will flash during charging.
    • The jump starter is fully charged when all indicators turn off.
    • Do not charge the jump starter immediately after jump-starting a car; wait at least 30 minutes.

Maintenance Features and Cautions:

  • Storage: For long-term storage, do not fully discharge the battery. Keep some capacity in the battery and fully discharge and recharge it at least once every three months to maintain battery health. Store the device in a cool, dry place, away from humidity and explosive environments, with a storage temperature between 0°C and 40°C.
  • Temperature: Avoid using or storing the battery in high-temperature environments. Do not charge the jump starter below 0°C.
  • Safety:
    • Do not transport or store the battery with metal objects to prevent short circuits.
    • Do not clean the product with harsh chemicals (e.g., strong acids, bases, or soaps).
    • Avoid dropping the product.
    • Keep out of reach of children.
    • Do not leave the product unattended while charging.
    • Keep away from the car engine's rotating parts during jump-starting to prevent injury.
    • Disconnect the jump starter and car battery immediately after the engine starts to prevent damage to either device.
    • Do not burn or dispose of the product improperly.

By following these instructions, users can ensure safe and effective operation and prolong the lifespan of their Ironside Multi-Function Jump Starter.

Ironside 102777 Specifications

General IconGeneral
BrandIronside
Model102777
CategoryRemote Starter
LanguageEnglish