EasyManua.ls Logo

ItaldibiPack DIBIPACK 4255 SA EV - User Manual

ItaldibiPack DIBIPACK 4255 SA EV
72 pages
Print Icon
To Next Page IconTo Next Page
Loading...
Via Europa, 35 - 20010 Pogliano Milanese (MI) - Tel. 02/9396461 r.a. - Fax 02/93549494
Via del Mare 32/A (interno D) - 00040 Pomezia (Roma) - Tel. 06/9100417 - Fax 06/9100430
Catalogo delle Parti di Ricambio
Catalogue des Pièces de Rechange
Spare parts catalogue
Ersatzteilkatalog
Catálogo de las Partes de Recambio
Confezionatrici per termoretraibili
Machines à conditionner pour thermorétractiles
Shrink-wrapping machines
Schrumpfmaschinen
Empaquetadoras para Termoretractil
ITALDIBIPACK S.p.A.
Installazione, uso e manutenzione
Installation, utilisation et entretien
Installation, use and maintenance
Installation, Gebrauch und Wartung
Instalación, uso y mantenimiento
DIBIPACK 4255 SA EV
Question and Answer IconNeed help?

Do you have a question about the ItaldibiPack DIBIPACK 4255 SA EV and is the answer not in the manual?

Overview

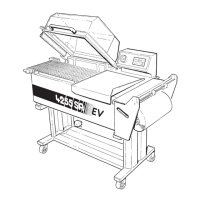
The ITALDIBIPACK DIBIPACK 4255 SA EV is a shrink-wrapping machine designed for conditioning products with heat-shrinkable film. It is manufactured by ITALDIBIPACK S.p.A., located in Pogliano Milanese (MI), Italy.

Function Description:

The DIBIPACK 4255 SA EV is a semi-automatic shrink-wrapping machine that utilizes heat-shrinkable film to package products. The machine operates by sealing the film around the product and then applying heat to shrink the film, creating a tight and protective package. It features a transparent hood, a mesh belt conveyor, and a control panel for operation. The machine is designed for continuous operation and includes features for adjusting sealing time, air temperature, and conveyor belt speed to accommodate various film types and product sizes.

Important Technical Specifications:

  • Dimensions:
    • Length: 2060 mm
    • Width: 750 mm
    • Height: 910 mm (working height 920 mm)
  • Weight: 120 kg (265 lbs)
  • Power Supply: 400 V three-phase (refer to "Technical Data" for details)
  • Installed Power: 5.5 kW
  • Noise Level: 71.8 dB(A)
  • Electrical Absorption: 8.5 A
  • Packaging Capacity:
    • Minimum (A x B x C): 50 x 50 x 1 mm
    • Maximum (A x B x C): 550 x 420 x 200 mm
    • Note: B + C cannot exceed 550 mm. It is not possible to create packages with maximum dimensions A x B x C.
  • Film Compatibility: Monoply thermoshrinkable film, thickness 0.015 ÷ 0.050 mm.
  • Film Dimensions: (D x E x F) 570 x 250 x 75 mm.
  • Electrical Components: Includes a general switch, cycle start device, film holder shaft with cones, program selection keys, program number display, current value display, value decrement/increment keys, inserted resistor signal (LED), piece counter reset, mesh belt operating time (LED), air temperature signal (LED), magnet time signal (LED), sealing time signal (LED), and function selector.
  • Safety Standards: Conforms to EEC directives 98/37 CEE (DM), 73/23 CEE (DBT), 93/68 CEE (DBT), 89/336 CEE (EMC), 92/31 CEE (EMC), 93/68 CEE (EMC), EN-60204-1 (04-1998), EN-292-1.2 (11-1992).

Usage Features:

The machine is generally shipped fully assembled in a wooden crate. Special care must be taken during unpacking due to plastic parts that are not resistant to violent impacts. The machine should be lifted by its front and back sides, not by the hood handle or film holder unit, and requires two people for this operation. If a support stand is not available, the machine should be placed on a suitably sized, level, smooth, and dry worktop at a minimum height of 60 cm, capable of supporting the machine's weight.

Preliminary Operations:

  1. Activate the general switch.
  2. Select the working program (5, 6).
  3. Wait 7-8 minutes for the temperature to be reached and stabilized. The LED (10) will turn off when the temperature is reached. If it blinks, it indicates the heating element is off or not yet at the set temperature.
  4. Verify the height of the mesh belt (17) in relation to the product to be packaged. The sealing height should be approximately half the product's height.
  5. To perform this operation, turn the handwheel (18) on the side of the machine, beneath the belt itself.
  6. Preheat the machine by performing one or two empty cycles.

First Sealing Operation:

To perform the first sealing operation, pull the film forward on the left side, as required, onto the lower edge of the sealing bar (basin perimeter). Lower the hood with the right hand and maintain a light pressure to automatically activate the machine and perform the first sealing. Use the left hand to help detach the film from the sealing bar. The film is then ready for successive product packaging operations.

Normal Operation:

To package a product, grasp the film with the left hand and pull it forward by about ten centimeters. Lift the upper edge of the film with the left hand. Place the product on the loading platform with the right hand, ensuring it is positioned against the sealing and the folded part of the film. Without releasing the product, lower the hood with the right hand and keep it pressed until the sealing and shrinking are complete. The hood will open slightly to enable the film to be released from the bars and shrink. At the end of the magnet time, the hood will open automatically.

Pause During Work:

After 30 minutes of inactivity, the machine enters energy-saving mode, regulating itself to an air temperature lower than the working temperature. This state is indicated by the flashing digits on the display (7). To resume normal functioning, perform an empty cycle or press any key on the control panel and wait a few minutes for the LED (10) to go out.

Prohibited Uses:

  • Do not allow operation by psychophysically unfit personnel or those who have not read the manual.
  • Do not use the machine in unsuitable environmental conditions.
  • Do not use "mobile" electrical connections with temporary or non-insulated cables or extension leads.
  • Do not leave the machine unattended when enabled for operation.
  • Do not use the machine for purposes other than its intended design.
  • Do not modify machine components to increase productivity.
  • Do not operate the machine while wearing flowing or wide-sleeved garments.
  • Do not operate the machine if the manual's contents are not fully understood.
  • Do not perform cleaning or extraordinary maintenance without first deactivating the machine and removing the plug from the power socket.
  • Do not perform temporary or emergency repairs; call the service center.
  • Do not use the machine as a resting surface or place any object on it not used for normal packaging operations.
  • Do not touch the sealing bar when opening the hood after a packaging operation.
  • Do not perform packaging operations with a broken sealing element; replace it immediately.

Maintenance Features:

Before any intervention, deactivate the machine and remove the plug from the power supply.

Cleaning the Sealing Bar:

The machine functions with plastic films, which can leave deposits on the sealing bar that can impair sealing. If necessary, remove film residues with a dry cotton cloth. This operation should be performed immediately after sealing so that residues can be easily removed.

Cleaning the Shrink-Wrapping Film Belt:

Wait until the machine has cooled down sufficiently. If necessary, remove the belt and use a normal vacuum cleaner to eliminate any deposits.

Cleaning the Transparent Hood and Machine Body:

For cleaning the transparent hood and machine body, use a cotton cloth or synthetic material dampened with water or a product of the type normally used for cleaning glass.

Replacement of the Sealing Blade:

Loosen the screws holding the sealing element, wire tensioner clamps, and the central clamp; remove the broken blade. Insert the replacement blade (1) into the slot of the crossbar (2) and in the clamp (3), then in the central clamp (4) and the longitudinal bar (5). Cut it at a distance of approximately 10-12 mm beyond the bar, and then insert it in the clamp (6).

Replacement of the Rubber Seal Around the Edge of the Basin:

Remove the worn seal. Clean its housing, removing all residues of rubber and glue. Cut the new rubber to size and glue it in the housing, starting from the corner of the joint, using a thin layer of silicone glue.

Replacement of the Teflon Tape Around the Edge of the Basin:

Remove the worn band and all glue residues. Carefully reposition the new tape using a thin layer of silicone glue. Wait for the silicone to glue the tape before reusing the machine.

Troubleshooting:

The manual provides a detailed troubleshooting guide for common issues such as:

  • Conveyor belt not starting or making noise.
  • Hood opening with difficulty.
  • LED (10) blinking at 0.5 Hz or 2 Hz.
  • Temperature not reaching the preset value.
  • Smoke from the sealing wire.
  • Film not shrinking properly or uniformly.
  • Package being inflated after shrinking.
  • Seal opening during shrinking.
  • Irregular sealing.
  • No sealing occurring. For each issue, probable causes and remedies are listed. If problems persist after performing these checks, contact the Service Assistance and describe the defect accurately.

Scrapping and Disposal:

If the machine is to be scrapped, its components must be disposed of separately, considering the different nature of the materials (e.g., metal, oils, greases, plastic, rubber, etc.). This should be done by authorized specialized companies and in compliance with local regulations for industrial solid waste disposal. Do not abandon the machine in passageways, as it could pose a serious danger to people, especially children, and animals. The machine owner will be liable for any damages.

ItaldibiPack DIBIPACK 4255 SA EV Specifications

General IconGeneral
BrandItaldibiPack
ModelDIBIPACK 4255 SA EV
CategoryStretch Wrapping Systems
LanguageEnglish

Related product manuals